When it comes to video analytics, the art of visualization is just as important as actual core analysis. Pixels and algorithms tell a visual story, with each annotation serving as a key character. Conventional HTML video tags are more advanced in terms of annotations than they are in terms of basic video playback, especially when it comes to object tracking and detection.
The Why Behind the What: Annotations
Before we go into visualizations, let’s talk about annotations. Imagine a video capture of a bustling street scene, where each person and car represents a distinct element within a larger visual narrative. In this case, systems capable of detecting and tracking people and objects take the lead.
Models such as YOLO are utilized. They start with a video and turn it into a series of bounding boxes that frame different objects or people. A data frame provides these boxes, which contain the corresponding coordinates, frame numbers, object classes, and confidence scores. These coordinates define the limits of each bounding box, perfectly framing every important piece in our scene.
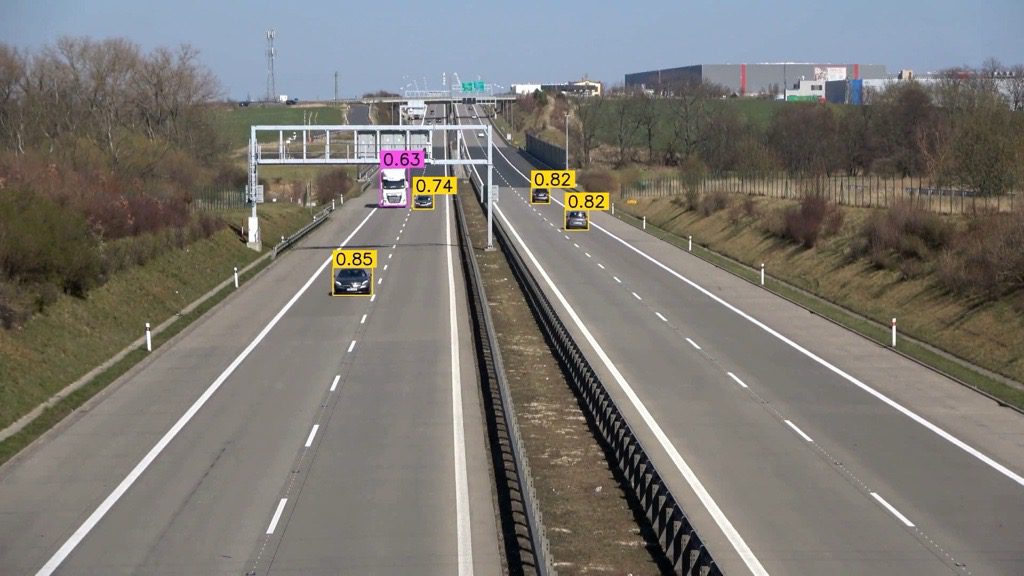
Consider a scenario in which you want precise control over your video annotations. Sometimes you need to highlight specific objects, show all annotations, or show none at all, especially when integrating these features into a website or mobile app. Constantly relying on a Python backend to generate and retrieve a new video for each user action is not optimal. This level of agility must be readily available to the client. What’s the twist? The HTML <video> tag cannot handle these dynamic annotations. At this point, our custom solution takes center stage—a seamless combination of a canvas element and a custom video player.
Custom Video Player
Vue’s reactive features, enhanced by Vuetify’s sleek UI elements, drew me in. What could be the outcome? A video player that is designed to not only play the video but also overlay machine learning annotations in a seamless way. It also synchronizes with the video frames and incorporates custom video controls.
Workflow
Our approach involves merging the <canvas> element with video playback, allowing us to overlay annotations directly on the video. Here is an overview:
- Video Tag Creation: To start off, create a video tag that will serve as your video’s source.
- Canvas Setup: Align a canvas to match the video’s dimensions.
- Rendering Video on Canvas: Keep the video element hidden and render the video’s frames on the canvas while they reload, in accordance with the browser’s repaint.
- Creating Cusm Video Controls: To programmatically control video playback, create a set of custom video controls using CSS and icons.
Note: The purpose of this article is to look at how to build a basic canvas rather than how to set up Vue 3. There are plenty of other excellent blogs on the subject.
The following is an overview of the essential components:
Vue Template
Let’s start by creating the template for our video player component. We will have a hidden video element, a canvas for displaying videos and annotations, and a control button for enabling and disabling annotations and video controls.
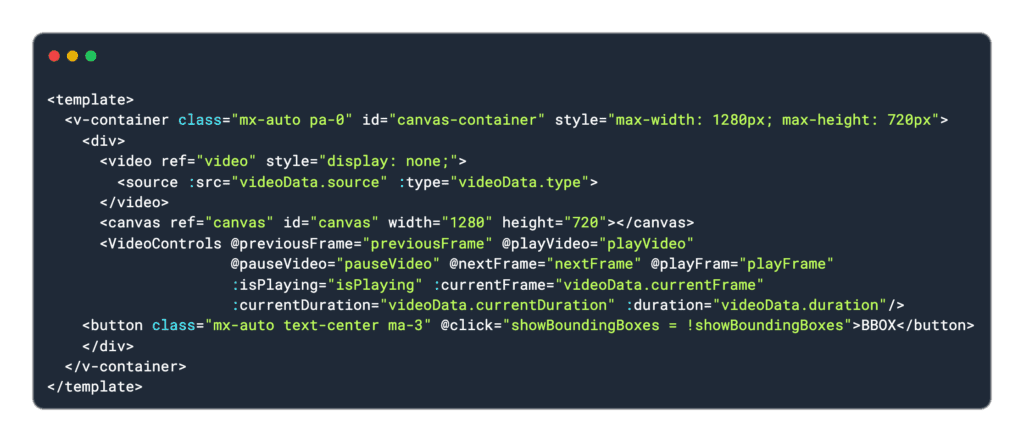 Component and tag references are critical because they enable us to access and control data in Vue.
Annotations
We need a backend that sends annotations in a format that JavaScript can handle, ideally JSON. When we load the video, we should also obtain its annotations. A sample annotation would look like the following:
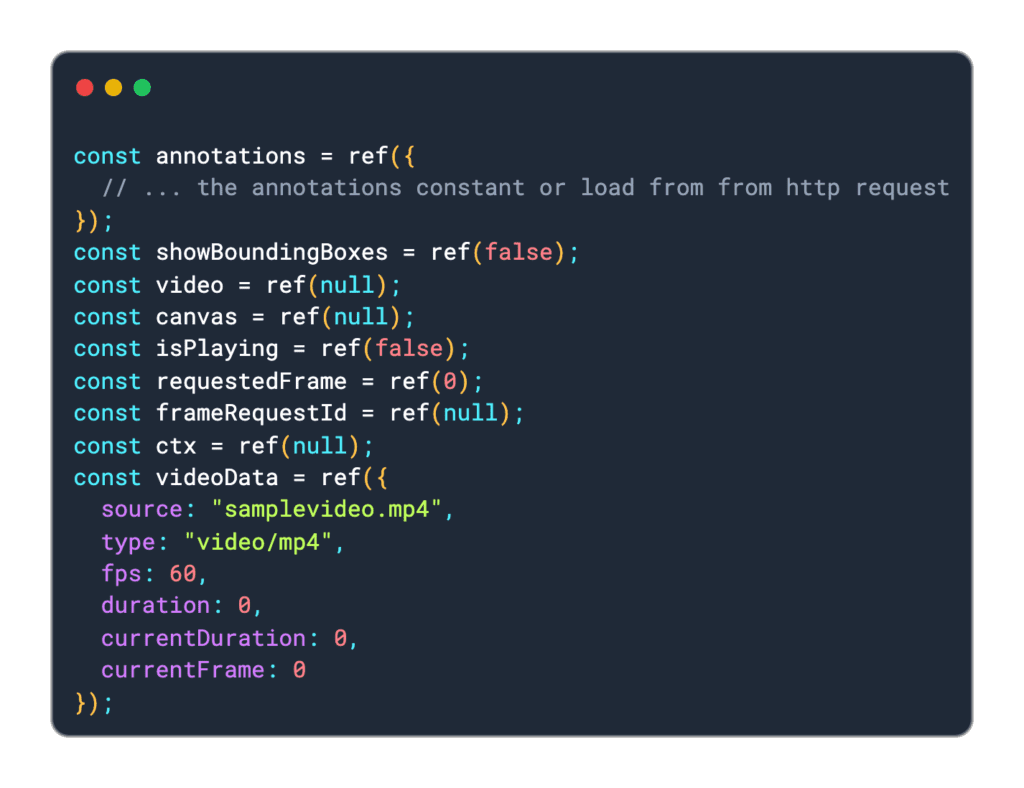
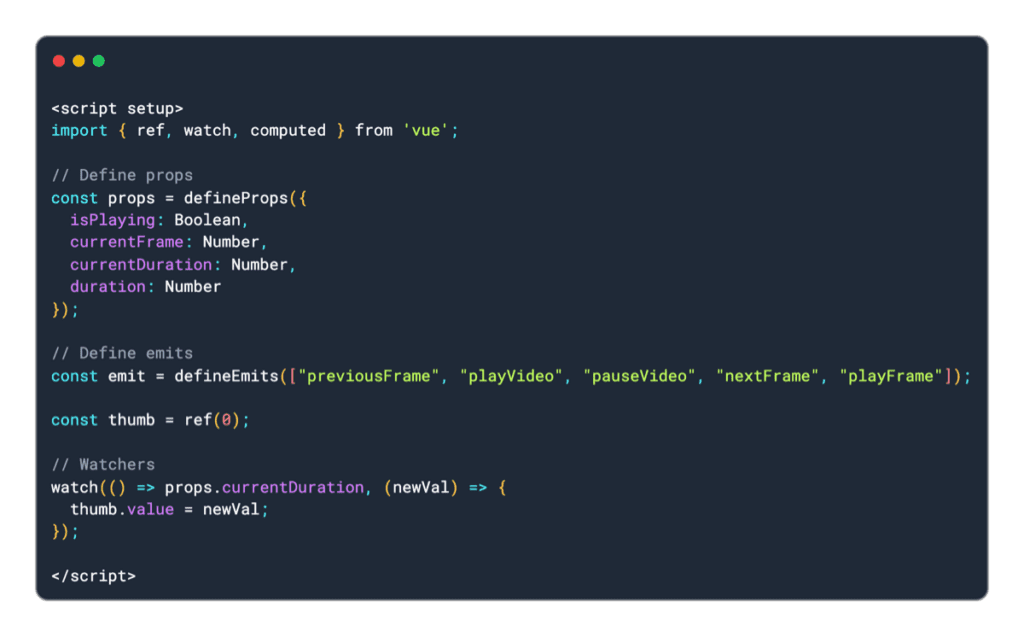
Getting started with the States
Vue 3’s composition API provides a more flexible approach to managing state in your components. We begin by defining our reactive states using ref.
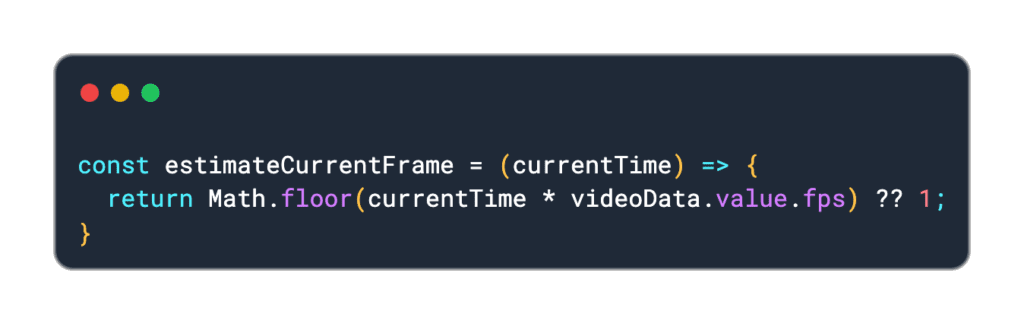
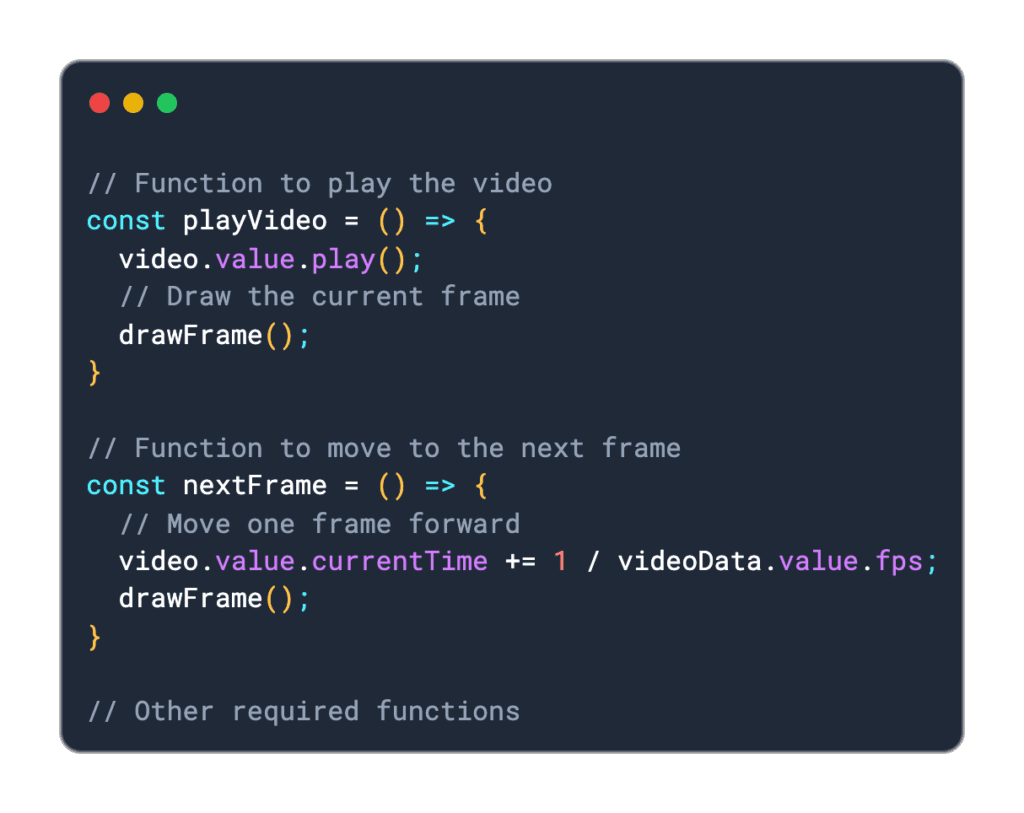
Frame Calculation and Rendering
An important component of our player is estimating the current frame based on the duration, as the HTML5 video tag does not offer this directly.
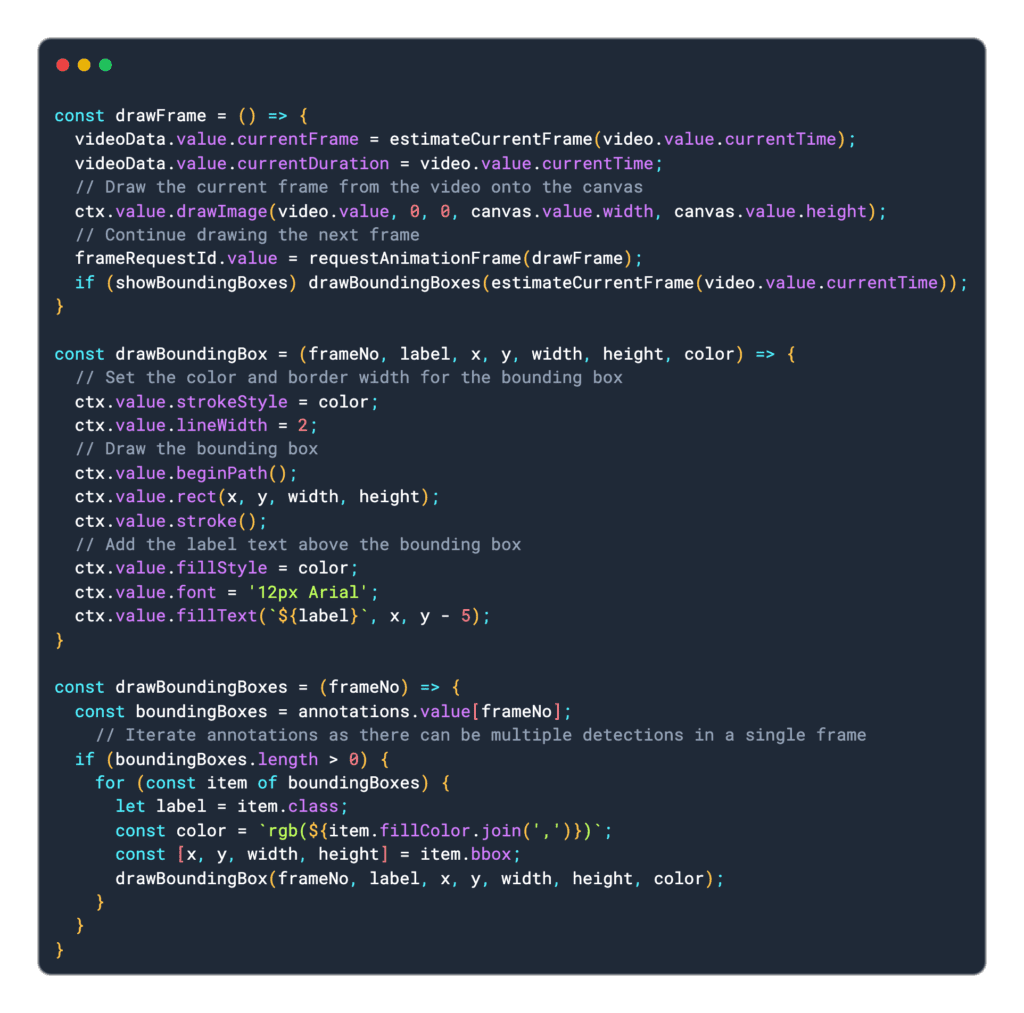
 To play the video in Canvas, we must first draw each frame in the video and then check to see if any annotations are associated with it. If that’s the case, we’ll need to draw boxes on the canvas using bbox coordinates. Let us create the necessary functions for these things.
 The
The drawFrame method is critical, as it renders each frame onto the canvas and overlays it with annotations. requestAnimationFrame is a JavaScript programming language that generates smooth, high-performance animations in web browsers. It informs the browser that you want to run an animation and demands that it call a certain function to update the animation before the next repaint.
ℹ️ Key Considerations for Optimal Video Playback
- Video Dimensions: Understanding the video’s height and width is essential. These dimensions are required for properly sizing the canvas and arranging the bounding boxes. A mismatch in dimensions may result in incorrect object tagging.
- Frame Rate: Understanding the video’s actual frame rate is critical for accurately determining the current frame during playback. This is necessary for synchronizing the bounding boxes with the video. Unfortunately, the HTML5 video element does not offer this information directly. However, we can get around this by having the server communicate the frame rate as part of the metadata alongside the annotations.
Video Control Actions
We can use the default features of the video tag to implement the playback controls.
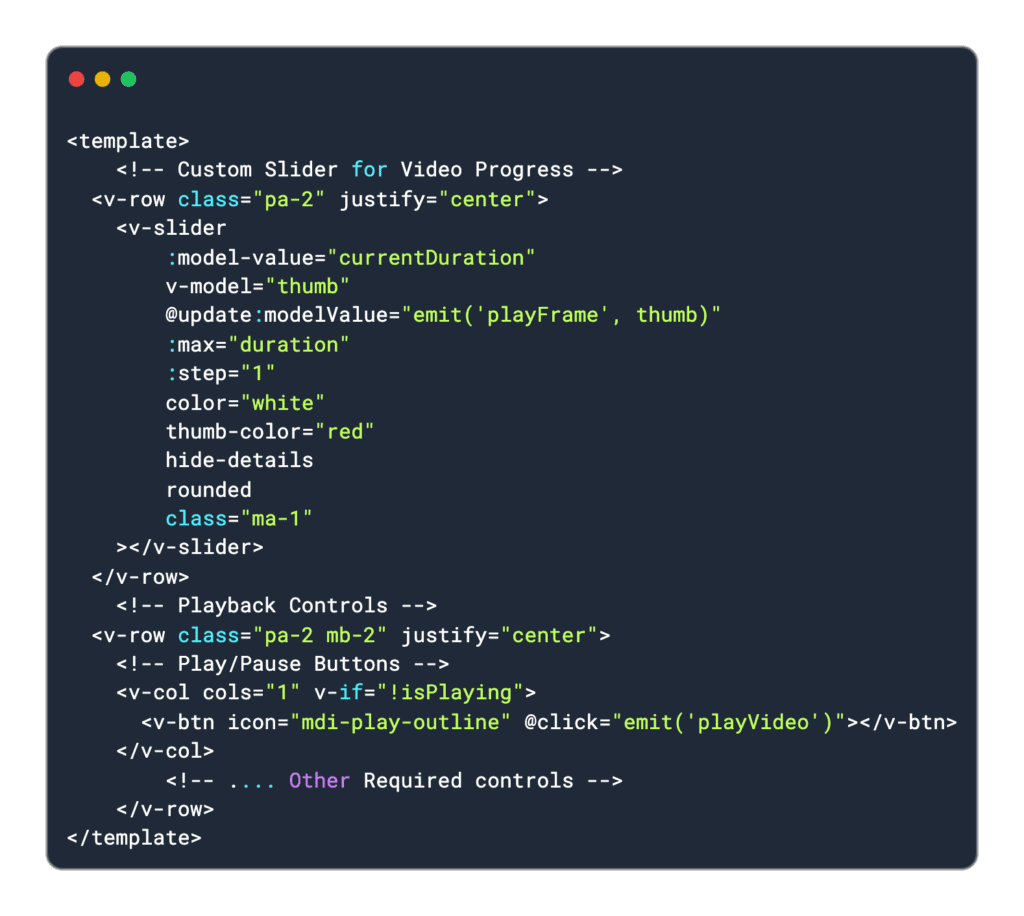
Video Playback Controls
After hiding and playing with the canvas, we will be in charge of controlling the designs for our videos. Fortunately, HTML’s video tag includes programmable functions, allowing us to create our own set of controls specific to our requirements, which we have previously done in our parent component. We only need to call them here.
Let’s create a component for the video controls, starting with the video slider for video progress and other playback controls.
 Now that the template is complete, let’s proceed with the script section.
This display shows the playback time, total duration, play/pause status, next frame, and previous frame. Additionally, there is a slider that, when adjusted, will calculate the duration and adjust the video playback to the corresponding duration.
Output
After completing all the necessary processes, the final outcome will look like this:
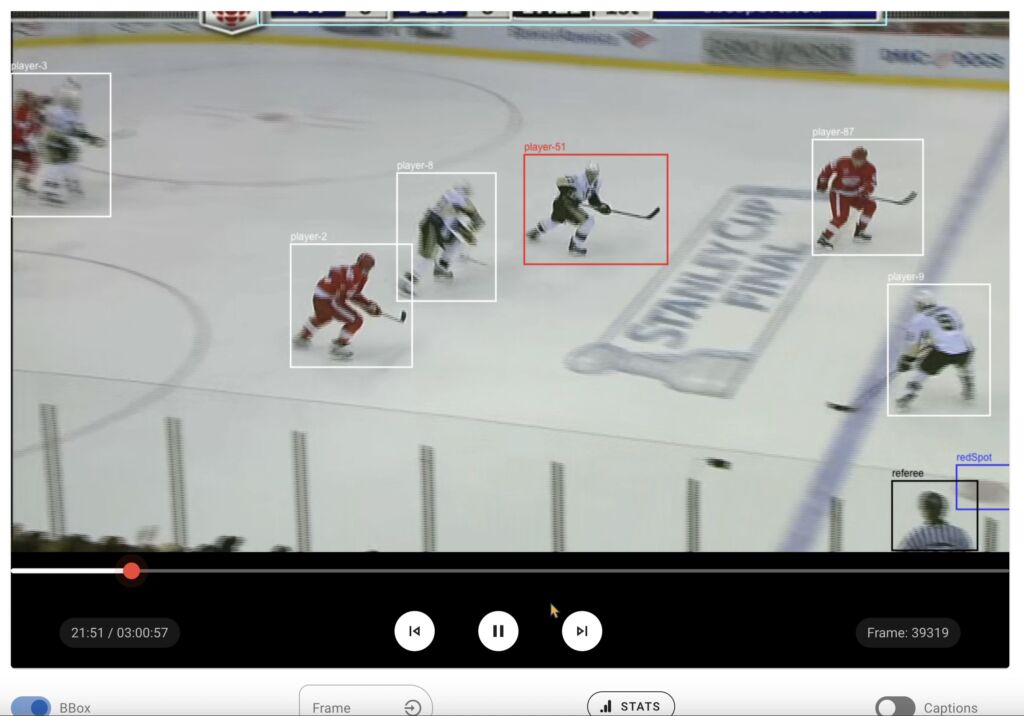
This UI is more than simply a static entity; it offers many possibilities with enormous flexibility. One of the hidden treasures (hint: see the GitHub Gist) is the option to display video captions, which adds an extra degree of engagement.
Keep in mind that this innovation extends beyond Vue’s borders. We can apply the principles and methods we’ve discussed to a variety of web frameworks, showcasing the universality of our approach. We have highlighted some of our project’s important components and problems in this post, but it’s best to read the entire code to fully appreciate its complexity and scope. The scripts are available on GitHub for those with curious minds and a passion for coding. Dive in and adapt it to your projects; perhaps even improve it with your own touch. I’m excited to watch how this project evolves and transforms with your contributions.