
Introduction
In the fast-paced world of web development, choosing the right framework for building scalable and efficient server-side applications is crucial. Enter NestJS, the game-changing framework that will transform the way you approach backend development. Combining the simplicity and familiarity of Express.js with the power and scalability of modern architecture patterns, NestJS offers a robust and modular framework that takes your projects to new heights. With its clean-code organization, seamless dependency injection, and effortless database integration, NestJS empowers developers to create complex and efficient backend systems with ease. Join us on this exciting journey as we unlock the full potential of NestJS and revolutionize your backend development experience.
Why NestJS?
Below are few scenarios where NestJS excels as the ideal choice:
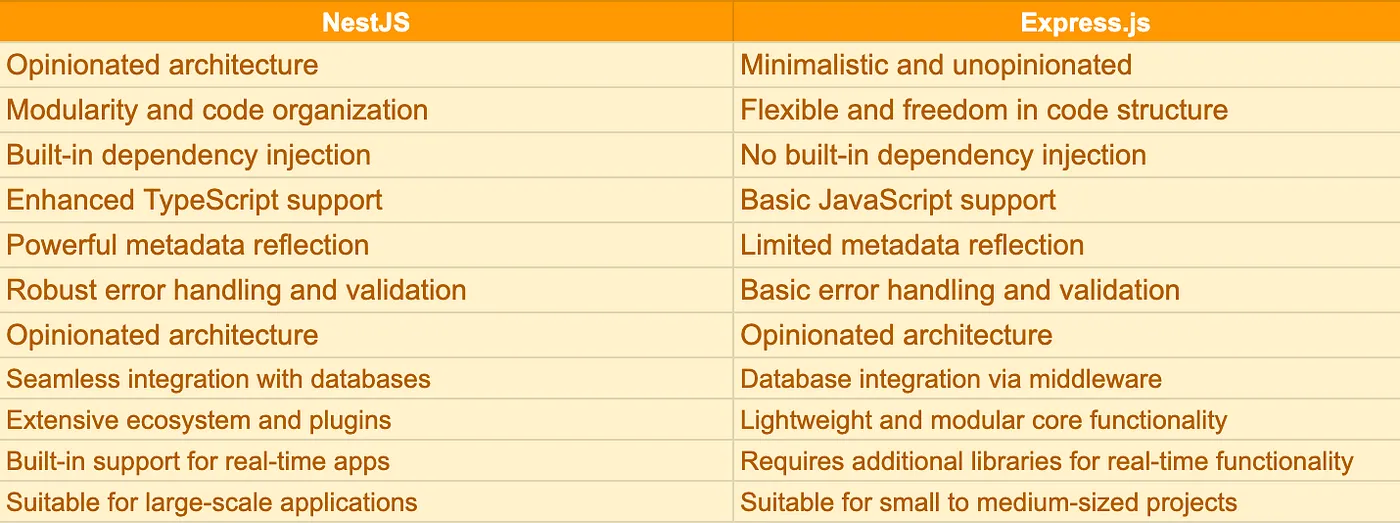
- Complex and large-scale applications: NestJS is well-suited for handling large and intricate projects with its modular architecture and strong typing.
- API development: NestJS provides a structured and opinionated approach, including decorators, modules, and dependency injection, making it easy to build robust and well-organized APIs.
- Real-time applications: With seamless integration of technologies like WebSockets and server-sent events (SSE), NestJS is perfect for creating real-time applications with instant data updates and bidirectional communication.
- TypeScript development: NestJS leverages TypeScript’s benefits, such as strong typing and enhanced tooling, for catching errors early, maintaining code, and boosting developer productivity.
- Code organization and maintainability: NestJS follows design patterns like MVC and SOLID, encouraging clean-code organization, separation of concerns, and reusability.
- Team collaboration: With its standardized architecture and modular approach, NestJS facilitates collaboration among team members, allowing independent work on different modules and components.
Architechture
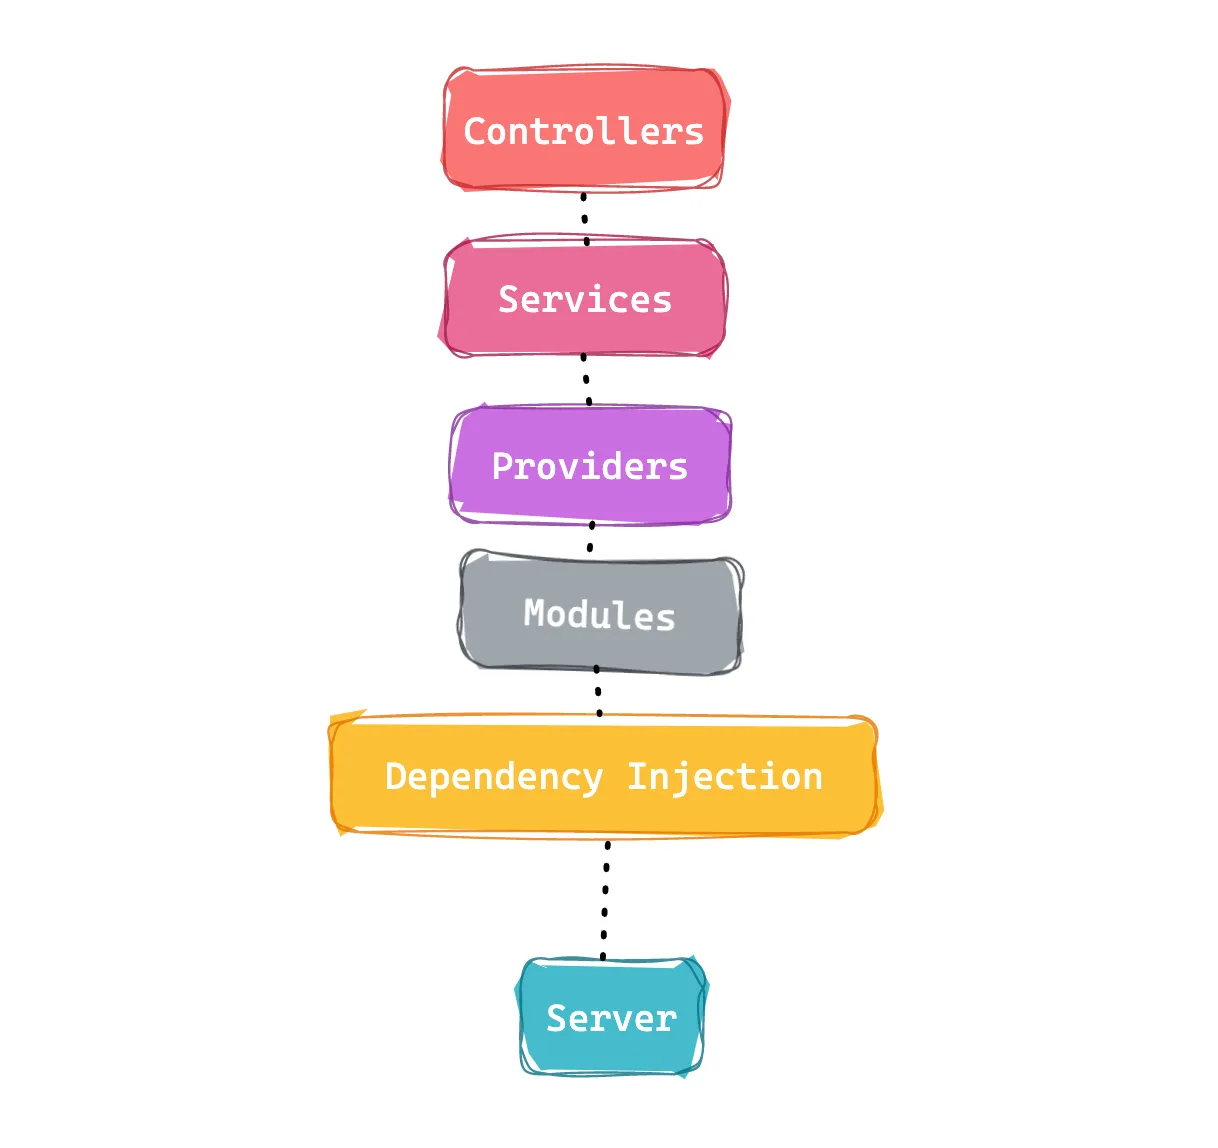
NestJs Architecture
The application is organized into modules, which can contain one or more controllers, services, and providers. Controllers handle incoming requests and return responses to the client, while services handle business logic and data manipulation. Providers are used to inject 💉 dependencies into controllers and services.
The modules are organized using a dependency injection system, which helps to manage dependencies between components of the application. This makes it easy to maintain and test the application.
Finally, the entire application is served by a server, which listens for incoming requests and directs them to the appropriate controller.
Building a Simple NestJS Application with Services, Controllers, Providers, and Modules 🧱
The first step in building our NestJS application is to create a new project. We can do this by running the following command:
nest new app-name After the project is successfully created, you can proceed to navigate to the project directory and begin developing our application.
When you generate a new project in NestJS, the CLI tool creates several files and folders for you. Here’s a brief explanation of some of the most important ones:
src/main.ts: This file is the entry point of your NestJS application. It creates a new Nest application instance and starts the server.
src/app.module.ts: This file is the root module of your NestJS application. It declares all the modules, controllers, services, and providers that your application will use.
src/app.controller.ts: This file is an example controller that is included by default in the generated project. It defines a basic endpoint that returns a JSON response.
src/app.service.ts: This file is an example service that is included by default in the generated project. It provides some functionality that can be used by the controller.
src/app.controller.spec.ts and src/app.service.spec.ts: These files are unit tests for the controller and service, respectively. They use the Jest testing framework and are set up to test the functionality of the controller and service.
package.json: This file is the configuration file for your Node.js project. It contains metadata about your project, as well as the dependencies and scripts that your project uses.
tsconfig.json: This file is the configuration file for the TypeScript compiler. It defines how TypeScript code should be compiled into JavaScript.
File structure to maintain in the sample code,

1. Defining the AppModule🤖
The AppModule is a critical component of a NestJS application. It is responsible for defining any dependencies and wiring up the controllers, services, and providers. The AppModule helps set up the global configuration of the application, such as configuring the application’s root path and defining any global middleware that needs to be applied. It also provides a way to organize the application into separate, reusable modules, each with its own responsibilities and dependencies.
In this example, we’re going to create a ProductsController and a ProductsService. We can define our AppModule as follows:
// app.module.ts import { Module } from '@nestjs/common'; import { AppController } from './app.controller'; import { AppService } from './app.service'; import { DatabaseModule } from './database.module'; import { ProductModule } from './product/product.module'; @Module({ imports: [DatabaseModule, ProductModule], controllers: [AppController], providers: [AppService], }) export class AppModule {} Let’s walk through the code…🚶♀️
the @Module decorator is a key feature that helps to define and configure modules within an application.
imports: an array of other modules that this module depends oncontrollers: an array of controller classes that this module providesproviders: an array of providers (such as services) that this module providesexports: an array of providers that should be made available to other modules that import this module
In this file, you can see the following:
- Import statements for the
DatabaseModuleandProductModule. These are two custom modules created in the application. - The
controllersarray contains theAppController. This is the default controller generated by NestJS when you create a new project. - The
providersarray contains theAppService. This is the default service generated by NestJS when you create a new project. - The
DatabaseModuleis responsible for setting up the connection to the database, while theProductModuleis responsible for handling all the product-related functionality of the application.
👉
TypeOrmModuleis not the only way to connect to a database in NestJS. NestJS supports other database libraries and ORMs, such asSequelize,Mongoose,Prisma, and more.2. Building a CRUD API with NestJS: Writing Code for Product Entity🎟
import { Entity, Column, PrimaryGeneratedColumn } from 'typeorm'; @Entity() export class Product { @PrimaryGeneratedColumn() id: number; @Column() name: string; @Column() description: string; @Column() price: number; @Column({ default: true }) isActive: boolean; } This Product entity has four columns: id, name, description, price, and isActive. The @PrimaryGeneratedColumn() decorator is used to indicate that the id field is the primary key for this entity, and will be automatically generated by the database.
The @Column() decorator is used to define the properties of each field. For example, the name field is defined as a string column, the description field is defined as a string column, and the price field is defined as a number column. The isActive field is defined with a default value of true.
All columns in the table are self-explanatory except for ‘isActive’, which may be confusing to some. This column is used to indicate whether a product is available for purchase or not. If a product is out of stock or has been discontinued, its ‘isActive’ field could be set to ‘false’, indicating that it is no longer available for purchase.
👉 The Product entity is using the TypeORM decorators, and is designed to map to a database table. You will need to have a database connection and create the corresponding
productstable in your database for this entity to work properly.
3. Building a CRUD API with NestJS: Writing Code for Database Module🧺
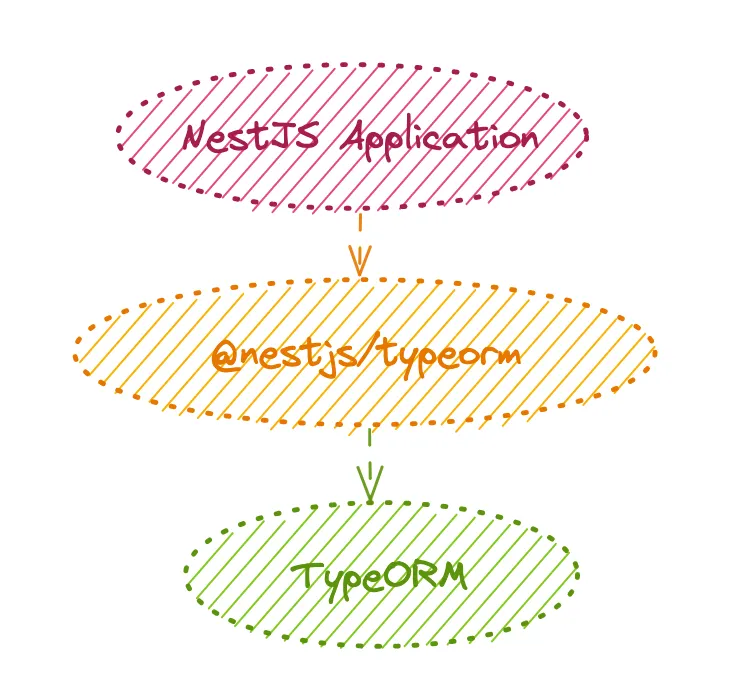
Let us use TypeORM to connect with the database, before getting started make sure you installed the necessary libraries and modules,
 npm install typeorm --save
 npm install @nestjs/typeorm
@nestjs/typeorm is a NestJS-specific module that provides integration with the TypeORM library, while typeorm is the actual TypeORM library that provides a wide range of database-related features.
// DatabaseModule import { Module } from '@nestjs/common'; import { TypeOrmModule } from '@nestjs/typeorm'; import { ProductController } from './product/product.controller'; import { Product } from './product/product.entity'; import { ProductService } from './product/product.service'; @Module({ imports: [ TypeOrmModule.forRoot({ type: 'mysql', host: 'localhost', port: 3306, username: '$$$$$$', password: 'xxxxxx', database: '######', entities: [Product], synchronize: true, // automatically update the database schema }), TypeOrmModule.forFeature([Product]), ], providers: [ProductService], controllers: [ProductController], }) export class DatabaseModule {} This configuration uses the mysql driver, and specifies the MySQL database credentials (host, port, username, password, and database). The entities option specifies the entities that should be mapped to database tables, and synchronize ensures that the database schema is synchronized with the entity metadata.
🚨 you’ll need to install the MySQL driver package (npm install mysql) and add it to your project’s dependencies in order to use it in your application. Also, make sure that you have a MySQL server running and that the database and user credentials specified in the TypeOrmModule options are valid.
4. Building a CRUD API with NestJS: Writing Code for ProductService and ProductController🕹
// ProductController import { Controller, Get, Post, Put, Delete, Body, Param} from '@nestjs/common'; import { ProductService } from './product.service'; import { Product } from './product.entity'; @Controller('products') export class ProductController { constructor(private readonly productService: ProductService) {} @Get(':id') async findOne(@Param('id') id: string): Promise { return await this.productService.findOne(parseInt(id)); } @Get() async findAll(): Promise<Product[]> { return await this.productService.findAll(); } @Post() async create(@Body() product: Product): Promise { return await this.productService.create(product); } @Put(':id') async update(@Param('id') id: string, @Body() product: Product,): Promise { await this.productService.update(parseInt(id), product); } @Delete(':id') async delete(@Param('id') id: string): Promise { await this.productService.delete(parseInt(id)); } } In the above code, you may find many decorators involved. Let’s know about the purpose of each:
@Controller('products'): This decorator is used to define a controller for the/productsroute.@Get(): This decorator is used to define a GET method for the/productsroute.@Get(':id'): This decorator is used to define a GET method for the/products/:idroute.@Post(): This decorator is used to define a POST method for the/productsroute.@Put(':id'): This decorator is used to define a PUT method for the/products/:idroute.@Delete(':id'): This decorator is used to define a DELETE method for the/products/:idroute.
🚨 While defining multiple
@Get()decorators with the same route path, the more specific@Get('/:id')decorator should be placed before the more general@Get()decorator.This is because NestJS uses the order of decorators to determine the execution order of routes. By placing the more specific
@Get('/:id')decorator first, it ensures that requests with a route parameter is handled by that route before the more general@Get()route.
Here are some of the most commonly used decorators in NestJS:
@Controller: This decorator is used to define a controller class. It takes a single argument, which is the base route for all the endpoints defined in the controller. For example,@Controller('products')will define a controller that handles all endpoints starting with ‘/products’.@Get,@Post,@Put,@Delete: These decorators are used to define HTTP methods for a specific endpoint. For example,@Get('/:id')will define a GET endpoint that accepts an ‘id’ parameter.@Param,@Query,@Body: These decorators are used to extract data from the request object.@Paramis used to extract route parameters,@Queryis used to extract query parameters, and@Bodyis used to extract data from the request body.@UseGuards,@UseInterceptors,@UseFilters: These decorators are used to apply global middleware to a specific endpoint or controller. For example,@UseGuards(AuthGuard)will apply an authentication guard to an endpoint or controller.@ApiResponse,@ApiTags,@ApiBearerAuth: These decorators are used to add metadata to the API endpoints.@ApiResponseis used to describe the response for a specific endpoint,@ApiTagsis used to add tags to a controller or endpoint, and@ApiBearerAuthis used to specify that an endpoint requires a bearer token for authentication.
These are just a few examples of the decorators available in NestJS. By using decorators, one can easily create a well-structured API with clear endpoints and data flow.
This controller has five basic CRUD operations:
findAll: returns all productsfindOne: returns a single product by idcreate: creates a new productupdate: updates an existing product by iddelete: deletes an existing product by id
👉 The controller is using the ProductService to handle these operations. You will need to have a ProductService that implements these methods for this controller to work properly. Not to worry, checkout the code below🙃
// Product Service import { Injectable } from '@nestjs/common'; import { InjectRepository } from '@nestjs/typeorm'; import { Repository } from 'typeorm'; import { Product } from './product.entity'; @Injectable() export class ProductService { constructor( @InjectRepository(Product) private productRepository: Repository, ) {} async findAll(): Promise<Product[]> { return this.productRepository.find(); } async findOne(id: number): Promise { return this.productRepository.findOne({ where: { id } }); } async create(product: Product): Promise { return this.productRepository.save(product); } async update(id: number, product: Product): Promise { await this.productRepository.update(id, product); } async delete(id: number): Promise { await this.productRepository.delete(id); } } This ProductService uses the @InjectRepository decorator to inject a Repository<Product> instance into the service. This Repository provides methods for querying and manipulating Product entities in the database.
The ProductService has five methods that correspond to the basic CRUD operations:
findAll: returns all productsfindOne: returns a single product by idcreate: creates a new productupdate: updates an existing product by iddelete: deletes an existing product by id
👉 These methods are using the Repository instance to interact with the database. You will need to have a ProductEntity with a corresponding @Entity() decorator and @Column() decorators for each field to match the structure of the database table.
5. Building a CRUD API with NestJS: Writing Code for Product Module
// Product Module import { Module } from '@nestjs/common'; import { ProductController } from './product.controller'; import { ProductService } from './product.service'; import { Product } from './product.entity'; import { TypeOrmModule } from '@nestjs/typeorm'; import { DatabaseModule } from '../database.module'; @Module({ imports: [DatabaseModule, TypeOrmModule.forFeature([Product])], controllers: [ProductController], providers: [ProductService], exports: [ProductService], }) export class ProductModule {} Here, we are importing the DatabaseModule, which provides the TypeOrmModule used to connect to the database. We also register the ProductRepository as a provider by calling TypeOrmModule.forFeature([Product]), which tells NestJS to create a repository instance for the Product entity.
Finally, we export the ProductService so that it can be used in other modules.
❗ Make sure that you also import the ProductModule in the appropriate AppModule or other modules that need to use the ProductService.
Now that we have everything set up, we can finally run our code and see it in action! 🚀
6. Start your NestJS application by running the following command in your project directory 🎉
npm run start The NestJS application will start and begin listening for incoming requests on the configured port (usually 3000). Check the console output for any errors related to connecting to the database or creating tables. If everything is successful, you should see a message like this Nest application successfully started 🥳
If there are no errors in the code, the application will start successfully and we can start making requests to the defined endpoints. If there are any errors, they are displayed in the console and the application will fail to start.
Once the application is running, we can test the API endpoints using tools like Postman or any other HTTP client. The endpoints we have defined in our product controller can be accessed using the base URL and the defined route paths. For example, if we have defined a GET endpoint for products at the path /products, we can access it at http://localhost:3000/products.
❌ What are some ways to troubleshoot and fix errors that may arise during coding?
➡ Check that the module containing the class you are trying to inject is properly imported into the module, where you are using it. Make sure that the module is included in the “imports” array of the module where you want to use the class.
➡ Check that the class you are trying to inject is a valid constructor. For example, it should have a constructor function that accepts arguments and should not be an abstract class or an interface.
➡ Check that the class you are trying to inject has been properly defined and exported. Make sure that the class has been properly declared and exported from its file, and that the file has been properly imported into your module.
➡ Check that the class you are trying to inject is not undefined. If the class is undefined, then it cannot be used as a constructor and you will get this error. Make sure that the class is properly initialized and defined before trying to inject it.
➡ If you are using a third-party library or module, make sure that you have installed it properly and that it is compatible with the version of NestJS you are using.
Conclusion
In conclusion, NestJS is a powerful framework for building scalable and maintainable server-side applications. With its strong typing, modular architecture, and rich set of built-in features, NestJS provides a great developer experience and enables faster development. In this blog, we learned how to create a new NestJS project, define controllers and services, and use various decorators to handle HTTP requests and responses. We also explored the basics of dependency injection and how to use TypeORM for database connectivity. With these foundational concepts, you are now well on your way to building more complex applications with NestJS. Happy coding! 😇
