In the era of remote communication, Amazon Chime has become a valuable tool for hosting meetings and making calls. However, there are times when you need to customize your call flow to meet specific business requirements. In this blog post, we’ll walk you through the process of building a custom call flow automation system using Amazon Chime.
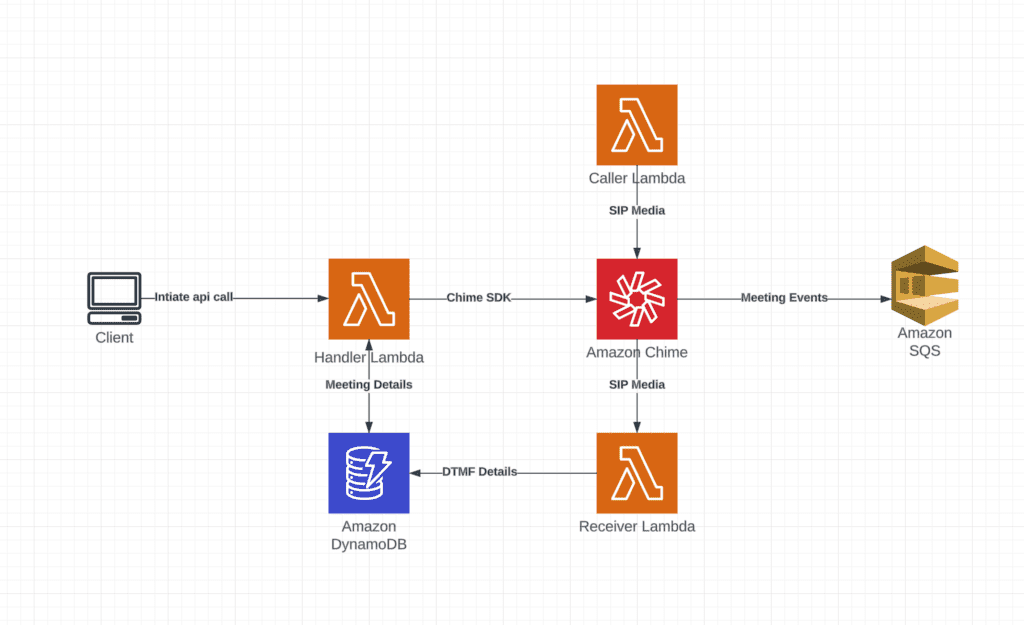
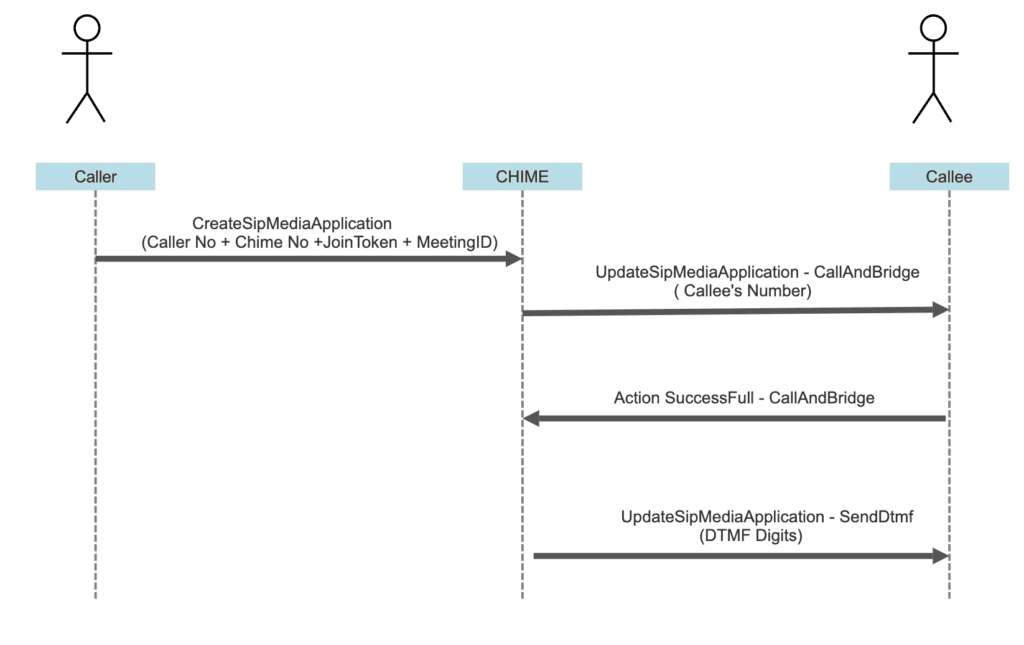
Architecture:
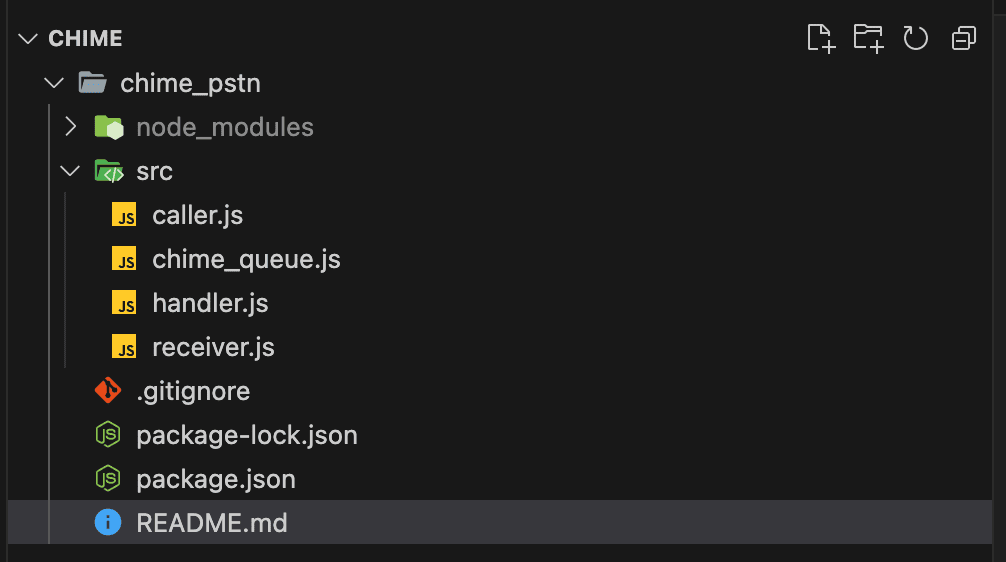
Folder Structure:
Package Dependencies:
- “@aws-sdk/client-chime”: “^3.357.0”
- “@aws-sdk/client-chime-sdk-meetings”: “^3.357.0”
- “@aws-sdk/client-sqs”: “^3.357.0”
- “aws-sdk”: “^2.1451.0”
Call Flow Implementation
Step 1: Create a Meeting
The first step in our custom call flow automation system is to create a meeting. We’ll use Amazon Chime’s
CreateMeetingWithAttendeesCommand function to do this. Here’s a code snippet that demonstrates how to create a meeting:
src/handler.js
await chimeClient.send(
  new CreateMeetingWithAttendeesCommand({
    ClientRequestToken: requestToken,
    ExternalMeetingId: externalMeetingId,
    MediaRegion: region,
    Attendees: [attendeeDetails],
    NotificationsConfiguration: {
      SqsQueueArn: queueArn
    }
  })
);
Step 2: Create a SIP Media Application
To customize your call flow, you’ll need to create a SIP Media Application using the Amazon Chime SDK service in AWS. Deploy the Lambda handler in either us-east-1orus-west-2, as Chime supports PSTN in these regions. Attach the Lambda function to the SIP Media Application.
src/caller.js
switch (event.InvocationEventType) {
      case 'CALL_UPDATE_REQUESTED':
        if(event.actionData.type  == 'callAndBridge'){
          return {
            Type: 'CallAndBridge',
            Parameters: {
              CallTimeoutSeconds: 30,
              CallerIdNumber: fromNumber,
              EarlyMediaMode: 'ENABLE',
              Endpoints: [
                {
                  BridgeEndpointType: 'PSTN',
                  Uri: toNumber
                }
              ]
            }
          };
}Next, we want to initiate a call to a specific phone number using Amazon Chime. To do this, first create a sip media application using the Amazon Chime SDK service in AWS and attach the Handler lambda to it. The lambda needs to be deployed in us-east-1 or us-west-2. We’ll use the CreateSipMediaApplicationCallCommandfunction and include the meeting ID and join token in the SIP headers. Here’s a code snippet to initiate the call:
src/handler.js
await chimeClient.send(
  new CreateSipMediaApplicationCallCommand({
    FromPhoneNumber: fromPhoneNumber,
    SipMediaApplicationId: sipMediaApplicationId,
    ToPhoneNumber: chimePhoneNumber,
    SipHeaders: {
      'X-chime-meeting-id': MeetingId,
      'X-chime-join-token': JoinToken
    }
  })
);
Step 4: Call and Bridge to the Receiver’s Number
Once the interpreter joins the meeting, we’ll receive anAttendeeJoined event in the Simple Queue Service (SQS). When this event occurs, we’ll invoke the UpdateSipMediaApplicationCallCommand function with the required arguments to perform a “call and bridge” action. This means that the call will be routed through a third-party Session Border Controller (SBC) instead of Chime’s SBC. If you don’t need a third-party SBC, you can use Chime’s PSTN for making calls. Here’s an example of how to handle this action in your code:
src/handler.js
new UpdateSipMediaApplicationCallCommand({
  SipMediaApplicationId: sipMediaApplicationId,
  TransactionId: transactionId,
  Arguments: {
    action: 'callAndBridge'
  }
})
Step 5: Send Digits to the Receiver
You need to send DTMF digits to the receiver during the call. To do this, you can invoke the UpdateSipMediaApplicationCallCommand with the DTMF digits you want to send. Here’s a code snippet for sending DTMF digits:
src/handler.js
await chimeClient.send(
  new UpdateSipMediaApplicationCallCommand({
    SipMediaApplicationId: sipMediaApplicationId,
    TransactionId: transactionId,
    Arguments: {
      action: 'sendDtmf',
      digits: '123'
    }
  })
);
Step 6: Handle the Call at the Receiver’s End
To handle the call at the receiver’s end and verify the received digits, you can create a Lambda function (Receiver.js) and assign it to Chime’s SIP Media Application. This Lambda function will handle the inbound call flow. You can set up a SIP rule to route calls to the callee’s phone number in this SIP Media Application. When digits are received, you can store them in a DynamoDB table for verification. Here’s an example of how to handle this in your Lambda function:
src/receiver.js
switch (event.InvocationEventType) {
  case 'NEW_INBOUND_CALL':
    return {
      SchemaVersion: '1.0',
      Actions: [{
        Type: 'ReceiveDigits',
        Parameters: {
          InputDigitsRegex: '.*',
          InBetweenDigitsDurationInMilliseconds: 1000,
          FlushDigitsDurationInMilliseconds: 100000
        }
      }]
    };
  case 'ACTION_SUCCESSFUL':
    if (event.ActionData && event.ActionData.Type === 'ReceiveDigits') {
      // Store received digits in DynamoDB
      const data = {
        PK: `AUTOMATION${event.ActionData.ReceivedDigits}`,
        expiration: 'expirationTime'
      };

      await apiContext.dynamoDB.send(
        new PutCommand({
          TableName: tableName,
          Item: data
        })
      );
    }
    return {
      SchemaVersion: '1.0',
      Actions: []
    };
};
Step 7: Verification of Call Flow
To verify your call flow automation system, you can follow these steps:
- Invoke the
createMeetingWithAttendeesfunction and expect a 200 response with meeting details. - Invoke the
initiateCallfunction with the meeting and joinToken received from thecreateMeetingWithAttendeesfunction and expect a 200 response. - Invoke the
sendDtmfDigitsfunction with valid digits, transactionId, and sipMediaApplicationId, and expect a 200 response. - After receiving the 200 response from the Send DTMF function, wait for a few seconds. Due to DynamoDB’s eventual consistency, it may take a few seconds to reflect in DynamoDB.
- Invoke
verifyDtmfDigitswith dtmfDigits and time received from thesendDtmfDigitsfunction. TheverifyDtmfDigitsfunction will query the DynamoDB table with the dtmfDigits and time. - If the data is present, expect a 200 response. If there is no data, it means that no digits were received at the receiver’s end.
Building a custom call flow automation system with Amazon Chime allows you to tailor your communication processes to your specific needs. By leveraging Chime’s APIs and integrating with other AWS services like SQS, Lambda, and DynamoDB, you can create a highly customized and efficient communication system. Amazon Chime offers the versatility and resources necessary to accomplish purposes such as initiating calls, transmitting DTMF digits, and managing incoming calls.
Reference:
GitHub – sarathsampath/chime_pstn: Building a Custom Call Flow Automation System with Amazon Chime