
Introduction
In the fast-paced world of mobile app development, ensuring the reliability of your app’s UI is crucial. Android Jetpack Compose is a modern UI toolkit for building native Android user interfaces with a declarative approach, simplifying UI development. This guide will walk you through setting up a pipeline to automate Instrumented Testing for Android apps using GitHub Actions and Firebase Test Lab.
With GitHub Actions, you can streamline the process of building, testing, and deploying your app, while Firebase Test Lab provides a powerful platform to run Instrumented Tests across various devices. We’ll cover how to configure workflows, set triggers, and automate Instrumented Tests to catch bugs early and ensure a seamless user experience.
Let’s dive into how you can elevate your Android app’s Instrumented Testing and development with the combined power of GitHub Actions and Firebase Test Lab!
Testing in Android
Unit Testing
This focuses on verifying individual components or functions in isolation to ensure they work correctly. It helps catch bugs early, improve code quality, and support safe code refactoring.
Popular Unit Testing Frameworks:
- JUnit: The standard framework for writing and running tests in Java and Android.
- Mockito: Used for creating mock objects to simulate interactions and verify behavior.
- Robolectric: Allows running Android tests on the JVM, providing faster feedback without an emulator.
- Truth: Offers fluent and readable assertions for a clearer test code.
UI Testing
The process involves testing the user interface to ensure it behaves correctly from a user’s perspective. It simulates user interactions to verify that the app’s UI works as intended.
Popular UI Testing Frameworks:
- Espresso: Part of Android Jetpack, it provides APIs for writing UI tests that simulate user interactions and assert UI states.
- UIAutomator: Allows testing across multiple apps and interacting with the system UI, useful for more extensive integration tests.
- Compose Testing: A framework for testing Jetpack Compose UI components, enabling unit-like testing for composables.
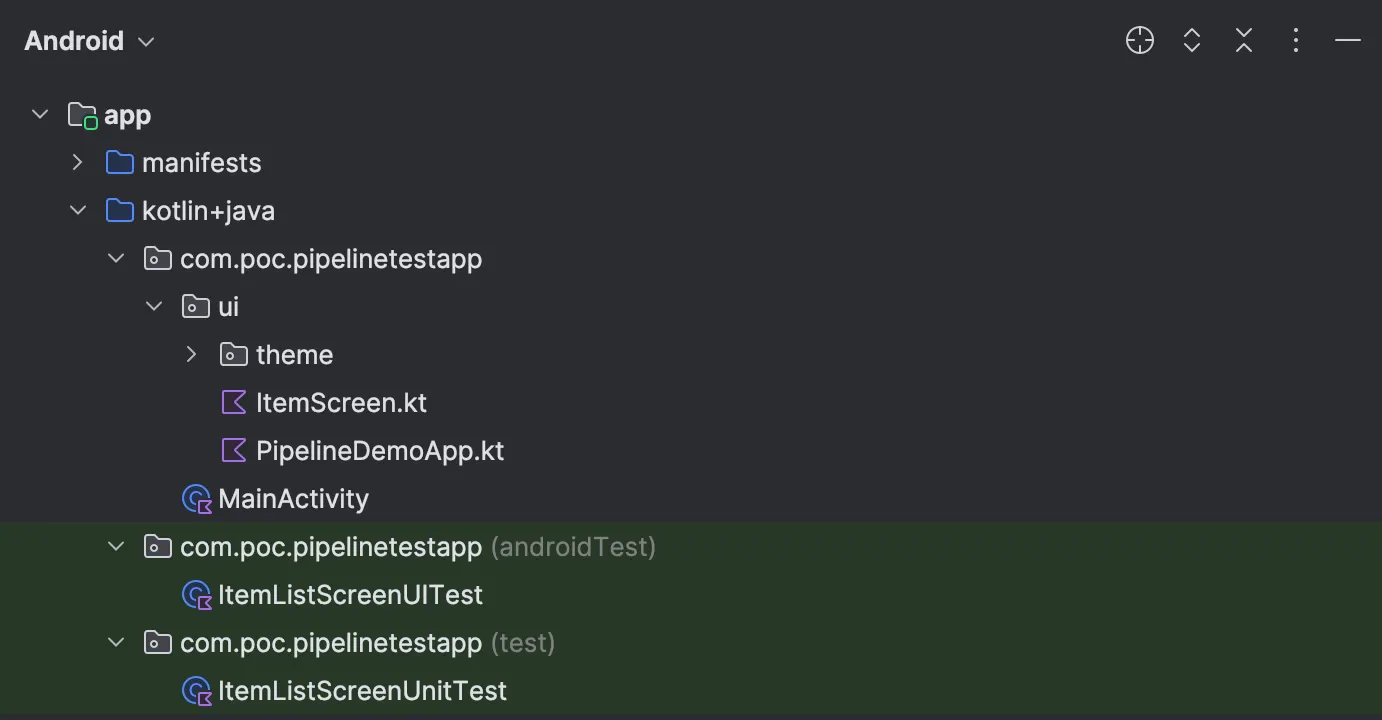
Project Structure
For this tutorial, we’re working with a simple Android app that displays a list of fruit names. The app includes a basic search filter to help users find specific fruits. When a fruit is selected, it navigates to a detail screen showing the fruit’s title and description.
To ensure the app behaves as expected, we’ve written one unit test to verify the search filter functionality and two instrumented tests to check the composables that display the fruit list and detail screens.
Let’s start by creating the data class for Item.
data class Item (
    val id: Int,
    val name: String,
    val description: String
)
Once that’s done, let’s define a list of fruits in sampleItems.
val sampleItems = listOf(
    Item(1, "Apple", "A red fruit"),
    Item(2, "Banana", "A yellow fruit"),
    Item(3, "Cherry", "A small red fruit"),
    Item(4, "Date", "A sweet brown fruit"),
    Item(5, "Elderberry", "A small, dark purple fruit"),
    Item(6, "Fig", "A soft fruit with a sweet taste"),
    Item(7, "Grape", "A small, juicy fruit that comes in bunches"),
    Item(8, "Honeydew", "A sweet green melon"),
    Item(9, "Kiwi", "A small fruit with brown skin and green flesh"),
    Item(10, "Lemon", "A sour yellow fruit")
)
PipelineDemoApp Composable:
Once that’s done, create a new file for the PipelineDemoApp composable, which is the main screen of your app. It maintains a selectedItem state to keep track of the currently selected item. If an item is selected, the app will display the ItemDetailScreen; otherwise, it will show the ItemListScreen.
@Composable
fun PipelineDemoApp() {
    var selectedItem by remember { mutableStateOf<Item?>(null) }
    BackHandler(enabled = selectedItem != null) {
        selectedItem = null
    }
    Surface(color = MaterialTheme.colorScheme.background) {
        if (selectedItem == null) {
            ItemListScreen(
                items = sampleItems,
                onItemClick = { item -> selectedItem = item }
            )
        } else {
            ItemDetailScreen(item = selectedItem!!)
        }
    }
}
The BackHandler composable listens for back button presses when an item is selected, allowing the user to return to the list by setting selectedItem to null. A sample list of items (sampleItems) is defined, which is passed to the ItemListScreen for display. The onItemClick callback updates the selectedItem state when an item is clicked.
ItemListScreen Composable:
The ItemListScreen composable displays a list of items with a search filter at the top. The searchText state stores the current search query and updates it as the user types. The filterItems function filters the list of items based on the search query.
@Composable
fun ItemListScreen(
    items: List,
    onItemClick: (Item) -> Unit
) {
    var searchText by remember { mutableStateOf("") }
    val filteredItems = filterItems(searchText, items)
    Column(
        modifier = Modifier
            .fillMaxSize()
            .padding(16.dp)
    ) {
        TextField(
            value = searchText,
            onValueChange = { searchText = it },
            modifier = Modifier.fillMaxWidth(),
            label = { Text("Search") }
        )
        Spacer(modifier = Modifier.height(16.dp))
        LazyColumn(
            modifier = Modifier.fillMaxSize()
        ) {
            items(filteredItems) { item ->
                ItemRow(item = item, onItemClick = onItemClick)
            }
        }
    }
}
The items are displayed using a LazyColumn, which efficiently renders only the visible items on the screen. Each item is represented by an ItemRow, which responds to click events and triggers the onItemClick callback.
ItemRow Composable:
The ItemRow composable represents each row in the item list. It displays the item’s name and an arrow icon. The row is clickable, and when clicked, it triggers the onItemClick callback, passing the clicked item as an argument.
@Composable
fun ItemRow(item: Item, onItemClick: (Item) -> Unit) {
    Row(
        modifier = Modifier
            .fillMaxWidth()
            .clickable { onItemClick(item) }
            .padding(8.dp)
            .testTag(item.name),
        horizontalArrangement = Arrangement.SpaceBetween
    ) {
        Text(text = item.name, style = MaterialTheme.typography.bodyMedium)
        Icon(imageVector = Icons.Default.ArrowForward, contentDescription = "Details")
    }
}
The testTag modifier is used to assign a unique tag to each row, which is helpful for UI testing.
ItemDetailScreen Composable:
The ItemDetailScreen composable displays the details of the selected item. It shows the item’s name and description centered on the screen.
@Composable
fun ItemDetailScreen(item: Item) {
    Column(
        modifier = Modifier
            .fillMaxSize()
            .padding(16.dp),
        horizontalAlignment = Alignment.CenterHorizontally,
        verticalArrangement = Arrangement.Center
    ) {
        Text(text = item.name, style = MaterialTheme.typography.headlineMedium)
        Spacer(modifier = Modifier.height(8.dp))
        Text(text = item.description, style = MaterialTheme.typography.bodySmall)
    }
}
filterItems Function:
The filterItems function filters the list of items based on the search text. It checks if the item’s name contains the search query, ignoring case differences. The filtered list is returned and displayed on the screen.
fun filterItems(searchText: String, items: List): List {
    val filteredItems = items.filter {
        it.name.contains(searchText, ignoreCase = true)
    }
    return filteredItems
}
Once all this is in place, we invoke PipelineDemoApp() in MainActivity.
class MainActivity : ComponentActivity() {
override fun onCreate(savedInstanceState: Bundle?) {
super.onCreate(savedInstanceState)
setContent {
PipelineTestAppTheme {
Surface(
modifier = Modifier.fillMaxSize(),
color = MaterialTheme.colorScheme.background
) {
PipelineDemoApp()
}
}
}
}
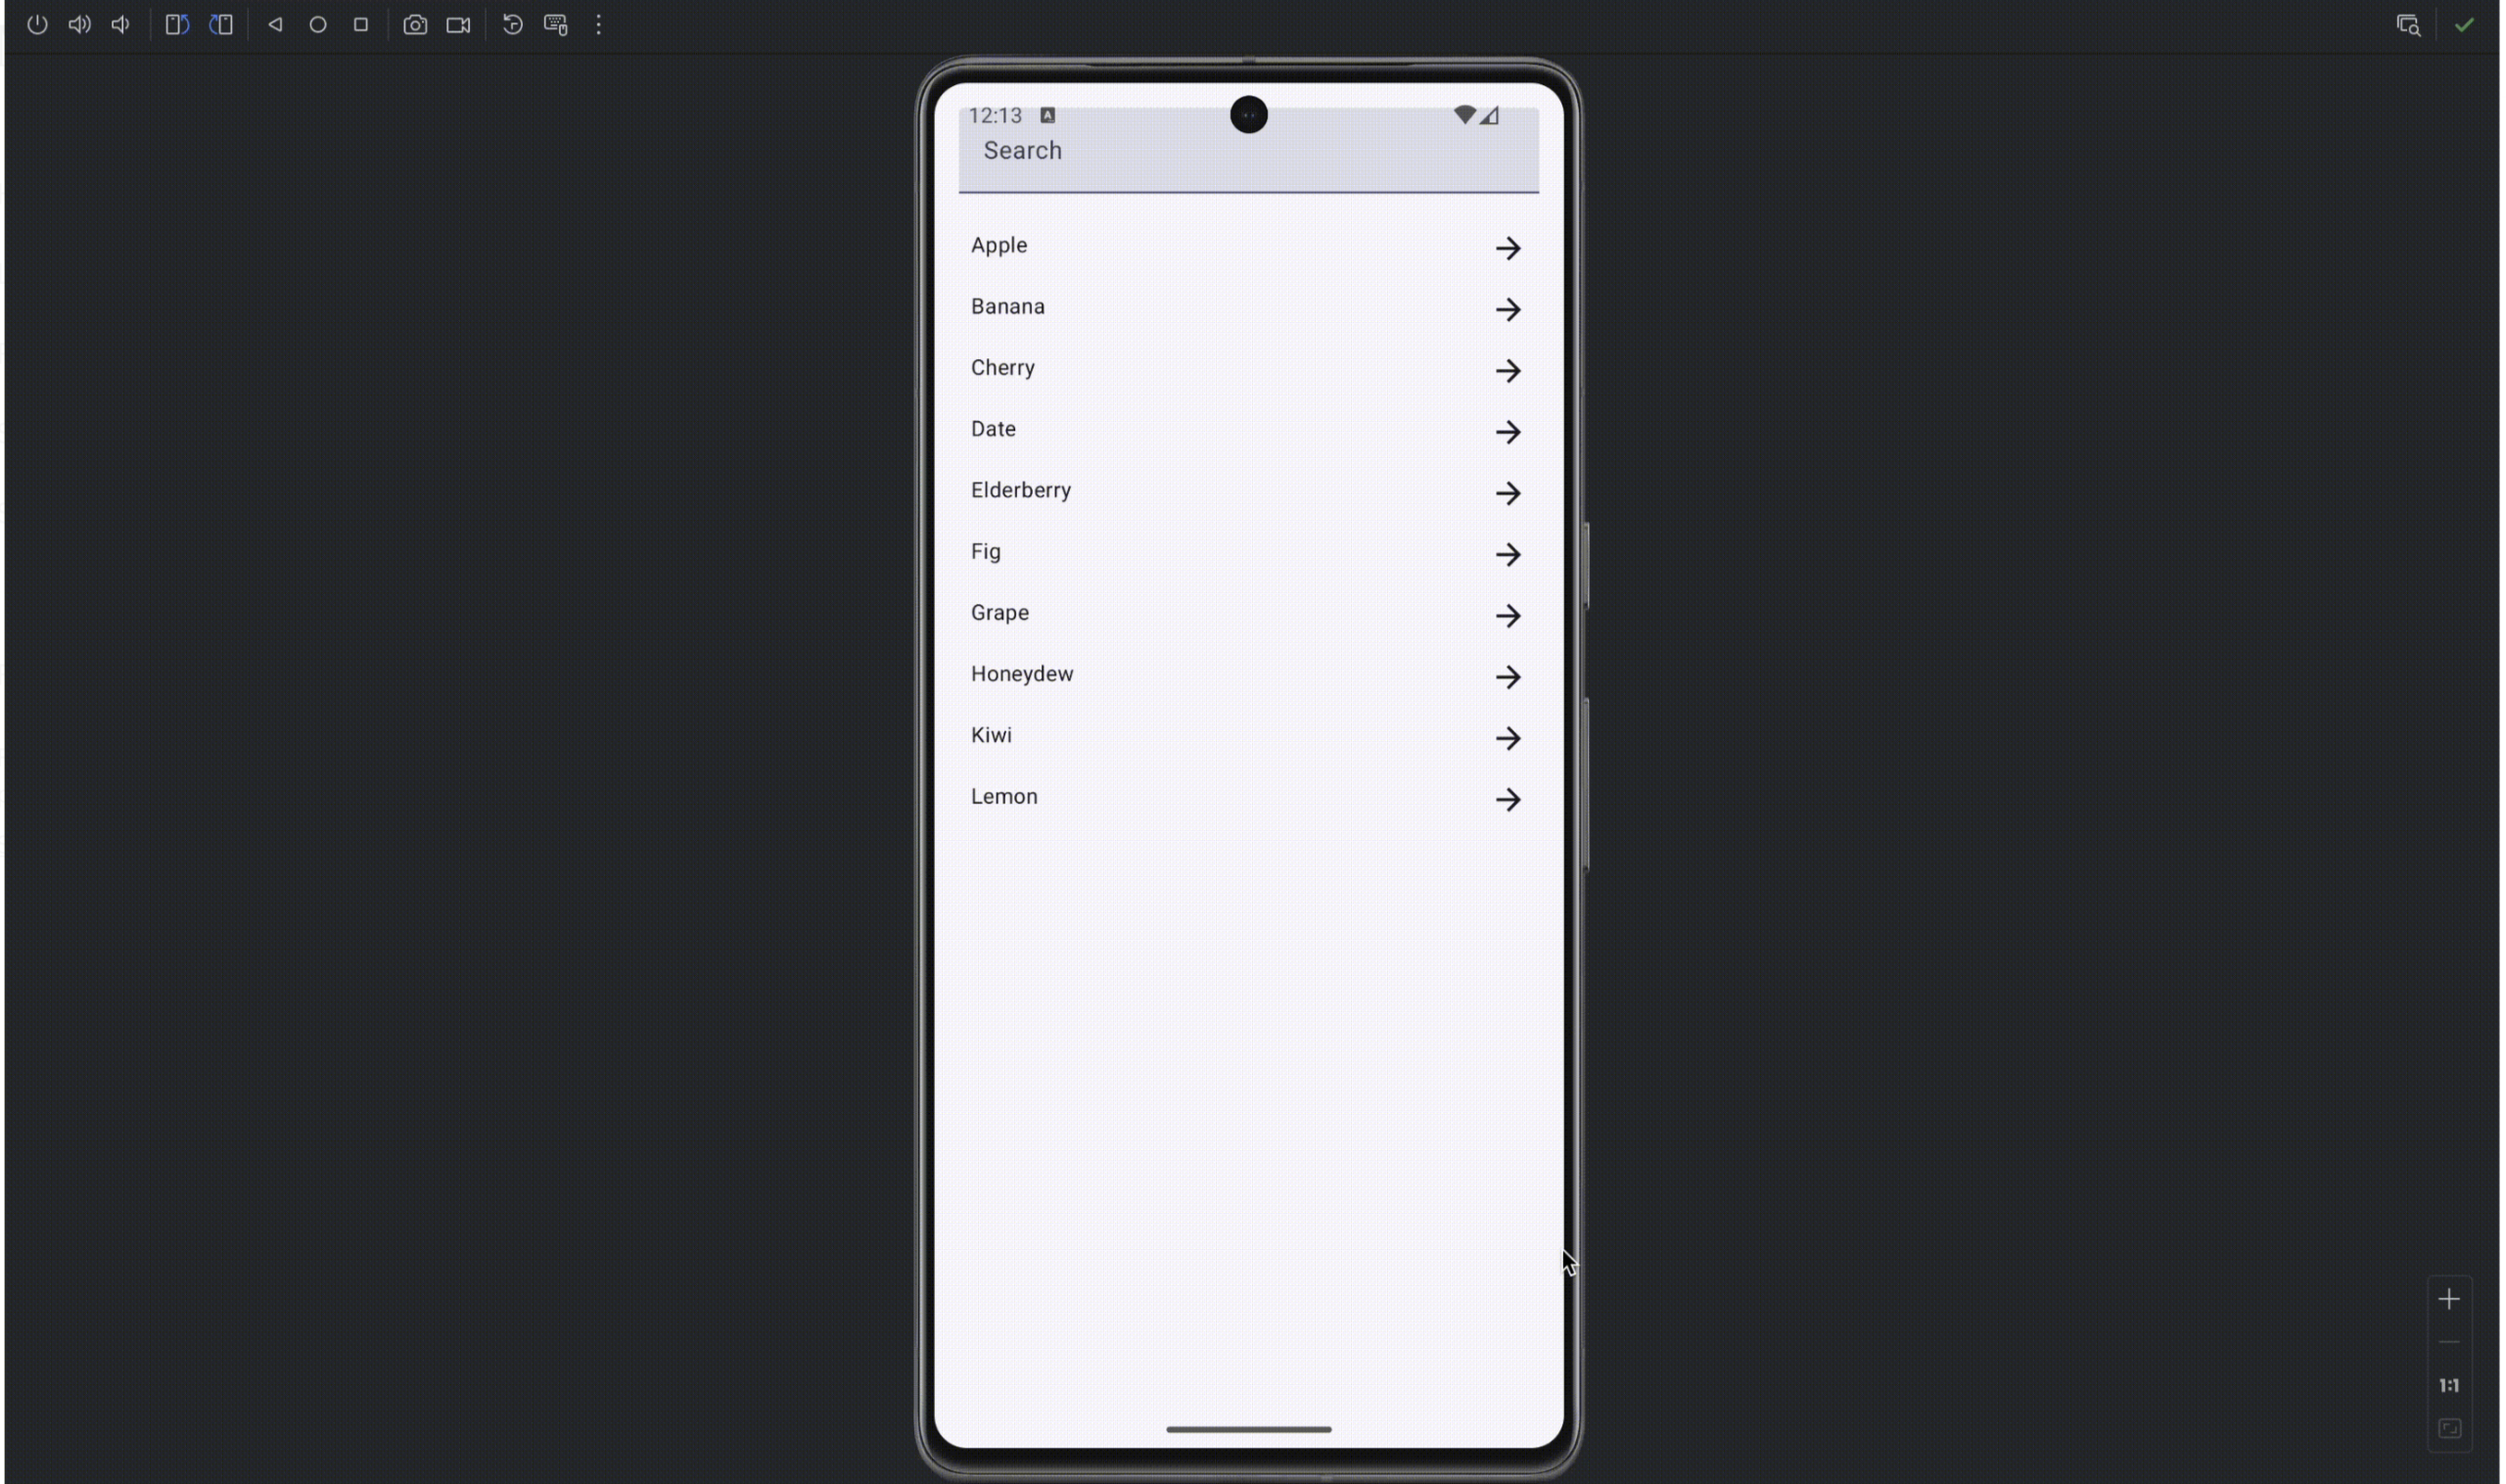
}Running the app should render an output like this.
Unit Tests:
This test is designed to check the correctness of the filterItems function in isolation.
filterValidation Function:
This test verifies that when the filterItems function is provided with the search term “Cherry,” it correctly returns a list containing only the item that matches that name.
ItemListScreenUnitTest.kt
- If the function works as expected, the test passes; otherwise, it fails, indicating an issue with the filtering logic.
- The test asserts that filtering for “Cherry” in sampleItems returns a list with only the third item, which corresponds to “Cherry.”
- If the function works as expected, the test passes; otherwise, it fails, indicating an issue with the filtering logic.
Instrumented Tests:
These tests are designed to verify that the user interface behaves as expected when interacting with the app. They use Jetpack Compose’s testing APIs to simulate user actions and verify UI states.
Test Rule:
The composeTestRule is used to create an Android-specific test environment for Jetpack Compose, allowing you to interact with UI components and verify their state.
ItemListScreenUITest.kt
@RunWith(AndroidJUnit4::class)
class ItemListScreenUITest {
@get:Rule
    val composeTestRule = createAndroidComposeRule()
    @Test
    fun clickItemNavigatesToDetail() {
        composeTestRule.onNodeWithText("Cherry").performClick().assertIsDisplayed()
        composeTestRule.onNodeWithText("A small red fruit").assertIsDisplayed()
    }
    @Test
    fun searchItemShowsAndNavigatesToDetail() {
        composeTestRule.onNodeWithText("Search").performTextInput("Cherry")
        composeTestRule.onNodeWithTag("Cherry").performClick().assertIsDisplayed()
        composeTestRule.onNodeWithText("A small red fruit").assertIsDisplayed()
    }
}
clickItemNavigatesToDetail Test:
- This test checks if clicking on an item in the list navigates to the correct detail screen.
- It finds a node (UI element) with the text “Cherry,” simulates a click on it, and then asserts that both the item’s name and description are displayed on the detail screen.
searchItemShowsAndNavigatesToDetail Test:
- This test simulates a user searching for an item and navigating to its detail screen.
- It first inputs the text “Cherry” into the search field.
- Then it verifies that the filtered item is displayed, clicks on it, and finally checks that the detail screen displays the correct information.
- The use of assertIsDisplayed() ensures that the expected UI elements are present on the screen after each interaction, confirming that the app behaves as intended.
Run the tests through Command Line or Android Studio.
How to run the tests in the pipeline?
Unit tests are designed to validate individual components or functions of your application in isolation. They generally do not require any special setup beyond a test runner.
Instrumented Tests, however, are more complex because they require an actual device or emulator to interact with the user interface. This is where tools like Gradle Managed Devices and Firebase Test Lab come into play.
Gradle Managed Devices
Gradle-managed devices enable automated test execution for API levels 27 and up. You can set up virtual or remote devices directly in your Gradle files. The build system handles everything: creating, running, and tearing down the devices automatically, making testing simpler and more efficient.
Gradle Tasks
A task represents some independent unit of work that a build performs. This might be compiling some classes, creating a JAR, generating Javadoc, or publishing some archives to a repository.
When a user runs gradlew <taskname> for Windows and ./gradlew <taskname> for Linux and Mac in the command line, Gradle will execute the task along with any other tasks it depends on.
To list all the available Gradle tasks, use
./gradlew tasks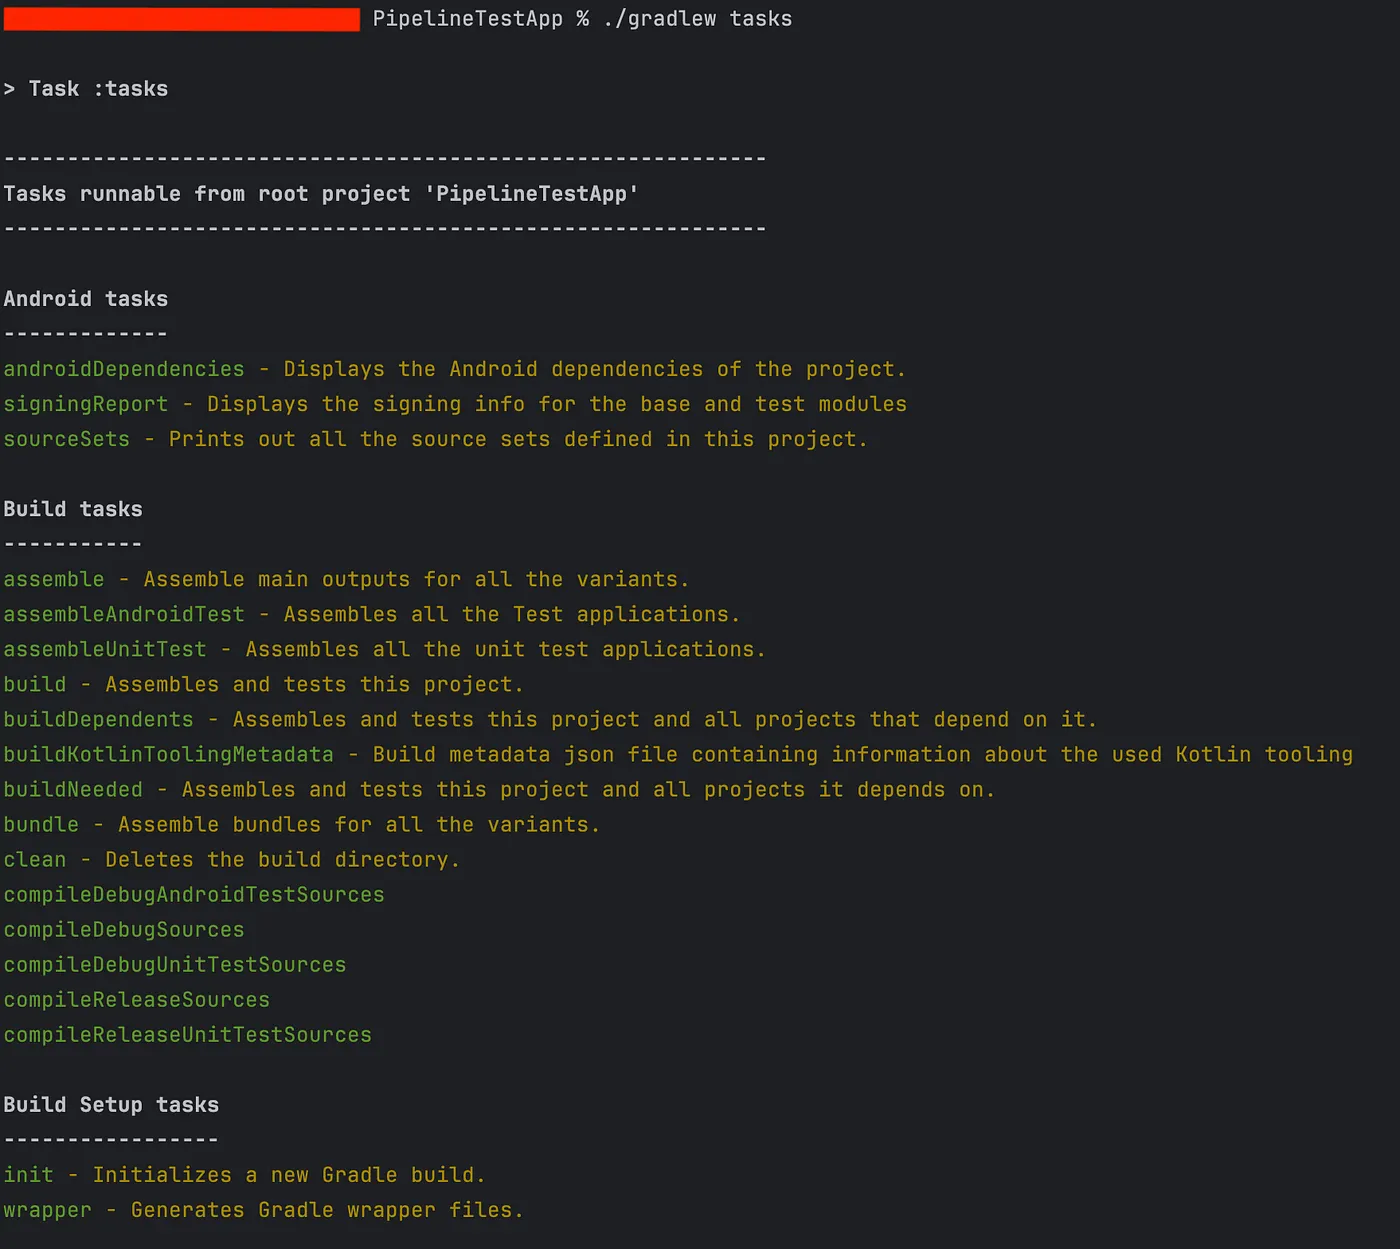
Creating a Gradle Managed Device
To create a Gradle Managed Device, navigate to the app/build.gradle and find the testOptions { … } within the android { … } block. If there isn’t a testOptions { … } block, feel free to add one. Register the device in the testOptions block.
android {
  testOptions {
    managedDevices {
      localDevices {
        create("pixel2api30") {
          // Use device profiles you typically see in Android Studio.
          device = "Pixel 2"
          // Use only API levels 27 and higher.
          apiLevel = 30
          // To include Google services, use "google/aosp/aosp-atd".
          systemImageSource = "aosp"
        }
      }
    }
  }
}
Gradle Managed Devices provide additional capabilities, such as creating groups of devices and enabling sharded tests for parallel execution.
Reference: https://developer.android.com/studio/test/gradle-managed-devices#create-device
Constructing gradlew commands
To perform a task with build variants on a gradle managed device, use
Unit Tests
./gradlew testUnitTestInstrumented Tests
./gradlew AndroidTestVisit the Official Google Documentation for more information on this.
Gradle Managed Devices (GMD) can introduce inconsistencies and flakiness due to variability in local hardware, software configurations, and resource constraints. These issues can lead to unpredictable test results that are difficult to diagnose and reproduce. In contrast, Firebase Test Lab offers a stable cloud-based environment with a diverse range of real and virtual devices, providing a more consistent and reliable testing experience. This minimizes the risk of flaky tests and delivers accurate results across different device configurations, making Firebase Test Lab a more dependable choice for comprehensive testing.
Firebase Test Lab
Firebase Test Lab allows you to run your automated instrumented tests at scale across a broad selection of Android devices, both physical and virtual, in remote Google data centers.Test Lab supports simultaneous testing on a wide variety of devices, unlike Gradle Managed Devices, which limit you to your local environment, and this enhances coverage and reliability. By working with Gradle-managed devices, Test Lab gains automated test management and reliable execution, making the testing process more complete and efficient.
Additionally, Firebase Test Lab offers built-in features such as test retries, screen recording, and detailed logs, which further enhance the testing process by making it easier to diagnose issues and ensure your app’s quality. These capabilities come out of the box, reducing the need for additional configuration and providing a more robust testing framework.
To run your Android Instrumented Tests in Firebase Test Lab, you’ll need to set up a project in Firebase, configure your Android project with the necessary dependencies, and ensure proper access credentials. Here’s a detailed guide:
-
Create a Project in the Firebase Console
- Navigate to Firebase Console.
- Add a New Project: Click on Add Project.
– Enter a project name and follow the setup wizard to create it.
– Optionally, enable Google Analytics if required for your project.
– Create the project.
-
Register the App to the Firebase Project
In the center of the project overview page, click either the Android icon or the Add app button to start the setup workflow for adding the SDK to your Android app.

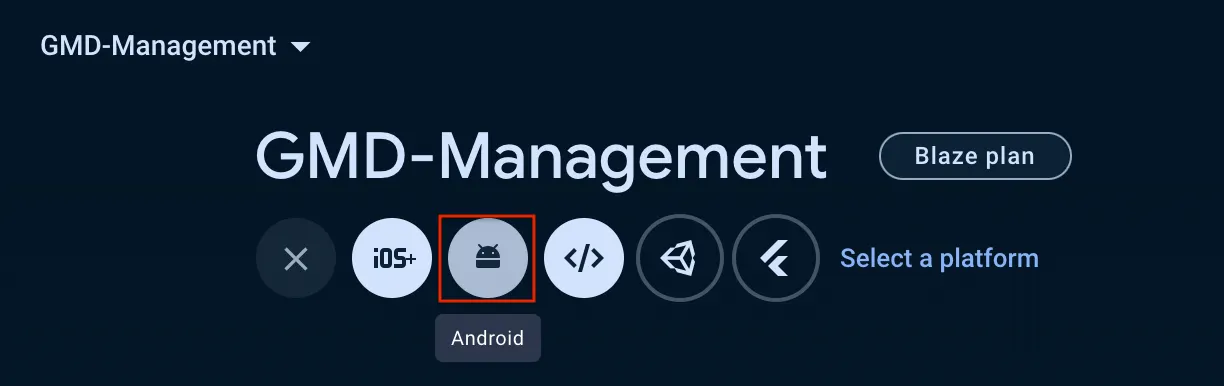
- Enter the full Android package name (e.g., com.poc.pipelinetestapp).
- Download the google-services.json file and save it in the app directory of your Android project.
-
Adding Dependencies for Firebase and the Firebase Test Lab
Add the following dependencies in the project-level Gradle file
plugins {
    ...
    id("com.google.gms.google-services") version "4.4.2" apply false
    id("com.google.firebase.testlab") version "0.0.1-alpha07" apply false
}
In the app/build.gradle file, add the following in the plugins section
plugins {
    ...
    id("com.google.gms.google-services")
    id("com.google.firebase.testlab")
}
In the gradle.properties file, add the line to enable Firebase Test Lab devices.
android.experimental.testOptions.managedDevices.customDevice=true-
gcloud linking to the project
Link to your Firebase project in gcloud and authorize your account. You can find the FIREBASE_PROJECT_ID in the Project Overview.
gcloud config set project FIREBASE_PROJECT_ID
gcloud auth application-default login-
Adding a Service Account
Navigate to your Project Settings > Service Accounts and click on Generate Private Key.
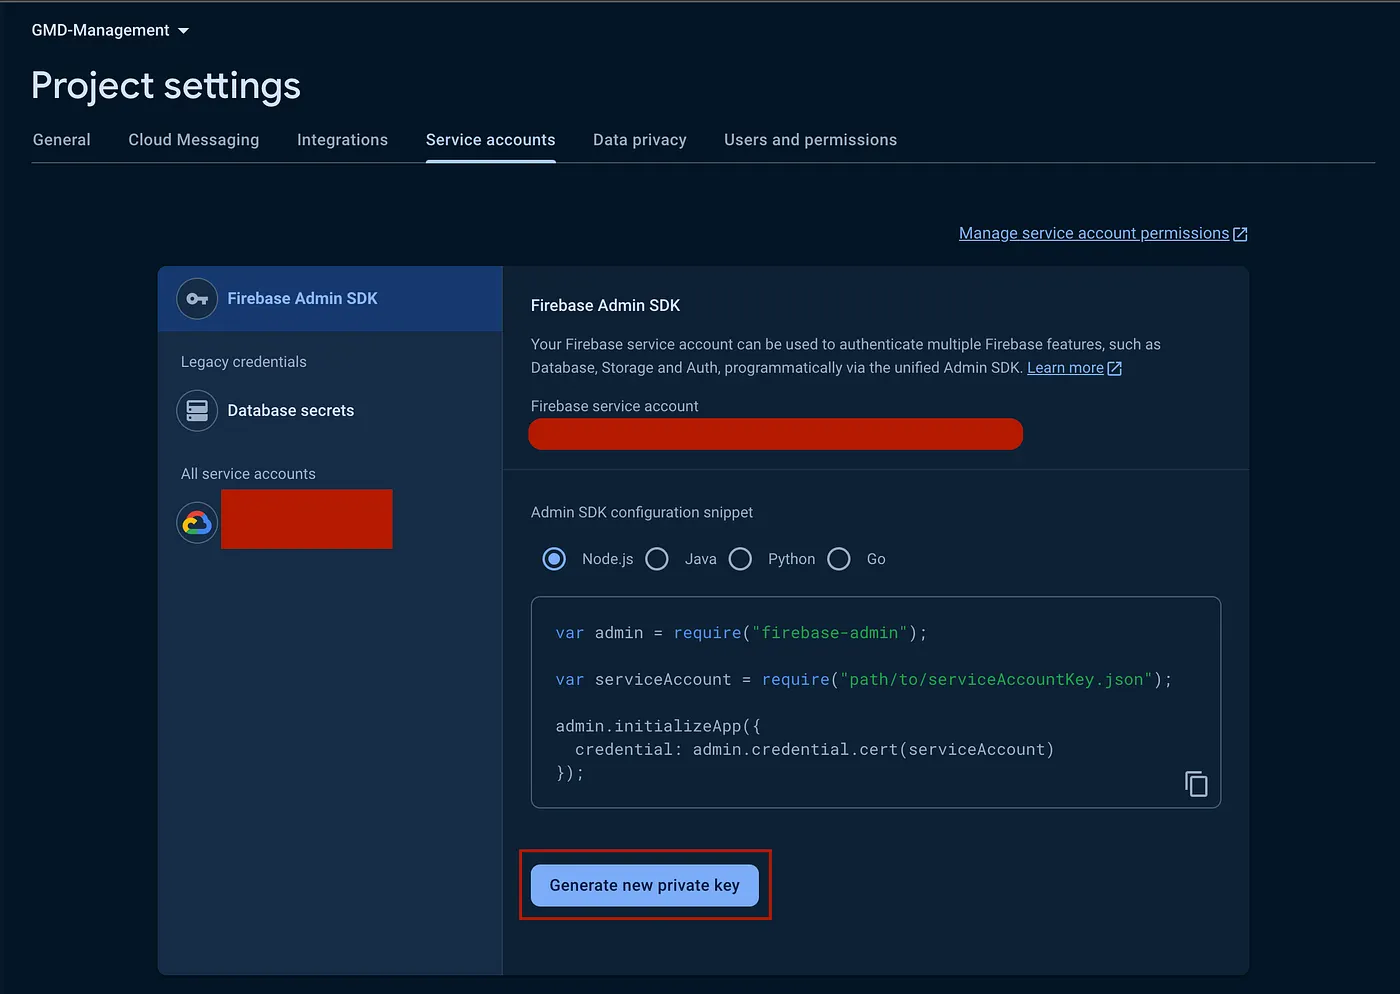
This should download a key file for your service account. Move this file to the app directory of the project, and rename the file to something like service-account.json.
At this point, you should have two JSON files in your app.
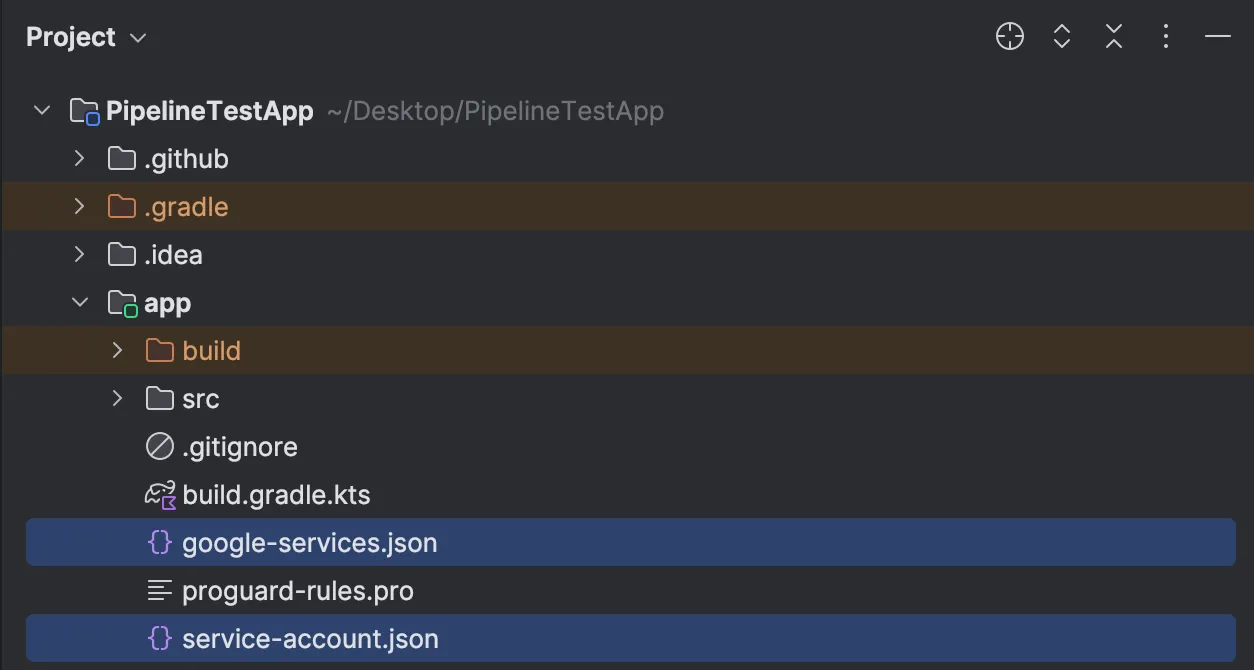
Make sure to add these two files to your .gitignore we don’t want any data leaks. Later, we’ll look into how to run the pipeline by creating secrets for the workflow.
Additionally, ensure the service account has the necessary permissions to perform required operations.
-
Enabling Cloud Testing API and Cloud Tool Results API
To use Firebase Test Lab for running UI tests, you need to enable specific Google Cloud APIs and ensure your project is linked to an active billing account. Here’s a concise guide:
Cloud Testing API:
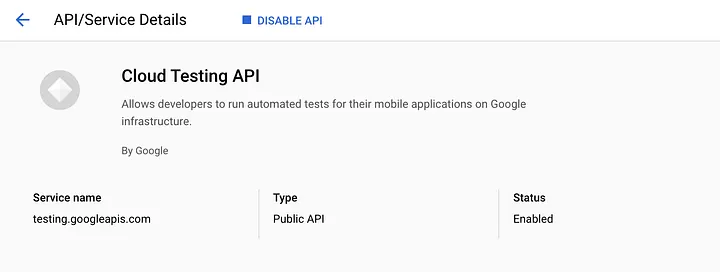
- Purpose: Manages and executes tests on devices in Firebase Test Lab.
- Steps to Enable:
1. Go to the Google Cloud Console.
2. Select your Firebase project.
3. Navigate to APIs & Services > Library.
4. Search for “Cloud Testing API” and enable it.
Cloud Tool Results API:
Press enter or click to view image in full size
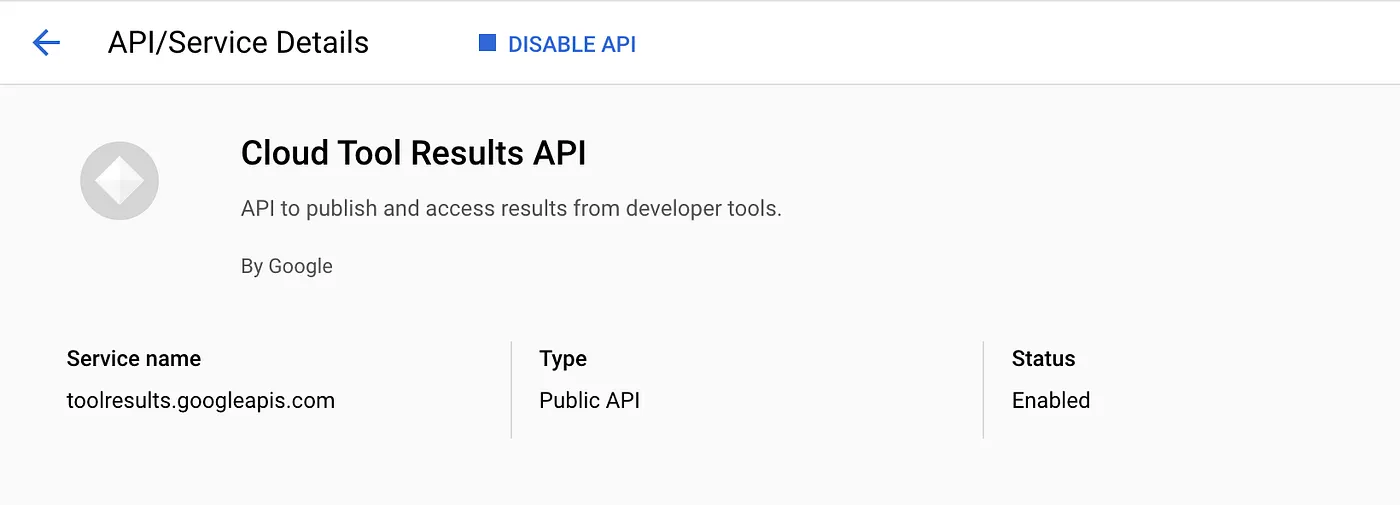
- Purpose: Retrieves detailed results from your test runs.
- Steps to Enable:
1. In the Google Cloud Console, go to APIs & Services > Library.
2. Search for “Cloud Tool Results API” and enable it.
Ensure You Have an Active Billing Account Associated with Your Project
- Link or Create a Billing Account:
- In the Google Cloud Console, navigate to Billing.
- Create a new billing account or link an existing one.
- Ensure your Firebase project is associated with this billing account.
- Set Up Billing Alerts (Optional):
- In the Billing section, go to Budgets & alerts.
- Create a budget and set alerts to monitor your spending.
By enabling these APIs and linking an active billing account, you can fully utilize Firebase Test Lab’s capabilities for running comprehensive Instrumented Tests on a variety of devices.
-
Enabling firebaseTestLab { … }block in the gradle file
To list all the device offerings provided by Firebase Test Lab, use the following command:
gcloud firebase test android models listTo add a device to your project, include the firebaseTestLab { … } block within the android { … } section of your Gradle file. Next, add the service account credentials within this block. After that, create a managedDevices { … } block to define a new device instance by specifying options like device type and API level, based on the output from the previous command. Your firebaseTestLab { … } block should look like this:
firebaseTestLab {
    serviceAccountCredentials.set(file("./service-account.json"))
    managedDevices {
        create("ftlDevice") {
            device = "Pixel2.arm"
            apiLevel = 33
        }
    }
}
You can also configure additional options within the firebaseTestLab { … } block, such as screen recording, test reruns, and more.
Reference: https://developer.android.com/studio/test/gradle-managed-devices#ftl-gmd-dsl
8. Testing locally
Testing the runs locally is similar to how we run Instrumented Tests using Gradle Managed Devices.
./gradlew <deviceName><BuildVariant>AndroidTestFor instance, the device we created has
- Name — ftlDevice
- Build Variant — Debug
The following command is used to run the tests.
>./gradlew ftlDeviceDebugAndroidTestTroubleshooting
Verify Service Account Roles: Ensure that the service account has the correct roles, such as the Editor role, to perform necessary operations within the project.
Check Device Model Validity: Confirm that the device model you’re using is valid and supported by Firebase Test Lab.
Confirm Billing Account Status: In case you get any 403 errors, make sure your Firebase project is linked to an active billing account. Some features of Firebase Test Lab require an active billing account beyond the free tier.
Enable Required APIs: Make sure your project in the Google Cloud Console has both the Cloud Testing API and the Cloud Tool Results API enabled. You need these APIs to manage and retrieve test results.
Using Confidential JSON Files without uploading to the Repository
To securely handle sensitive JSON files, such as google-services.json and service-account.json, without directly uploading them to your repository, follow these steps:
1. Encode the file with base64
Start by encoding the google-services.json. Please open your terminal and navigate to the project. Use the base64 command to encode the file and output the result. You’ll get an output string for the following input file:
base64 -i app/google-services.jsonYou should get a base64 encoded output string.
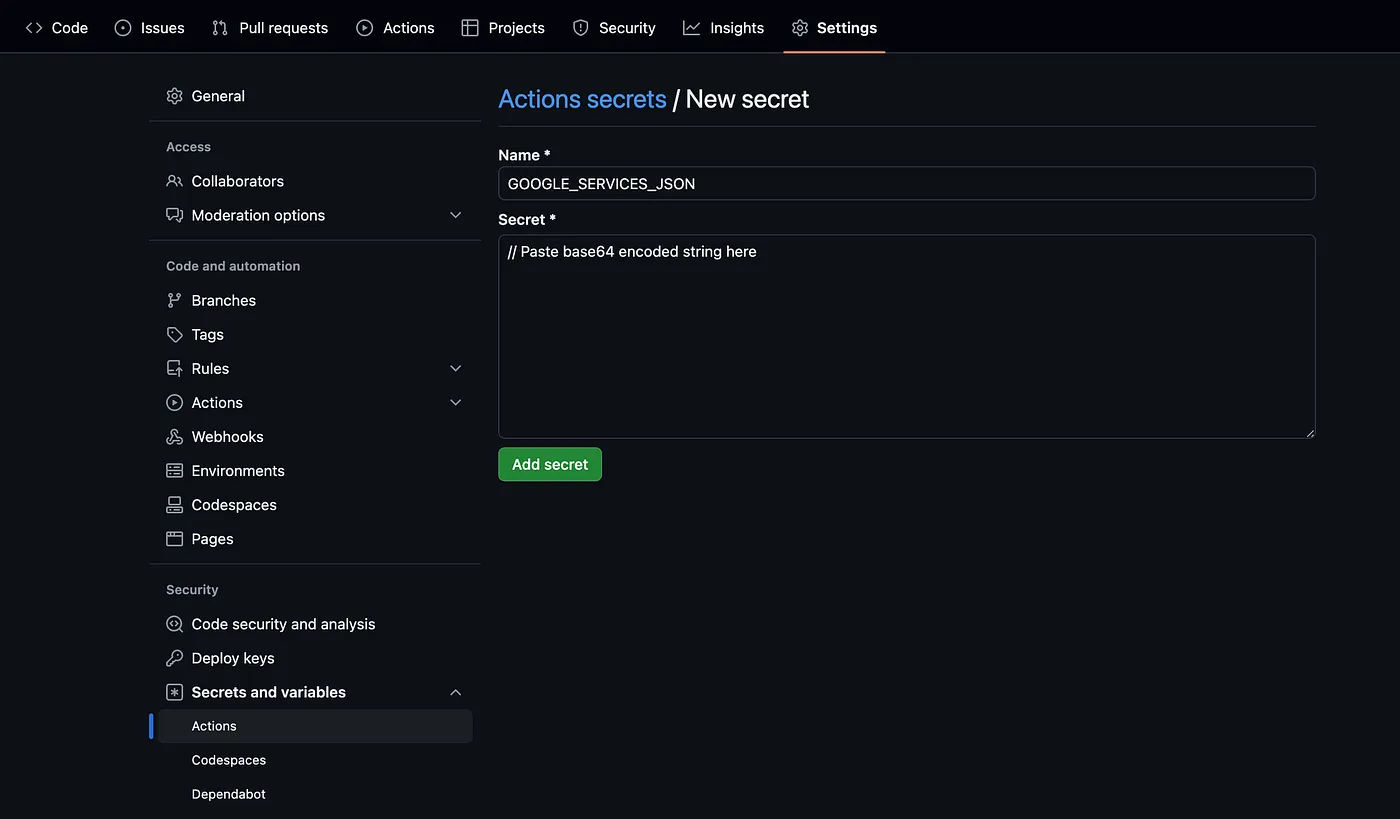
2. Create a GitHub Secret
Once you have the output, go to the repo where you will create a pipeline and navigate to Settings > Security > Secrets and Variables > Actions > New Repository Secret. Add a name to your secret (e.g., GOOGLE_SERVICES_JSON), paste the encoded string, and click Add Secret. This secret can now be decoded and accessed while running the pipeline build (which we will see shortly!).
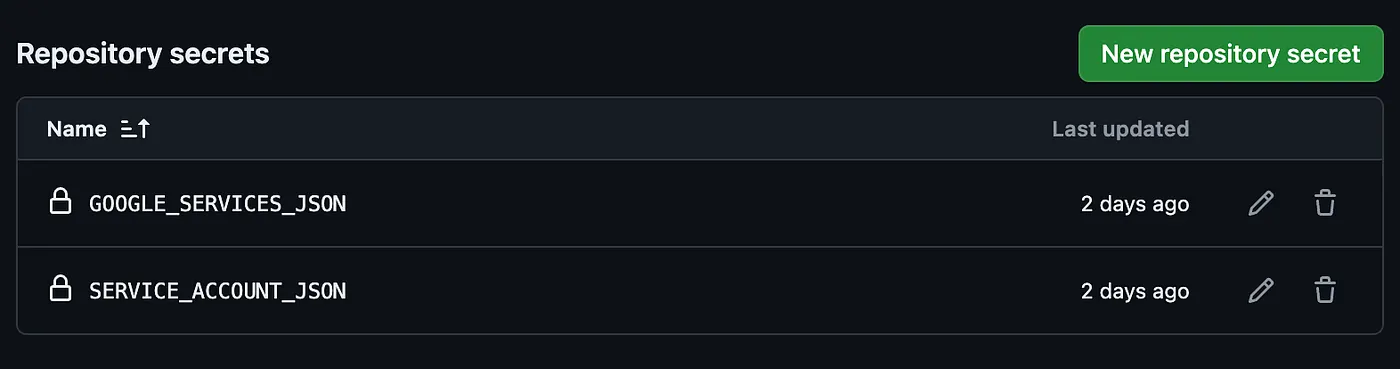
Repeat the same steps for the service-account.json file as well.
base64 -i app/service-account.jsonPlease save the encoded string to the other secret. You should be having two repository secrets now!
Creating the GitHub Actions Pipeline
This workflow automates the build process, runs unit and instrumented tests, and also handles Firebase Test Lab integration. To create the workflow,
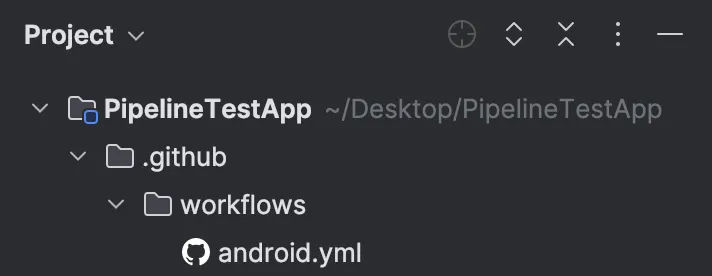
- Switch the Android View to Project View.
- Create a new directory .github/workflows in the project.
- Create a YAML file that will contain the tasks of the workflow.
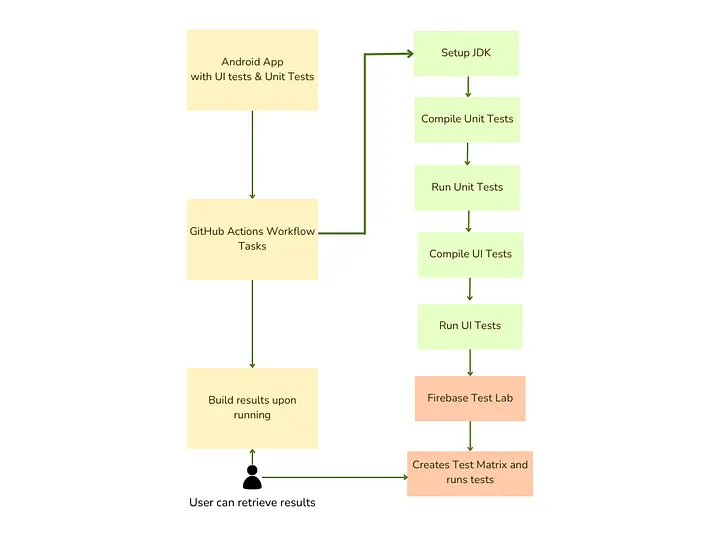
Workflow Overview
This GitHub Actions workflow is designed to automate the build and testing process for your Android project. It runs on every push to the main branch or on pull requests targeting the main branch. Here’s what each step will do:
1. Checkout Code
uses: actions/checkout@v4
Checks out your code from the repository so that the workflow can access it.
2. Set Up JDK 17
uses: actions/setup-java@v4
Sets up Java Development Kit (JDK) version 17, which is required to build and run your Android project. It also configures Gradle caching to speed up build times.
3. Grant Execute Permission for gradlew
run: chmod +x gradlew
Grants executable permissions to the gradlew script, allowing it to be run as a command in the workflow.
4. Decode and Load a Google Service File
env: DATA: ${{ secrets.GOOGLE_SERVICES_JSON }}
Loads the google-services.json file from GitHub Secrets, decodes it from base64, and writes it to the app/ directory. This file is required for Firebase and other Google services.
5. Decode and Load Service Account File
env: DATA: ${{ secrets.SERVICE_ACCOUNT_JSON }}
Similar to the previous step, this loads the service-account.json file from GitHub Secrets, decodes it, and writes it to the app/ directory. This file is used for authentication with Google services.
6. Build with Gradle
run: ./gradlew build
Runs the Gradle build process to compile and package your Android application.
7. Compile Unit Tests
run: ./gradlew compileDebugUnitTestKotlin
Compiles the unit tests for the debug build variant of your app. This step ensures that the tests are prepared for execution.
8. Run Unit Tests
run: ./gradlew testDebugUnitTest
Executes the unit tests for the debug build variant. This step runs the tests you’ve written to verify the functionality of your code.
9. Compile Instrumented Tests
run: ./gradlew compileDebugAndroidTestKotlin
Compiles the instrumented tests for the debug build variant. These tests run on an Android device or emulator and check the UI and interactions.
10. Run Instrumented Tests
run: ./gradlew ftlDeviceDebugAndroidTest
Executes the instrumented tests using Firebase Test Lab. This step runs your instrumented tests on a range of real and virtual devices in Firebase’s cloud environment.
11. Store Artifacts
uses: actions/upload-artifact@v4
Uploads build artifacts such as APK files, test reports, and AAR files for later inspection. This step helps you keep track of build outputs and test results. A retention period can also be added to save costs and avoid storing older artifacts.
12. Clean Managed Devices
run: ./gradlew cleanManagedDevices
name: Android CI
on:
push:
branches: [ "main" ]
pull_request:
branches: [ "main" ]
jobs:
build:
runs-on: ubuntu-latest
steps:
- uses: actions/checkout@v4
- name: set up JDK 17
uses: actions/setup-java@v4
with:
java-version: '17'
distribution: 'oracle'
cache: 'gradle'
- name: Grant execute permission for gradlew
run: chmod +x gradlew
- name: Load Google Service file
env:
DATA: ${{ secrets.GOOGLE_SERVICES_JSON }}
run: echo $DATA | base64 -di > app/google-services.json
- name: Load Service Account file
env:
DATA: ${{ secrets.SERVICE_ACCOUNT_JSON }}
run: echo $DATA | base64 -di > app/service-account.json
- name: Build with Gradle
run: ./gradlew build
- name: Compile Unit Tests
run: ./gradlew compileDebugUnitTestKotlin
- name: Run Unit Tests
run: ./gradlew testDebugUnitTest
- name: Compile Instrumented Tests
run: ./gradlew compileDebugAndroidTestKotlin
- name: Run Instrumented Tests
run: ./gradlew ftlDeviceDebugAndroidTest
- name: Store Artifacts
uses: actions/upload-artifact@v4
with:
name: build-artifacts
path: |
app/build/outputs/apk/debug/*.apk
app/build/reports/tests/testDebugUnitTest/
app/build/outputs/aar/*.aar
retention-days: 1
- name: Clean Managed Devices
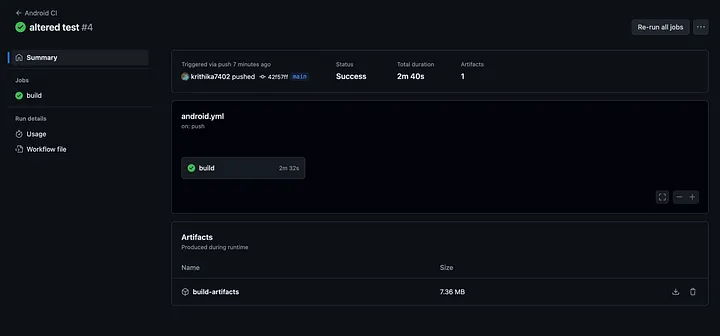
run: ./gradlew cleanManagedDevicesRun the Pipeline
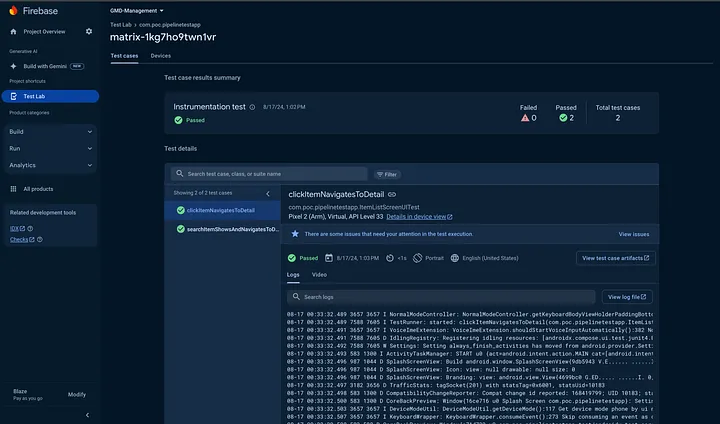
A push action in your Android repo would trigger the pipeline, add some changes, and push them. To verify that your pipeline is working and to retrieve test results, check the artifacts generated in the build. That aside, to verify the UI Test summary, you can check the test matrix in the Firebase Test Lab.
Conclusion:
This guide successfully walks through setting up a full-fledged CI pipeline for Jetpack Compose UI testing using GitHub Actions and Firebase Test Lab. You now have a solution that:
- Writes and runs Compose tests—from unit and instrumented tests to UI interactions like list filtering and navigation.
- Uses managed devices locally, with Gradle Managed Devices enabling emulator tests in GitHub Actions.
- Leverages Firebase Test Labfor cloud-based device testing: setting up service accounts, enabling APIs, & defining test devices.
- Secures credentialsusing GitHub Secrets (base64‑encoded).
- Automates everythingwith a CI workflow (.github/workflows/android-ci.yml) that builds, tests, uploads artifacts, and tears down devices on each push/PR.
Congratulations, you did it!
If you made it till here, Mazel Tov! Check the GitHub repository for further reference. Cheers!
