
Imagine owning a bustling restaurant with customers placing orders both online and in person. From time to time, customers will have questions or encounter issues, and handling these inquiries efficiently can enhance their overall experience. To streamline this, you might consider building a custom chatbot. But isn’t building a chatbot complicated? No, not at all—especially with Rasa’s help.
In this blog, we’ll guide you through the process of building and deploying a sample Rasa chatbot on an AWS EKS (Elastic Kubernetes Service) cluster using Helm. Rasa, a powerful open-source conversational AI platform, allows you to create highly customizable chatbots, while Helm simplifies the deployment process by managing Kubernetes applications with ease.
We will walk you through Helm charts, which streamline and automate the deployment process, and show you how to set up an AWS EKS cluster specifically for your Rasa chatbot. Additionally, we’ll configure AWS Load Balancers to connect your chatbot to customers, ensuring it’s publicly accessible and ready to handle inquiries efficiently.
This guide will equip you with the necessary tools, AWS configurations, and knowledge to bring your chatbot to life, regardless of your familiarity with Rasa. So grab your coding toolkit, your AWS credentials, and your curiosity, and let’s turn your chatbot vision into reality with Rasa and Helm!
Prerequisites:
- Understand the fundamental principles of Rasa, including intents, entities, and slots.
- Understand the Rasa action server‘s fundamentals.
- Familiarity with Helm and AWS Elastic Kubernetes Service (EKS)
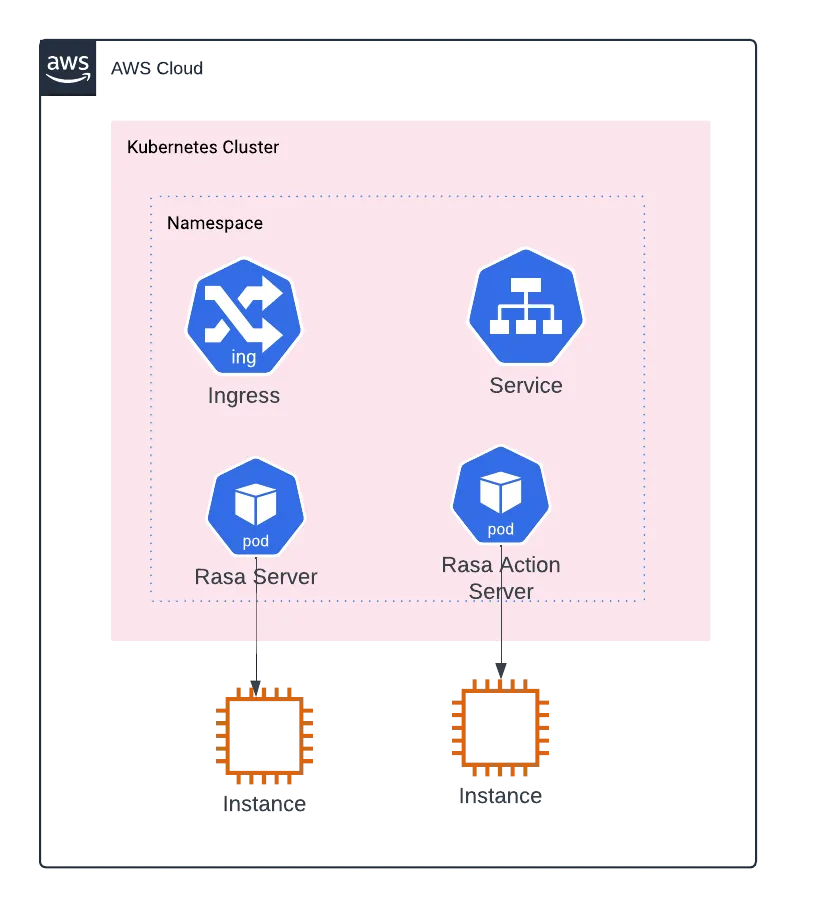
Target architecture
What is Rasa?
Rasa is an open-source conversational AI platform that allows developers to build chatbots and voice assistants. It provides a framework for natural language understanding (NLU) and dialogue management and integrates with a wide range of messaging channels and third-party systems. It also allows the user to train the model and add custom actions.
What is Helm Charts?
Helm Charts is an open-source package manager for Kubernetes that helps you manage the deployment, configuration, and lifecycle of your Kubernetes applications. It simplifies the installation, upgrade, and sharing of Kubernetes applications across various environments by packaging a Kubernetes application and all its dependencies into a single unit.
The application we are going to build is a simple Rasa application that uses Rasa open-source image. The Rasa action server, handling the custom actions for our application, will receive the request from the application (you can skip this step if you just want to deploy a Rasa server). We provide a concise overview of the deployment process below.
Overview of the deployment process
- Install Required Packages: Make sure you have the necessary tools and dependencies for building and deploying the Rasa application.
- Create an AWS EKS Cluster: Utilize the provided CloudFormation template (CFT) to establish an AWS EKS cluster, which will serve as the foundation for deploying your Rasa application.
- Set Up a Rasa Deployment Environment: Set up the EKS cluster to establish a dedicated Rasa deployment environment. This environment will provide you with the necessary resources to run your Rasa application smoothly.
- Deploy the Rasa Action Server (Optional): If your application requires custom actions, deploy the Rasa action server within the EKS cluster. The action server will be in charge of executing these custom actions.
- Deploy the Rasa Application: Once the environment is ready, deploy the Rasa application onto the EKS cluster. This will make your Rasa application accessible and ready to process user interactions.
By following these steps, you can successfully deploy your Rasa application on AWS EKS, allowing you to leverage Rasa’s power to create engaging and effective conversational AI experiences.
Install required packages
To install Kubectl, helm, and eksctl in your local environment, use the following command in your terminal.
Download and Install kubectl
# Download the kubectl binary curl -LO "https://dl.k8s.io/release/$(curl -L -s https://dl.k8s.io/release/stable.txt)/bin/linux/amd64/kubectl" # Apply execute permissions to the binary chmod +x ./kubectl # Add kubectl to the path mkdir -p $HOME/bin && cp ./kubectl $HOME/bin/kubectl # Add the export to bash profile echo 'export PATH=$HOME/bin:$PATH' >> ~/.bashrc # Execute the contents of bashrc which will add the kubectl to the path source ~/.bashrc # Verify installation kubectl version --short --clientDownload and Install eksctl
# Download the eksctl compressed file and extract it to /tmp sudo curl --silent --location "https://github.com/weaveworks/eksctl/releases/latest/download/eksctl_$(uname -s)_amd64.tar.gz" | tar xz -C /tmp # Move the extracted eksctl binary to the /usr/local/bin directory sudo mv /tmp/eksctl /usr/local/bin # Verify installation eksctl version
Download & Install helm
# Download the helm compressed file curl -fsSL -o get_helm.sh https://raw.githubusercontent.com/helm/helm/master/scripts/get-helm-3 # Change permission chmod 700 ./get_helm.sh # Install bash DESIRED_VERSION=v3.8.2 bash get_helm.sh
Create an AWS EKS cluster using the Cloud Formation template
On your local machine, create a yaml file called cluster.yaml. Copy and paste the following content into it. Please change the configuration like region, vpc Id, subnet Id, instanceType, and addons as per your requirement.
apiVersion: eksctl.io/v1alpha5 kind: ClusterConfig metadata: name: region: us-east-1 version: '1.28' annotations: kubernetes.io/ingress.class: alb vpc: id: subnets: private: us-east-1a: id: us-east-1b: id: privateCluster: enabled: false skipEndpointCreation: true nodeGroups: - name: labels: { role: workers } instanceType: m5.2xlarge desiredCapacity: 2 volumeSize: 80 privateNetworking: false addons: - name: aws-ebs-csi-driver version: latest - name: aws-vpc-cni version: latest - name: coredns version: latest - name: kube-proxy version: latest cloudWatch: clusterLogging: enableTypes: - all logRetentionInDays: 7
Run the command eksctl create cluster -f cluster.yaml to create the cluster.
Create an environment for Rasa deployment
# Create a new namespace kubectl create namespace # Install AWS LoadBalancer controller (Note: This is only mandatory for the provisioning of internal load balancer). curl https://raw.githubusercontent.com/kubernetes-sigs/aws-load-balancer-controller/v2.4.7/docs/install/iam_policy.json -o aws-load-balancer-controller-policy.json # Create an IAM Policy using the downloaded policy.json which will be used by the service account aws iam create-policy \ --policy-name RasaLoadBalancerControllerIAMPolicy \ --policy-document file://aws-load-balancer-controller-policy.json # Create a service account - It will give an identity to your Pods eksctl create iamserviceaccount \ --cluster= \ --namespace= \ --name=aws-load-balancer-controller \ --role-name RasaEKSLoadBalancerControllerRole \ --attach-policy-arn= \ --approve # Add EKS Helm chart repo to local Helm client. helm repo add eks https://aws.github.io/eks-charts # will fetch the chart index files helm repo update eks # Install the controller with the service account that is created in the above step helm install aws-load-balancer-controller eks/aws-load-balancer-controller \ -n \ --set clusterName= \ --set serviceAccount.create=false \ --set serviceAccount.name=aws-load-balancer-controller # verify the deployment - get all deployment details in the given namespace kubectl get deployment -n Deploy the Rasa action server in the EKS cluster (optional)
What is the Rasa action server?
A Rasa action server enables us to execute custom actions for a Rasa Open Source conversational assistant. Consider the Rasa action server to be the backend API for your Rasa application. When your Rasa assistant predicts a custom action (action_hello_world), the Rasa server sends a POST request to the action server with a JSON payload that includes the name of the predicted action, the conversation ID, the tracker contents, and the domain contents.
The Rasa server then returns the user’s responses and adds the events to the conversation tracker. Use the below-given Python code or the sample rasa action server code provided by the Rasa team.
class ActionHelloWorld(Action): def name(self) -> Text: return "action_hello_world" def run(self, dispatcher: CollectingDispatcher, tracker: Tracker, domain: Dict[Text, Any]) -> List[Dict[Text, Any]]: dispatcher.utter_message(text="Hello World!") return []
To deploy the basic Rasa action server, create a rasa-action-values.yaml file. Use Docker to deploy the Rasa action server separately, then install it in the EKS cluster using the provided rasa-action-values.yaml.
applicationSettings: port: 5055 scheme: http replicaCount: 1 image: name: tag: "1.0" repository: "" pullPolicy: Always service: type: NodePort port: 80 ingress: enabled: false
Save the file, and then use the helm command to deploy the Rasa action server.
# Add helm rasa repo helm repo add rasa https://helm.rasa.com # Install or Upgrade the rasa action server helm upgrade --install --namespace --values rasa-action-values.yaml rasa/rasa-action-serverIn the given namespace, use the following command to get the name of the deployed services for the Rasa action server.
kubectl get svc -n <namespace_name>To create an ingress resource for your action server, create a file named rasa-action-ingress.yaml.
apiVersion: networking.k8s.io/v1 kind: Ingress metadata: namespace: rasa name: annotations: alb.ingress.kubernetes.io/scheme: internal alb.ingress.kubernetes.io/target-type: ip alb.ingress.kubernetes.io/subnets: kubernetes.io/ingress.class: alb #By default the ingress(ALB) will be open to all ports and IPs. To connect with only the rasa application give VPC CIDR ips in which the eks cluster resides. alb.ingress.kubernetes.io/inbound-cidrs: spec: ingressClassName: alb rules: - http: paths: - path: / pathType: Prefix backend: service: name: port: number: 80
For the rasa action server, create an ingress resource using helm and the above-given yaml.
# Create an ingress (internal ALB) for rasa action kubectl apply -f rasa-action-ingress.yaml # get the internal action server ALB hostname (this URL is needed) kubectl get -f rasa-action-ingress.yaml -o jsonpath="{.status.loadBalancer.ingress[0].hostname}"Deploy the Rasa application in the EKS cluster
To deploy the basic Rasa action server, create a rasa-values.yaml file.
applicationSettings: debugMode: true trainInitialModel: true port: 5005 scheme: http enableAPI: true credentials: enabled: true replicaCount: 1 autoscaling: enabled: false serviceAccount: create: false ingress: enabled: true annotations: alb.ingress.kubernetes.io/subnets: # remove the below-given section if not needed tls: - secretName: chart-example-tls hosts: - chart-example.local pathType: Prefix path: / hostname: "chart-example.local" command: ["/bin/sh", "-c", "rasa run --cors * --enable-api -vv"] registry: docker.io/rasa image: name: rasa tag: "3.2.6" pullPolicy: Always service: type: NodePort port: 443 # can change it to 80 for HTTP and remove the tls section from ingress if you don't want to deploy your app in HTTPS(443) # Avoid the below-given code if you are not using the rasa-action server rasa-action-server: install: false external: enabled: true url: "/webhook" action: endpointURL: "/webhook"# Install or Upgrade the rasa application (rasa/rasa helm chart) using rasa-values helm upgrade --install --namespace rasa --values rasa-values.yaml rasa/rasaCreate an ingress resource for the Rasa application using the following yaml file.
apiVersion: networking.k8s.io/v1 kind: Ingress metadata: namespace: rasa name: annotations: alb.ingress.kubernetes.io/scheme: external alb.ingress.kubernetes.io/target-type: ip alb.ingress.kubernetes.io/subnets: kubernetes.io/ingress.class: alb spec: ingressClassName: alb rules: - http: paths: - path: / pathType: Prefix backend: service: name: port: number: 80Save the file and deploy the ingress resource.
# Create an ingress (internal ALB) for rasa kubectl apply -f rasa-ingress.yaml # get the rasa internal ALB hostname kubectl get -f rasa-ingress.yaml -o jsonpath="{.status.loadBalancer.ingress[0].hostname}" # some useful commands kubectl get all -n # List all resources in the given namespace kubectl delete ingress -n # delete the ingress resource in the given namespace kubectl describe ingress -n # delete the ingress resource in the given namespace kubetcl get logs -f -n # Get the logs of the given pod kubectl describe -n # Gives the details of the given pod kubectl logs -n -c # Get the logs of the container in the given pod
Now that we have our Rasa application, we can connect it to our Rasa action server. Use Postman to test the connection, or use the curl command in your terminal.

Conclusion
Voila! We have successfully built our first chatbot. In this blog, we walked through the process of creating a chatbot using Helm charts, deploying the application in an EKS (Elastic Kubernetes Service) cluster, and exposing it to the public through an AWS load balancer.
Additionally, you can easily integrate the chatbot into any application or use it as a standalone service. You can interact with it through its API, which opens up a wide range of possibilities for further development and customization.
This setup ensures high availability, flexibility, and the ability to scale as your chatbot grows. You now have the foundational architecture to support future improvements, whether your plans involve extending its functionality, integrating it with other services, or enhancing its AI capabilities.
With the deployment in place, you are ready to expand this chatbot’s use cases and continue enhancing its capabilities. Happy coding!
Reference
- https://rasa.com/docs/rasa/deploy/deploy-rasa/
- https://docs.aws.amazon.com/eks/latest/userguide/helm.html
- https://docs.aws.amazon.com/prescriptive-guidance/latest/patterns/deploy-kubernetes-resources-and-packages-using-amazon-eks-and-a-helm-chart-repository-in-amazon-s3.html
- https://kubernetes.io/docs/reference/kubectl/quick-reference/