Welcome to the final part of the multitenancy blog series. Before we proceed with this blog, let’s review some prerequisite checklists for AWS services. AWS Organizations, Step functions, Lambda functions, Elastic Container Services, the API gateway, the Cognito user pool, CloudFront, the code pipeline, the code build, IAM Identity Center, and VPC peering are all involved.
In this use case, a centralized RDS, our own API gateways, and Cognito user pools will isolate and segregate the hospital/organization from other tenants/hospitals.
Use case consoles:
- SuperAdmin: a portal for onboarding and managing tenants
- Hospital: separate tenant console
For general governance purposes, we will use AWS organizations for overall policy enforcement.
AWS Account Structure
- Super Admin Account – The high-level AWS account architecture described involves a centralized main account hosting the primary database RDS clusters and Super Admin components, including Lambdas and API Gateway. This main account acts as the core infrastructure hub. We deploy a super admin UI console here to onboard and manage the tenants.
- This account will hold two databases,
- one for tenant configuration management – DynamoDB table
- It contains the tenant’s deployed resource details, the hosted website’s S3 bucket name, the deployed API gateway ID, and so on.
- Another database, the RDS database, will be used for managing tenant application details.
- It contains the tenant’s user details and the application’s SQL schema based on relationships.
- one for tenant configuration management – DynamoDB table
- This account will hold two databases,
- Tenant Account – This will be the newly onboarded account, or org. Each organization or tenant automatically generates these tenant accounts upon creation. Each tenant account will use network peering to share access to the main account’s central database, ensuring secure data segregation between tenants.
- We will utilize a cross-account role with the necessary permissions to create new tenant accounts efficiently and securely. The central management account manages this role, simplifying and safeguarding the account creation process.
- DevOps Account – A centralized account for DevOps. Here, we primarily handle all source code in the form of code commit repos and pipeline-related tasks. All tenants are integrated into a single, end-to-end pipeline that collects source repositories, builds them at each stage of each tier, such as the backend and API services, and finally deploys them all together in the UI build. Rather than having a tier-wise pipeline, a tenant-wise pipeline will help customize each org individually whenever a change request arises to a specific org.
- Owner account – An account will be used to centrally maintain all the AWS accounts/orgs created via AWS organizations. We will use an IAM Identity Center to grant appropriate access to the accounts. This account also provides overall cost management across all organizations.
- Networking account – Each org will use this account as a VPC peering account, establishing a VPN connection to access databases for the backend developers. The lack of transitive routing in AWS VPC Network Peering prevents one org from connecting to another, thereby ensuring secure data sharing.
- Production account – We can set up an account to host a dedicated hosting zone specifically designed for providing domain names with Route53 records. We can arrange the org domain names so that each tenant owns its subdomain and can verify any ACM requests it creates. Hence, each org will have a separate domain for the console.
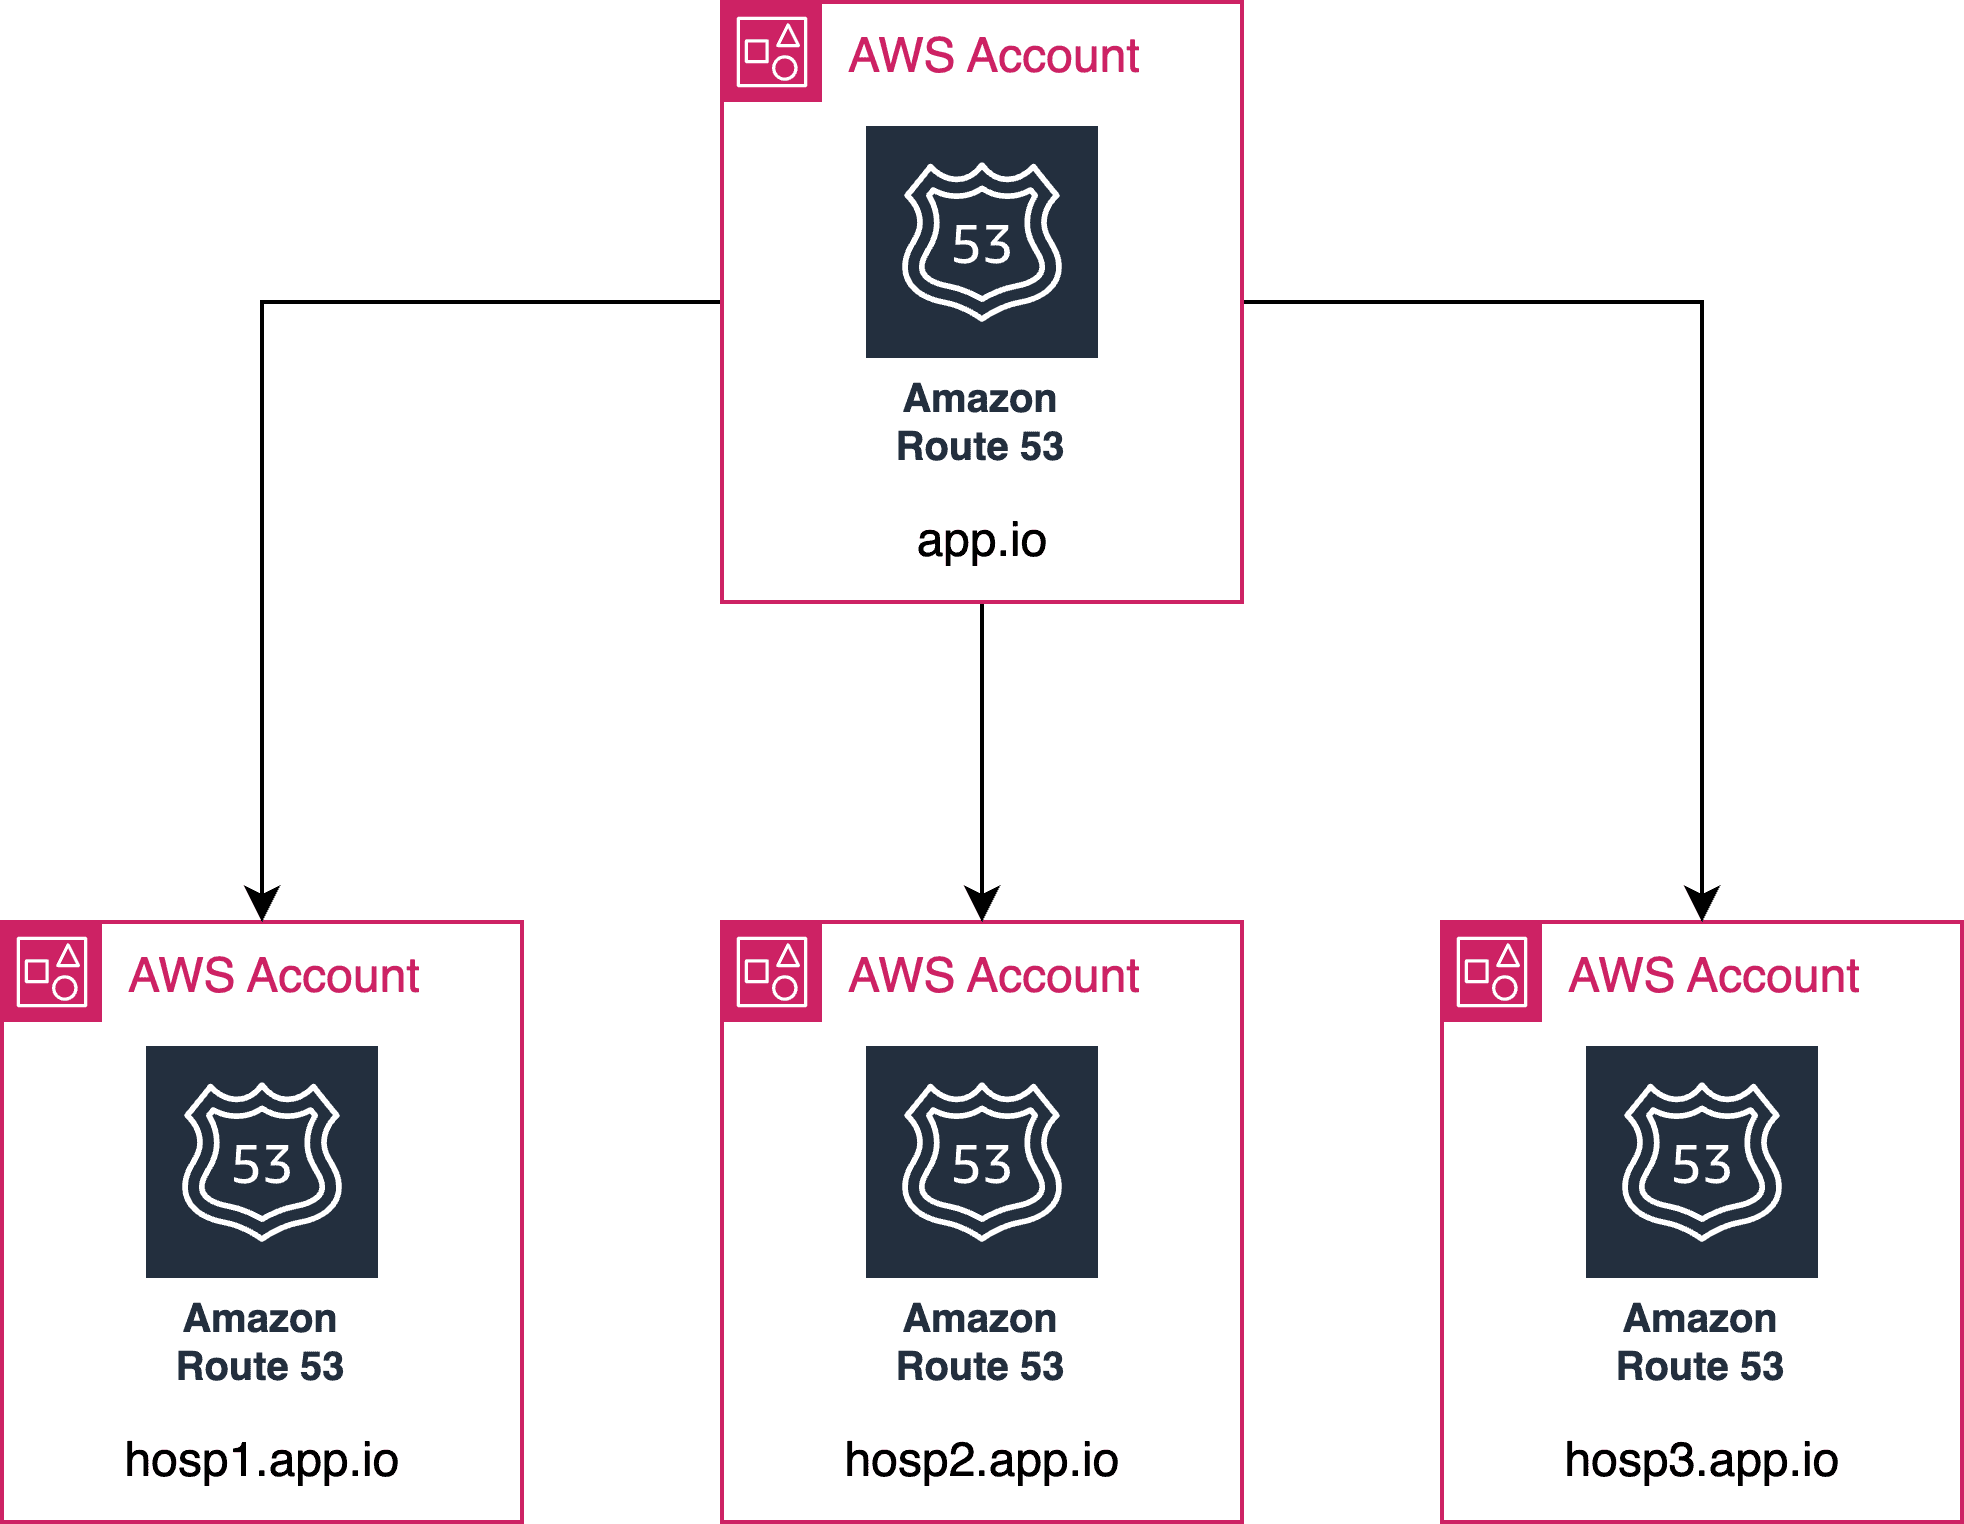
In summary, this architecture utilizes a central management account to supervise core services and automatically generates tenant-specific accounts as required. Network peering ensures secure data sharing, and the use of cross-account roles streamlines the creation of new tenant accounts. This design promotes scalability, security, and efficient management in a multi-tenancy environment.
Tenant Architecture:
- Frontend Website Hosting: We have successfully hosted the frontend website on the s3 bucket (tenant account), enabled static web hosting, mapped it to the CloudFront distribution for global reach, and mapped this CloudFront (tenant account) domain to the original domain record in route53 (production account)
- The backend RDS database
- Every tenant account will have an APIs Api gateway with Lambda, which is consolidated into a single proxy API gateway.
Domain Structure
We will use a super admin console for tenant onboarding, which will feature the same resource setup and pipeline setup as the tenant architecture for deploying the console changes. We will host a domain for each tenant console. Each console will have a separate login for the corresponding account, backed up by AWS Cognito. Let’s now add this new tenant to our application.
Example Domain: app.io
Superadmin: superadmin.app.io
Tenant: tenant1.app.io
Org Onboarding
From the super admin console [superadmin.app.io], you will have the option to add an organization with inputs such as the tenant name and domain URL of that tenant.
Once submitted, this will trigger the step function that automates the whole process in the super admin account.
An efficient solution is to back up each step-in-step function with a lambda function or an ECS task. We will consider a lambda function here for easy implementation.
- Account Creation: With the help of the existing cross-account role, this step will create an AWS account in the owner account, which will get automatically added to the organizational unit.
- Role waiter: With this newly created account, create a cross-role for resource deployments such as S3 buckets and API gateways.
- Wait Policy: Verify the AWS account’s setup and cross-account role. Once we confirm this, we can proceed with the subsequent deployment steps.

- Network Setup – This step involves creating a VPC with public and private subnets for database connections and attaching a static IP to the NAT gateway. Prior to the VPC setup, we already had a networking account set up, which is now ready for peering. This step handles all CIDR overlapping edge cases for peering purposes. Finally, this step establishes a successful peering connection with the VPN connection’s networking account.
- ACM Setup, WAF Setup, S3 Cloud Setup – Th These three steps help to successfully deploy the S3 hosted UI in CloudFront.
- First, create an ACM certificate in the tenant account using the domain URL from route 53’s user interface.
- Next, we create a Web Application Firewall for CloudFront security purposes.
- Finally, S3Cloudsetup will create corresponding origins with the S3 URL as an endpoint.
- Next, we map the CloudFront URL to the Route53 record in the production account, using the domain URL we created in the first step.
- Now, the UI console will be accessible from the input domain URL. However, this page remains empty as it lacks any UI source code or application configuration.
- PrereqResourcesLambda – This step will provision any necessary resources for the application. Let’s say a Simple Email Service (SES).
- Up until this step, everything occurs from the super admin account to the tenant.
- PipelineUpdateLambda – When it comes to the multi-tenancy pipeline, we’ll use the same buildspec for many accounts; thus, we’ll need both common and tenant-specific variables. But in each pipeline, we will have to make the tenant variables dynamic. In order to tackle this issue, we have established a DynamoDB table record specifically for this tenant, where we have recorded all the necessary tenant details. We will then dynamically update these details as environment variables in the pipelines for those tenants. This will also trigger a step function in the DevOps account for creating the tenant-specific pipelines, where we will deploy the RDS DB schemas, queries, and API gateway resources.
Integrated Pipeline setup:
As mentioned in our earlier blog – Part 1, this architecture will have an integrated pipeline for each tenant rather than a tier-wise pipeline, which will be more helpful in customizing for an individual tenant.
- The source commit will collect all the repos
- The data phase will encompass the database and backend deployments.
- The service will feature API gateway lambda deployments.
- The UI will construct and generate the UI artifacts, then upload them to the previously created S3 bucket that integrates with CloudFront.
Now, the console is readily available at the requested domain URL, tenant1.app.io.
Org Off-boarding:
To Off-board an org,
- We have the ability to suspend the AWS account instantaneously, but it might not be accessible right away due to specific resource constraints, like AWS’s 30-day suspension limit on only 10% of accounts. In such a case, we will clean up the billable resources with a cleanup script.
- Cleaning the RDS super admin account’s schema and DynamoDB records is necessary.
- Pipeline deletion in the DevOps account
- Peering connections in a networking account
- Route53 records in the production account
Conclusion:
Real-time tenant separation will only be possible with a fully serverless architecture and an AWS multitenancy per account model. This makes it excellent for managed service providers and SaaS programs that require security and data isolation. It provides tenants with control over their resources and configurations while centralizing administrative tasks.


