
In today’s cloud-centric environment, managing file storage efficiently between EC2 instances and Amazon S3 is crucial. Both S3FS and AWS S3 File Gateway offer effective solutions for synchronization, but they serve different purposes and come with distinct features. This guide provides a detailed comparison and setup instructions for both methods, helping you choose the right approach for your needs.
S3FS: A Simple Solution for Mounting S3 Buckets
S3FS is a FUSE file system that allows you to mount an Amazon S3 bucket as a local file system, behaving like a network-attached drive. This setup facilitates access to S3 data from an on-premises server without storing anything locally.
FUSE, or Filesystem in Userspace, offers a straightforward interface for userspace programs to export virtual file systems to the Linux kernel. It ensures a secure means for non-privileged users to create and mount their file system implementations.
The S3fs-fuse project, written in Python and backed by Amazon’s Simple Storage Service (S3), leverages the capabilities of Amazon’s open API, allowing various companies to build applications on top of this service via different interfaces such as web, rsync, and fuse.
Here are the steps to set up S3FS in a Linux OS:
Step 1: Generate Keys for Programmatic Access
Create an IAM user with full access privileges to the S3 bucket. Generate an ACCESS KEY and SECRET ACCESS KEY for CLI, curl command, or Java code access.
Step 2: Update the System
Ensure your system is up to date with:
sudo yum updateStep 3: Install Dependencies
Install necessary dependencies:
sudo yum install automake fuse fuse-devel gcc-c++ git libcurl-devel libxml2-devel make openssl-develStep 4: Clone and Install S3FS Source Code
Clone the s3fs source code from GitHub:
git clone https://github.com/s3fs-fuse/s3fs-fuse.gitNavigate to the cloned repository and install the code:
cd s3fs-fuse
./autogen.sh
./configure --prefix=/usr --with-openssl
make
sudo make install
Step 5: Check S3FS Installation
Confirm the installation path of s3fs by using the following command:
which s3fsStep 6: Use Access Keys
Create and edit a file to store access keys:
sudo touch /etc/passwd-s3fs
sudo nano /etc/passwd-s3fs
# Paste the access key and secret key in the format: {ACCESS_KEY}:{SECRET_ACCESS_KEY}
Step 7: Adjust File Permissions
Change the permissions of the file:
sudo chmod 640 /etc/passwd-s3fs Step 8: Mount the S3 Bucket
Create a directory for mounting and mount the S3 bucket:
sudo mkdir <mounted-path>
sudo s3fs <bucket-name> -o use_cache=/tmp -o allow_other -o uid=1001 -o mp_umask=002 -o multireq_max=5 <mounted-path>
Parameters:
- <mounted-path>: The directory path where the S3 bucket will be mounted.
- <bucket-name>: The name of the S3 bucket.
Step 9: Verify Mounting
Check if the S3 bucket is mounted:
df -Th
df -Th <mounted-path>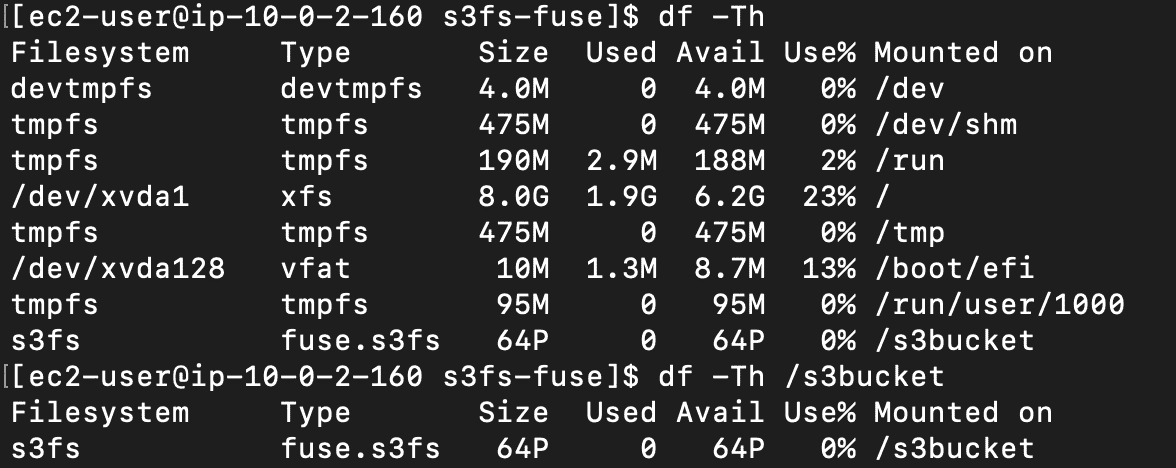
Figure 1—The image shows that s3fs is successfully mounted on /s3bucket.
Step 10: Test Mounting
Test the mounted S3 bucket by navigating to it and listing its contents:
cd <mounted-path>
ls
Figure 2—The image displays the list of existing files in the S3 bucket when using the ls command in the mounted path.
Step 11: Create a Test File
Create a test file within the mounted S3 bucket:
sudo echo "this is a test file to check s3fs" | sudo tee test.txt
ls
This process ensures successful mounting and testing of the S3 bucket, enabling seamless integration with existing applications.
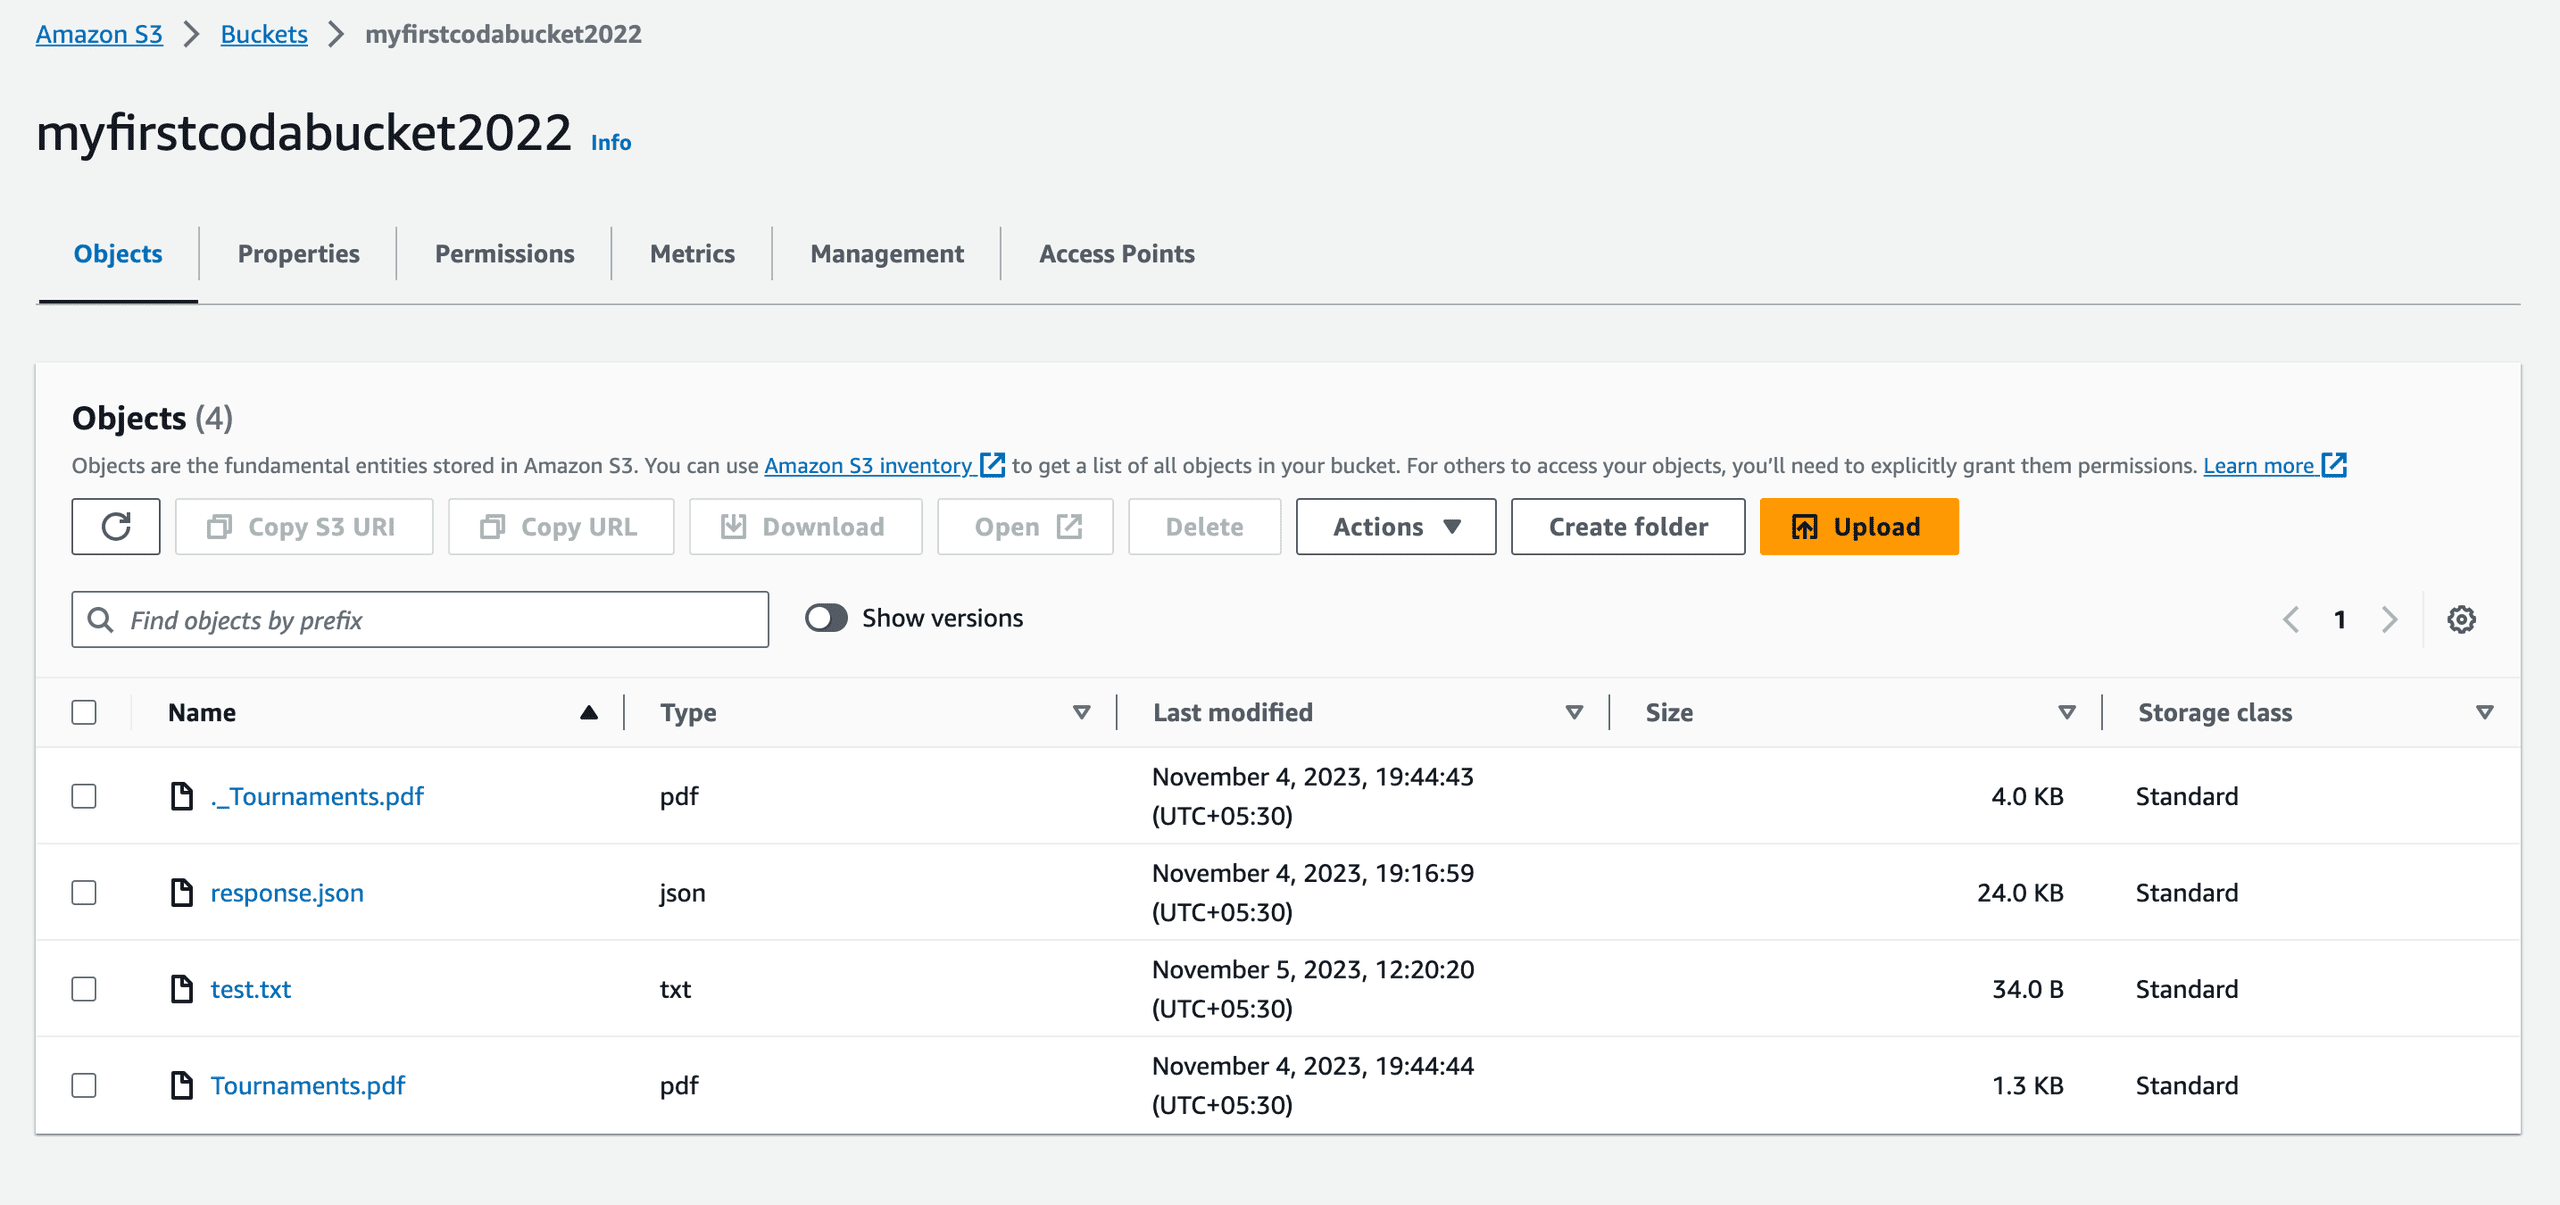
Figure 3—The image shows the S3 bucket containing the newly created test.txt file.
AWS S3 File Gateway: Advanced Integration with Amazon S3
AWS S3 File Gateway is a hybrid cloud storage service that provides on-premises applications with secure and efficient access to Amazon S3 cloud storage. It allows you to use S3 as a file system for your on-premises applications, enabling you to store and retrieve objects in S3 using standard file protocols like NFS or SMB.
In this setup, instead of on-premises hardware, we use an EC2 instance to serve as an NFS client to integrate with Amazon S3.
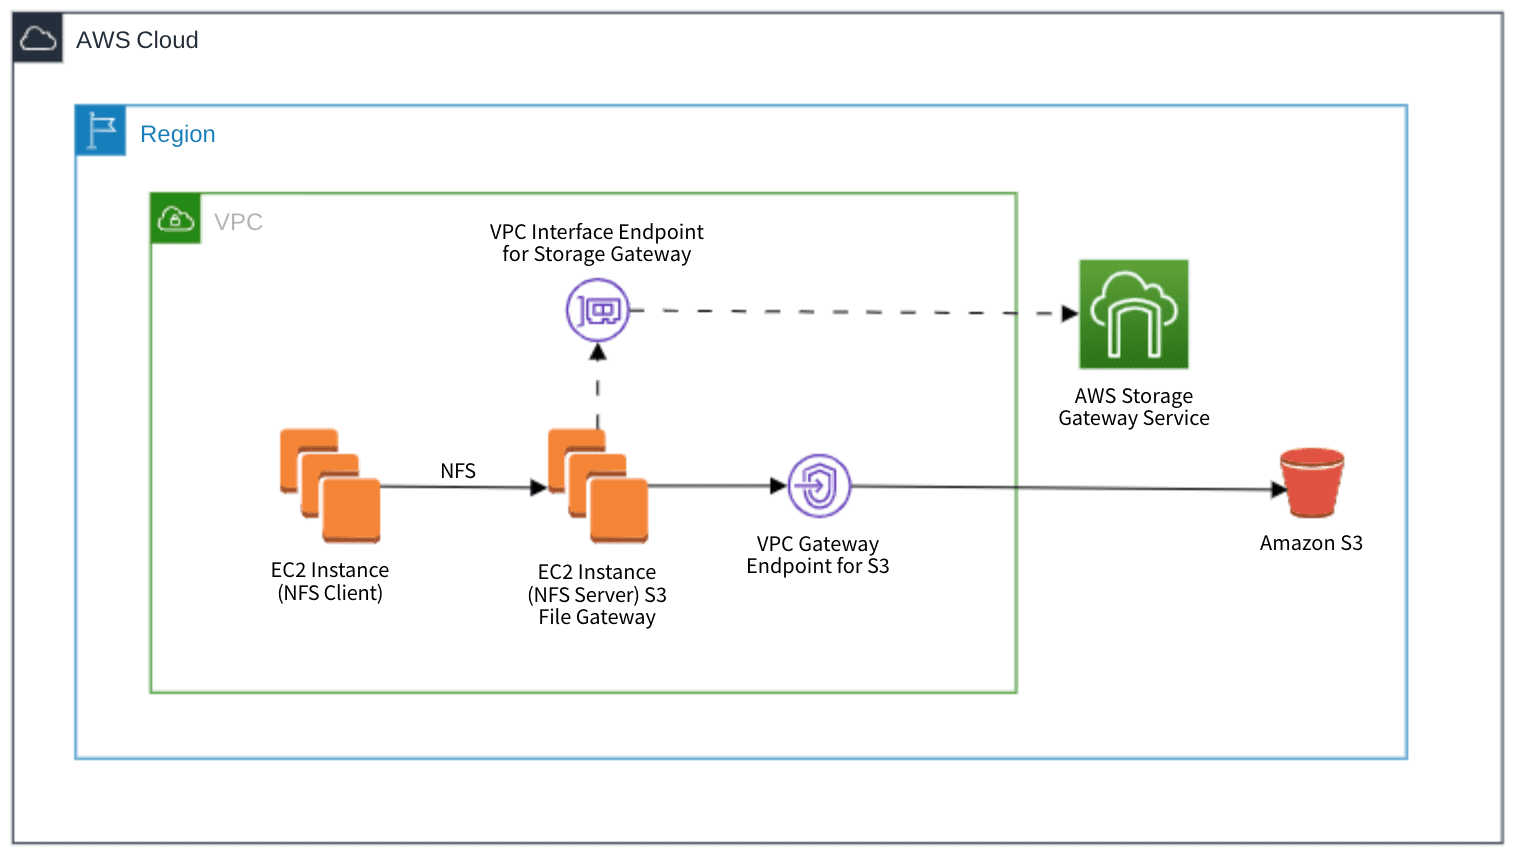
Figure 4—The architecture diagram illustrates synchronization with S3 via a private network using VPC endpoints.
Setup Overview
To deploy AWS S3 File Gateway with EC2 instances, we need a well-defined setup:
1. VPC Configuration:
- Two public subnets
- Two private subnets
- One Internet gateway
- One NAT gateway
2. EC2 Instances:
- Two EC2 instances are required.
- NFS Client: Transfers files to the S3 bucket via the NFS server.
- NFS Server: Hosts the S3 File Gateway.
NFS Client Configuration
- AMI: Amazon Linux AMI
- Subnet: Public
- Security Group: Configured to allow SSH (port 22) traffic.
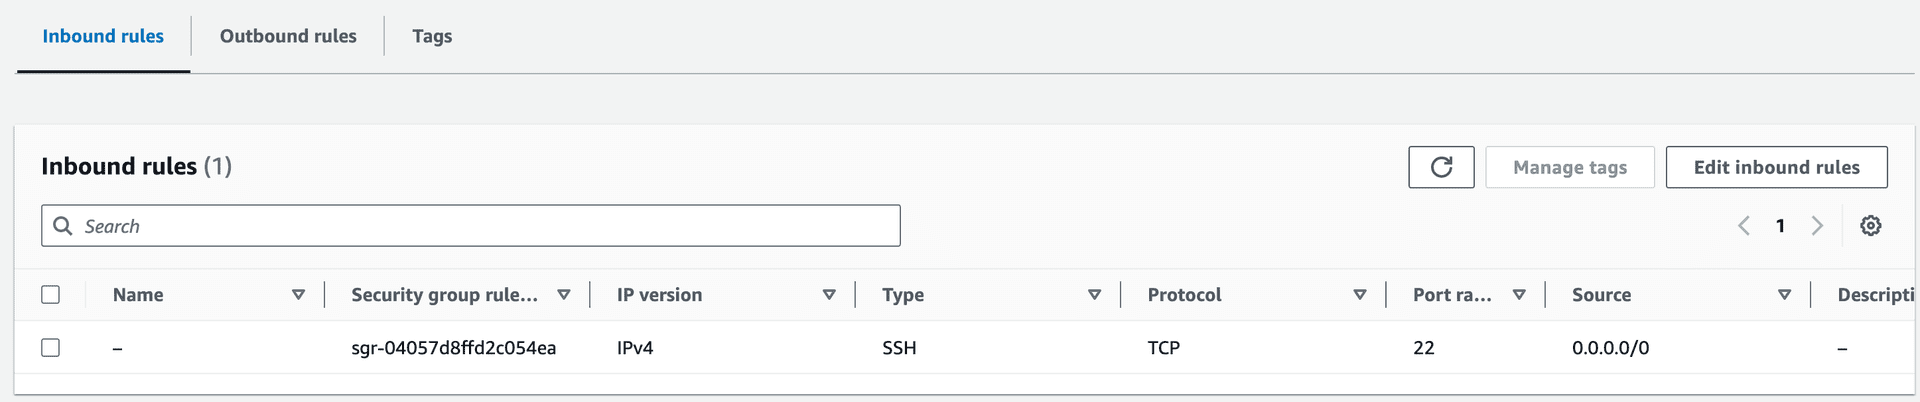
Figure 5—Security Group of NFS Client allowing SSH traffic from all ports.
NFS Server Configuration
- AMI: AWS Storage Gateway AMI (FILE_S3-1.24.3)
- Subnet: Private
- Security Group: Permits traffic from the NFS client’s security group on HTTP (port 80) and NFS (port 2049).
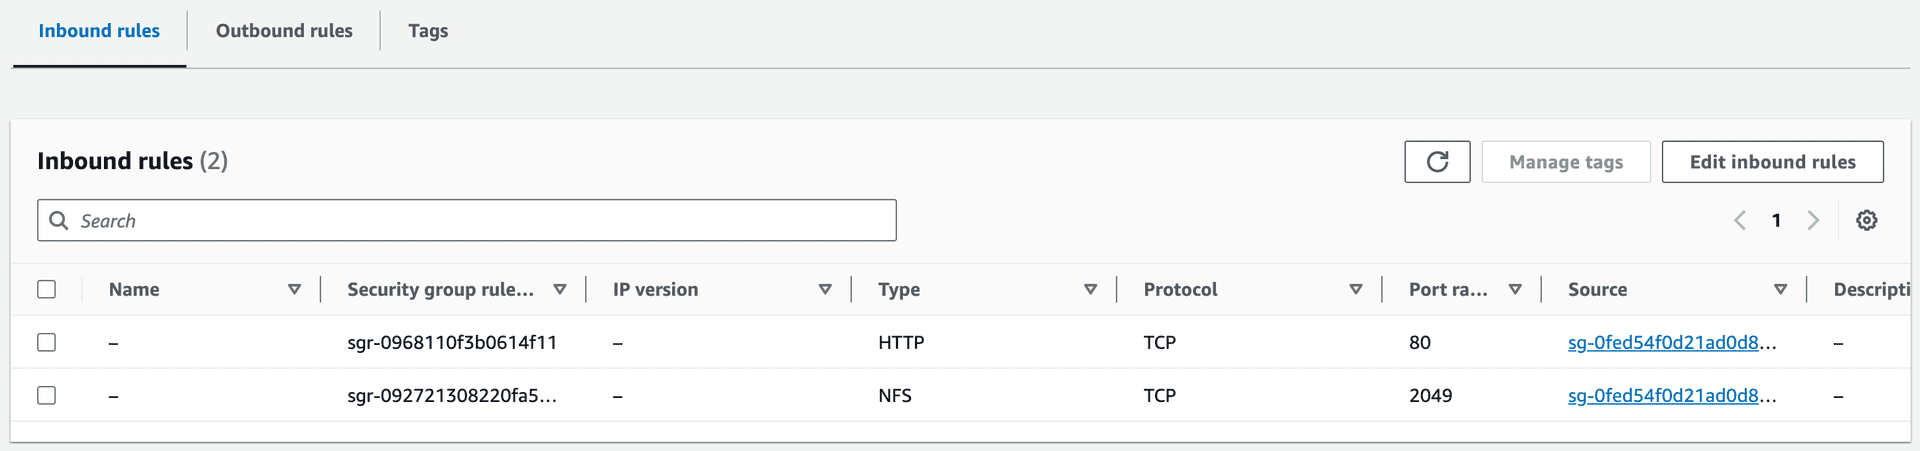
Figure 6—Security Group of NFS Server Allowing HTTP and NFS Traffic from NFS Client’s Security Group
- Instance Size: At least m5.xlarge
- Storage Configuration: 150 GiB EBS volume for cache (including root volume).
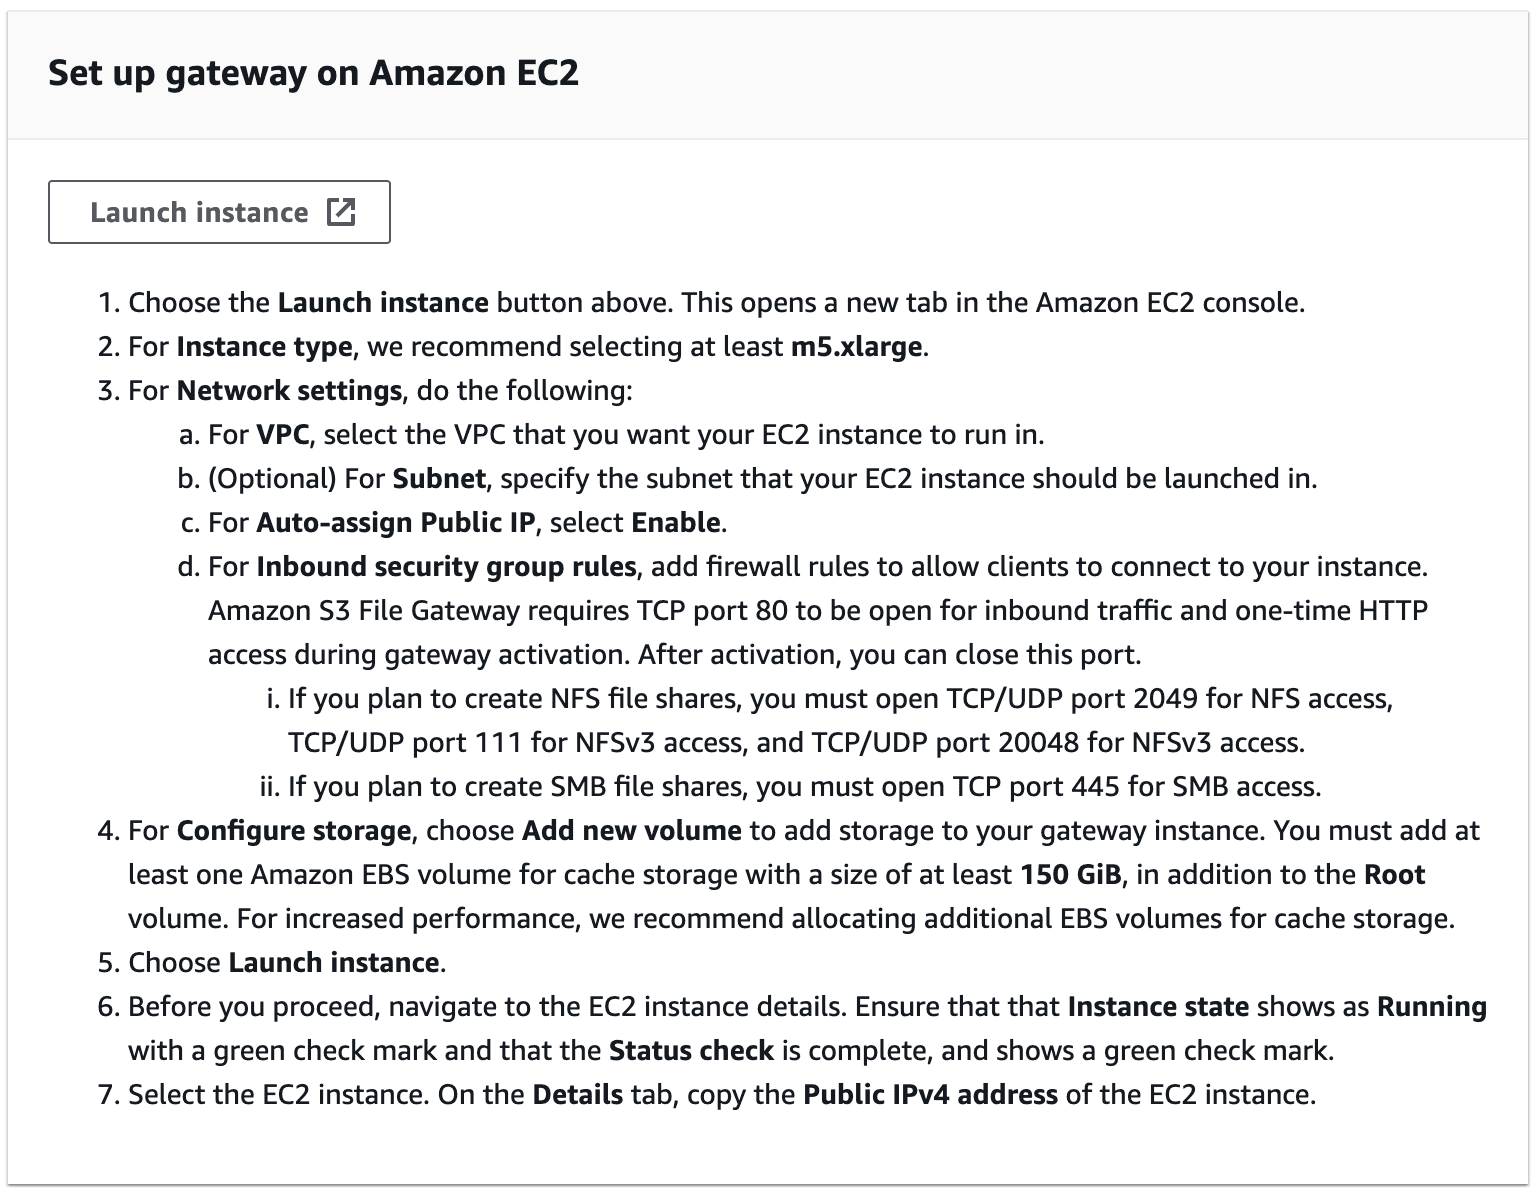
Figure 7—Requirements of the NFS Server provided in the AWS Console while creating the S3 File Gateway.
VPC Endpoint Creation
1. AWS Storage Gateway Service:
-
- Create an interface VPC endpoint for Storage Gateway in private subnets.
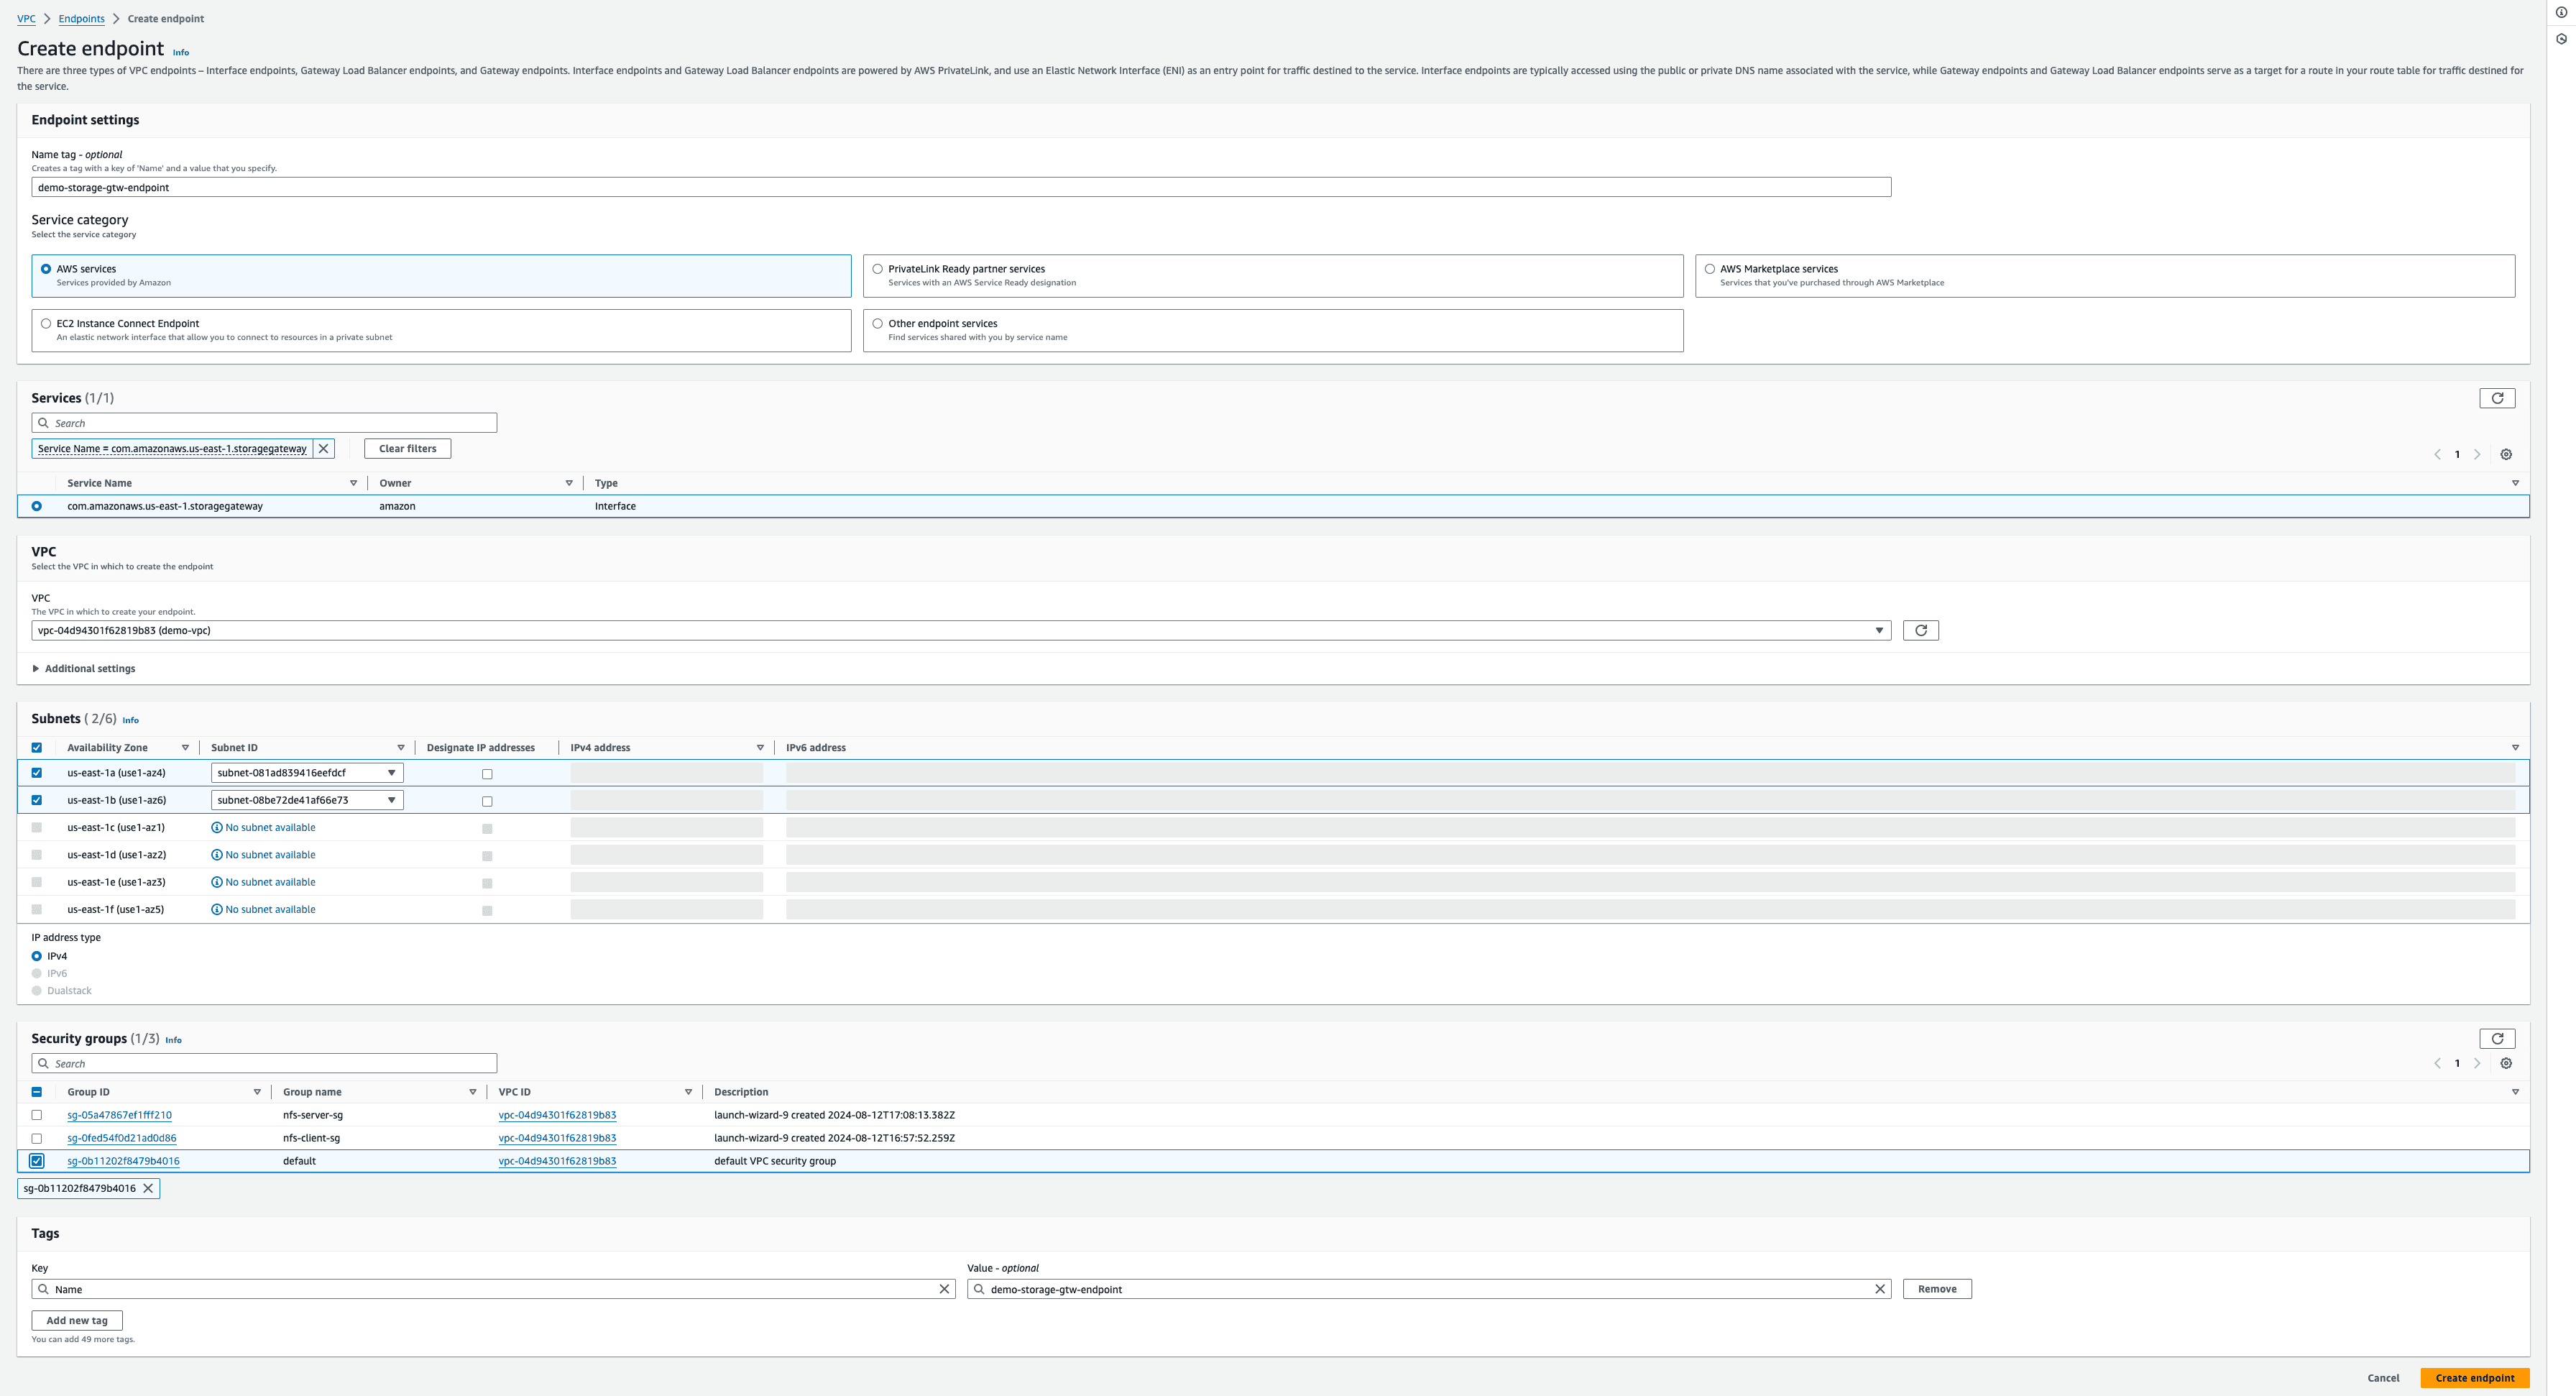
Figure 8—The image demonstrates steps to create a VPC Endpoint for AWS Storage Service.
-
- Ensure that the security group associated with the VPC endpoint allows traffic from the security group of the NFS server.
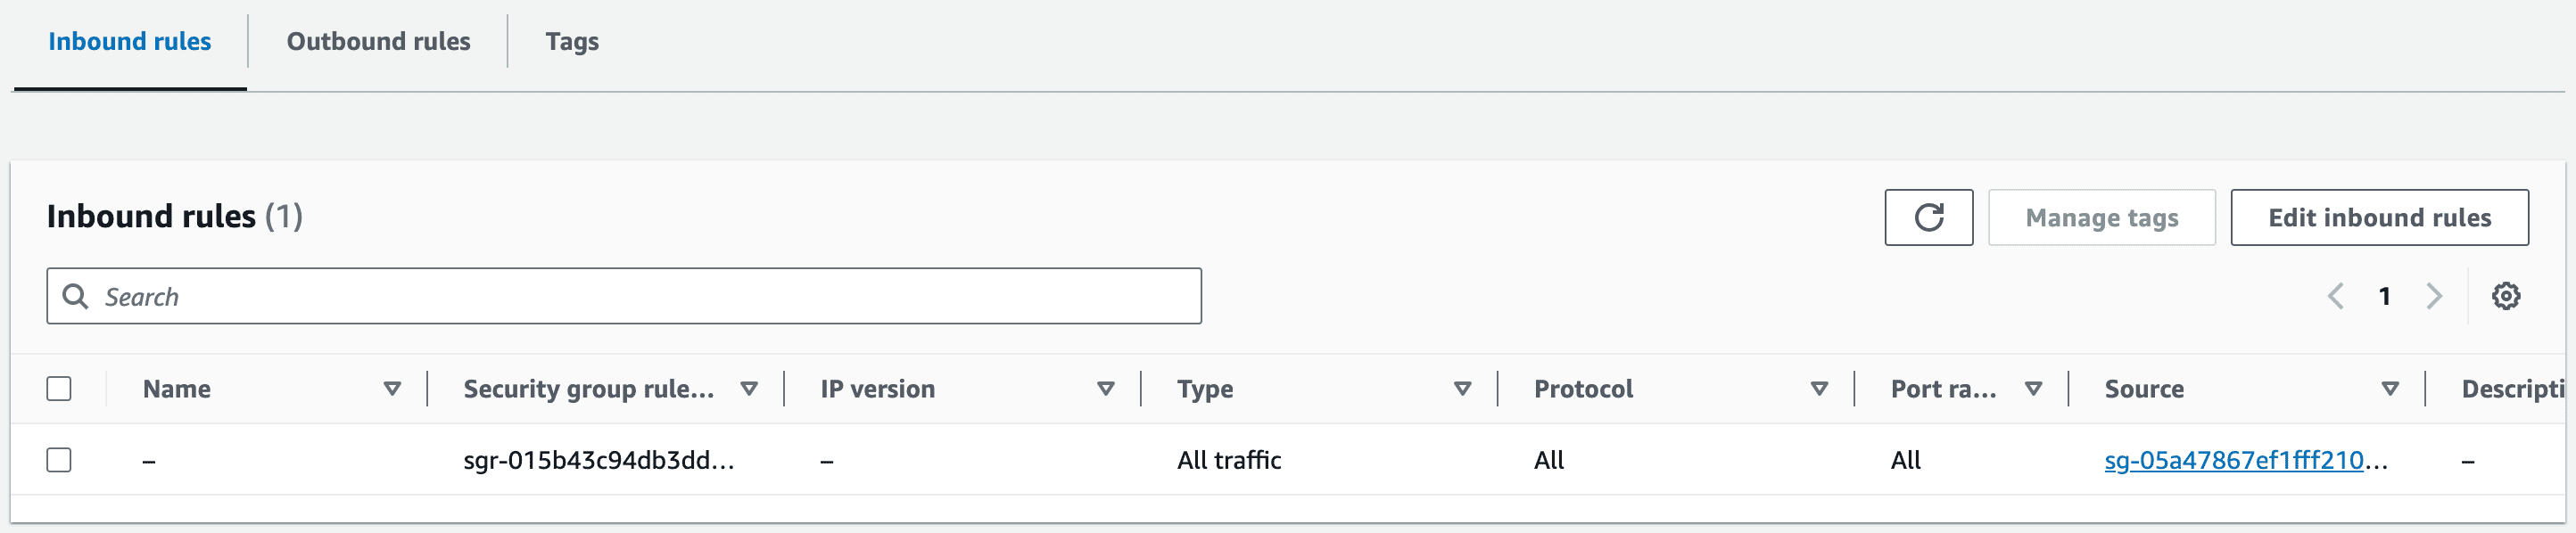
Figure 9—Security Group of VPC Endpoint for Storage Gateway allowing all traffic from the NFS Server’s Security Group
2. Amazon S3:
-
- Create a gateway VPC endpoint for S3 with appropriate route tables in private subnets for access to S3.

Figure 10—The image demonstrates steps to create a VPC endpoint for Amazon S3.
Retrieve the NFS Server Private IP
Access the NFS server to obtain its private IP address.
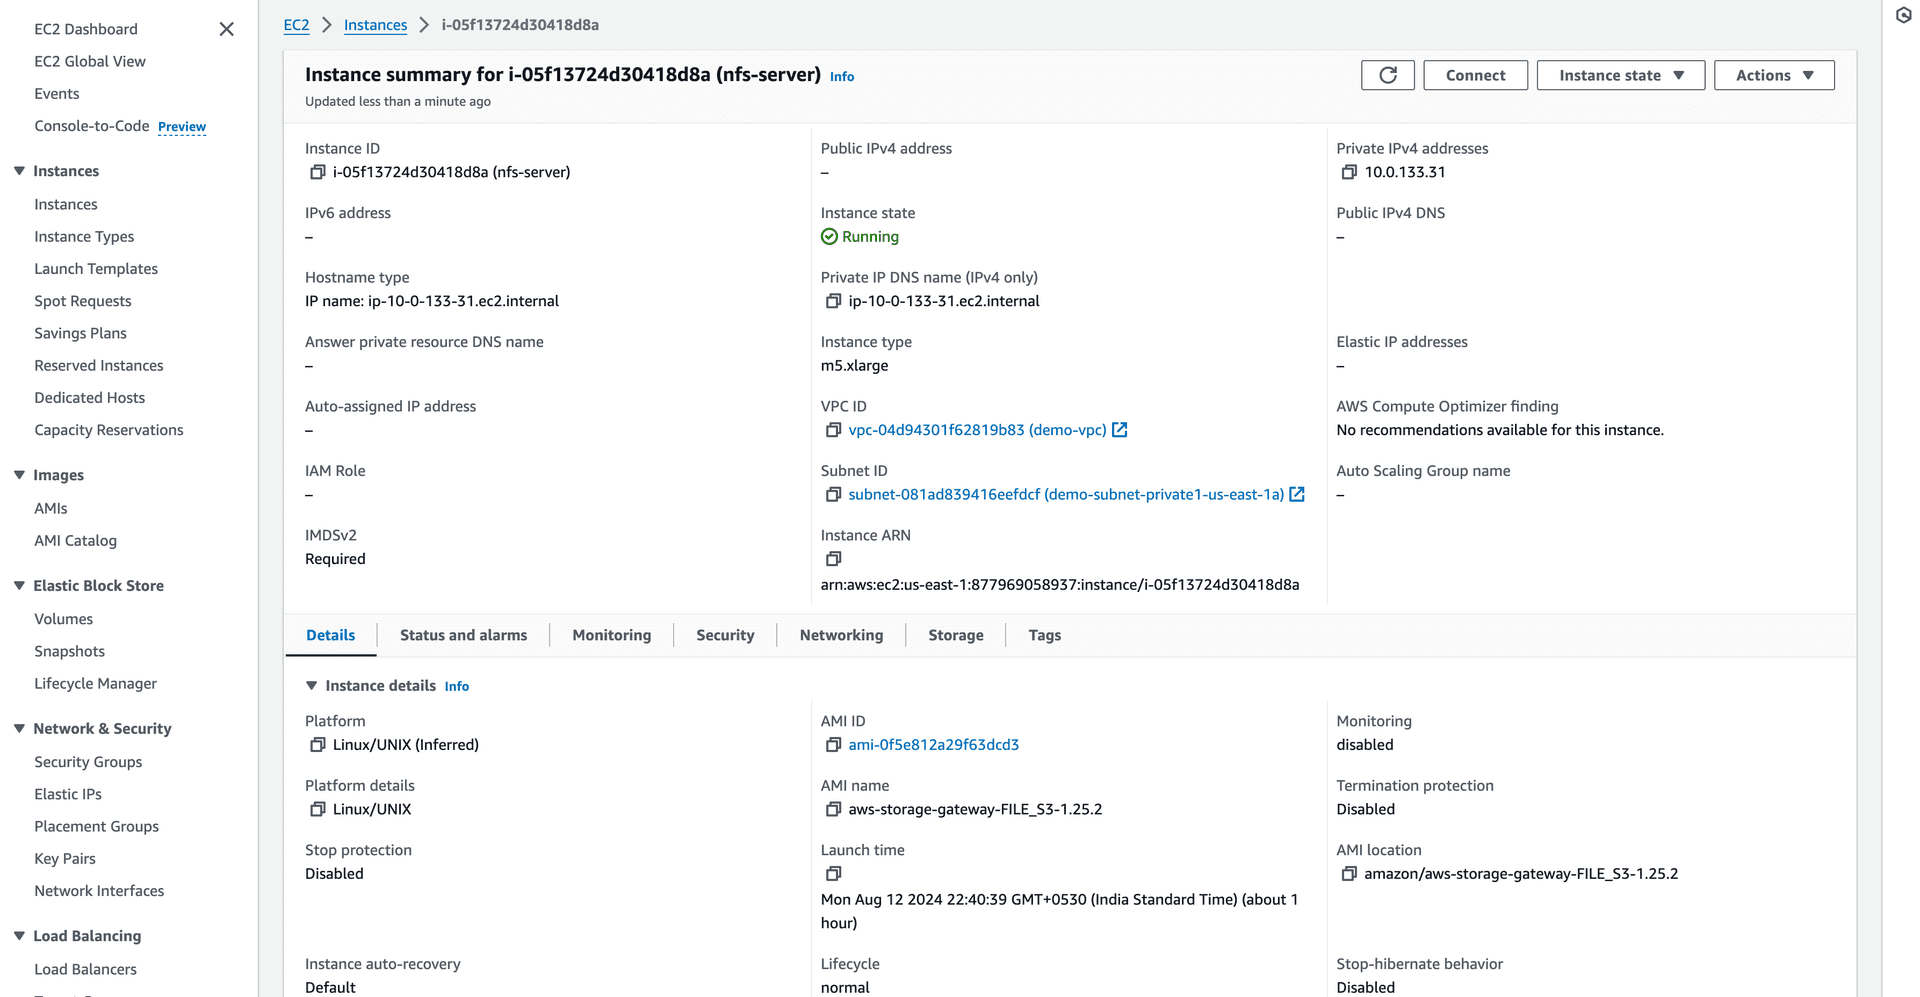
Figure 11—Copy the private IP address of the NFS server from the AWS Console.
Generate Activation Key
- SSH into the NFS client.
- Execute the following command:
curl "http:///?gatewayType=FILE_S3&activationRegion=&vpcEndpoint=&no_redirect" Parameters:
-
<nfs-server-private-ip>: Private IP address of the NFS server.- <
aws-region>: AWS region where the gateway is deployed. - <
dns-of-interface-endpoint-of-storage-gateway>: DNS name of the VPC interface endpoint for the Storage Gateway.
- Capture the activation key provided in the response.

Figure 12—The image displays the command executed on the NFS client and the resulting activation key.
Create AWS S3 File Gateway
Configure the gateway with the following settings:
- Host Platform: EC2 (NFS Server)
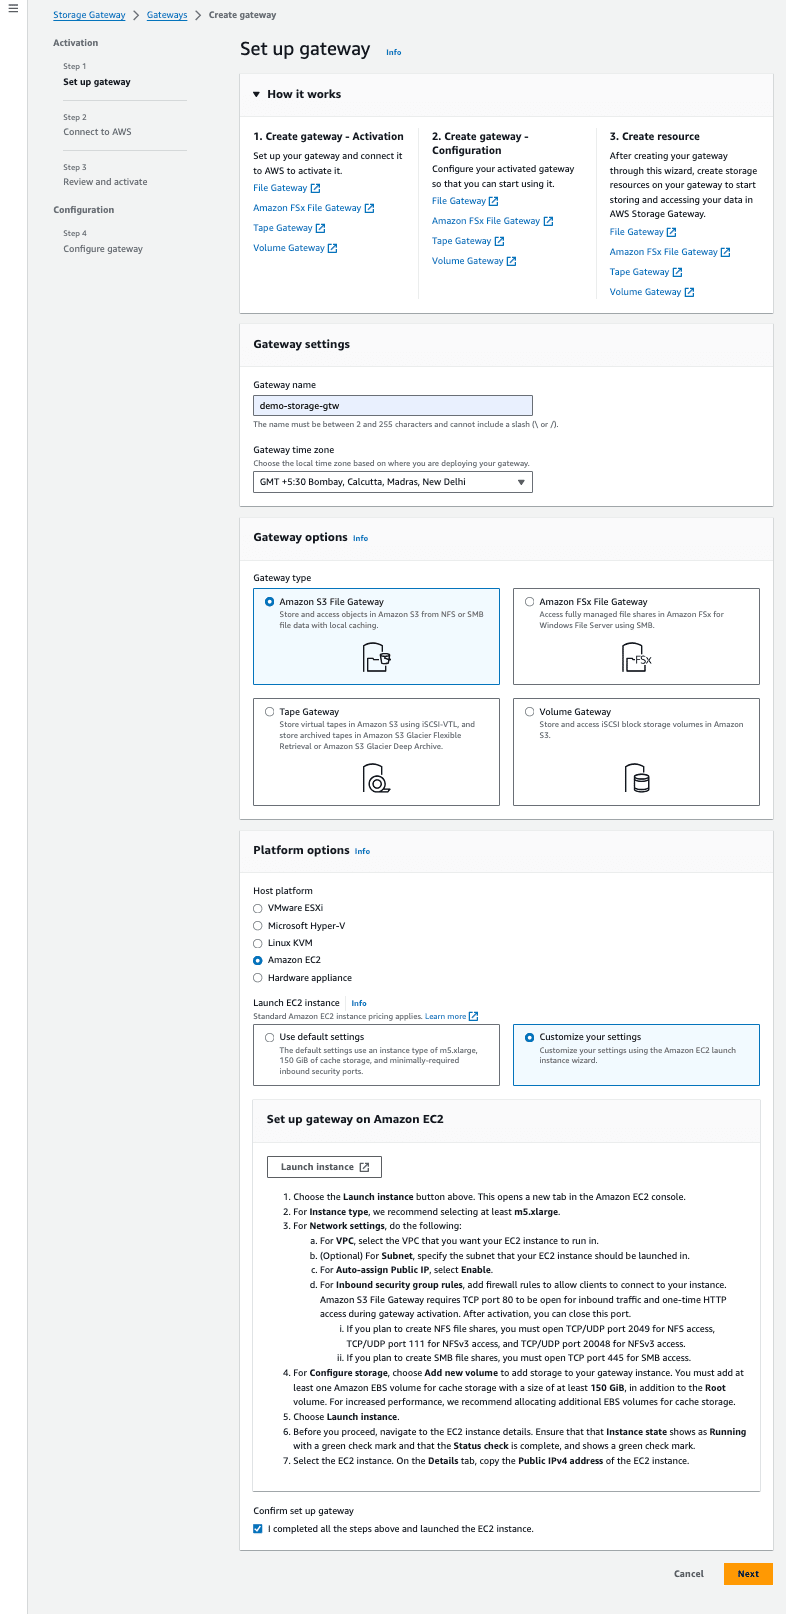
Figure 13 – Step 1: Set up Gateway – Initial steps to create AWS S3 File Gateway
- Connection Option: Activation Key
- Activation Key: Paste the key obtained earlier.
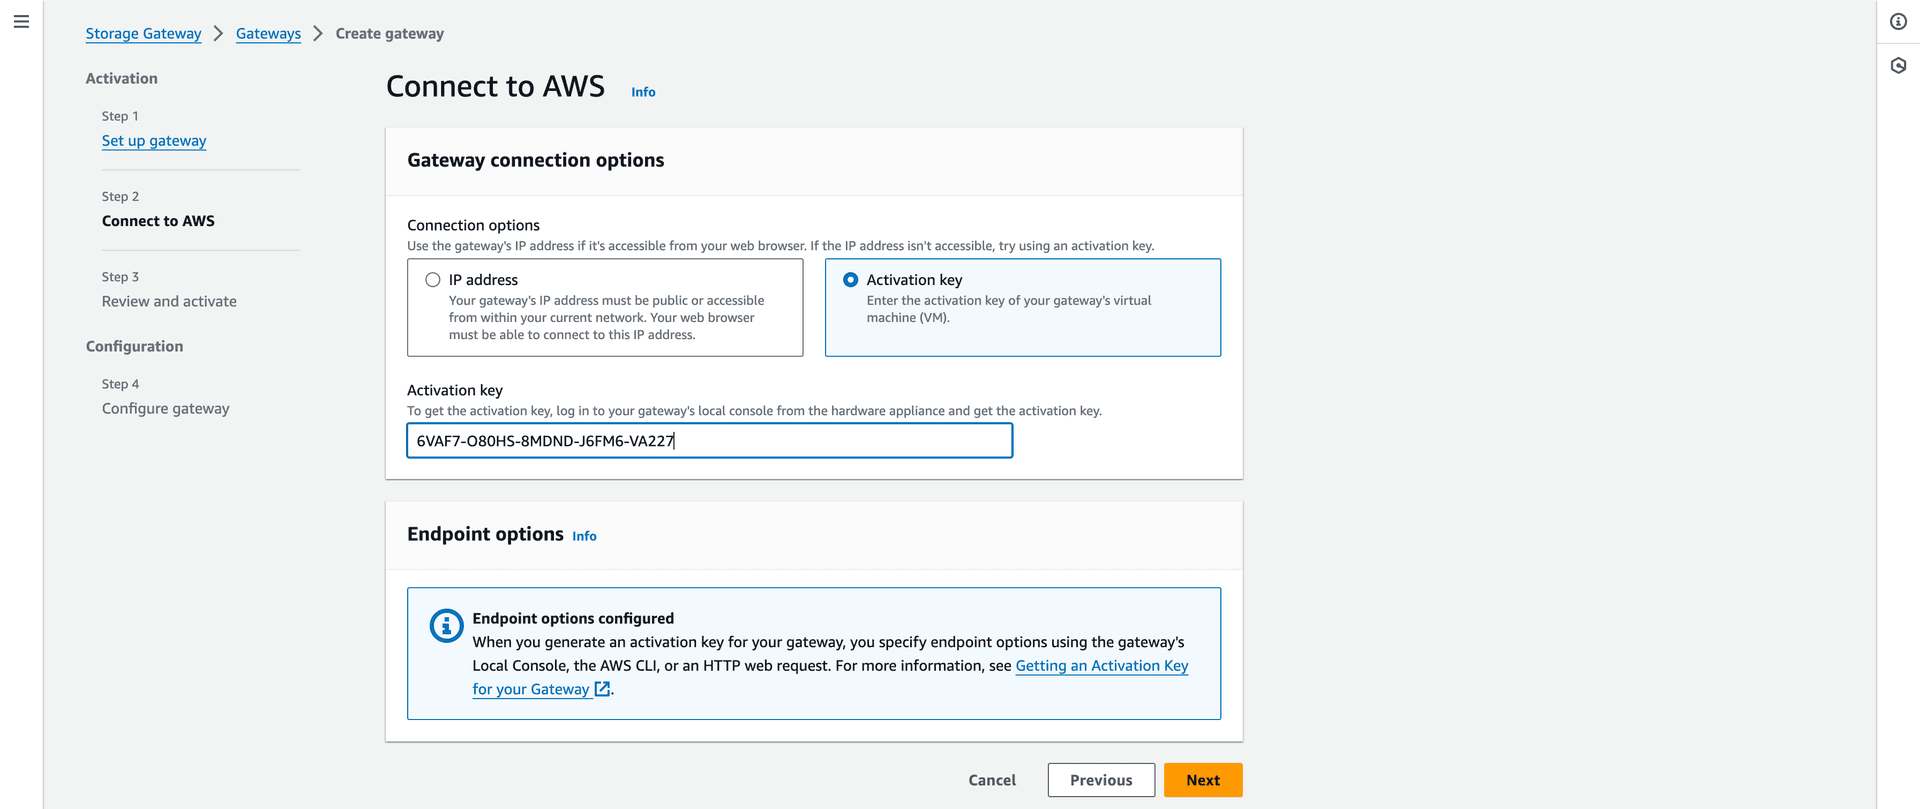
Figure 14 – Step 2: Connect to AWS—Pasted the activation key captured in the NFS client.
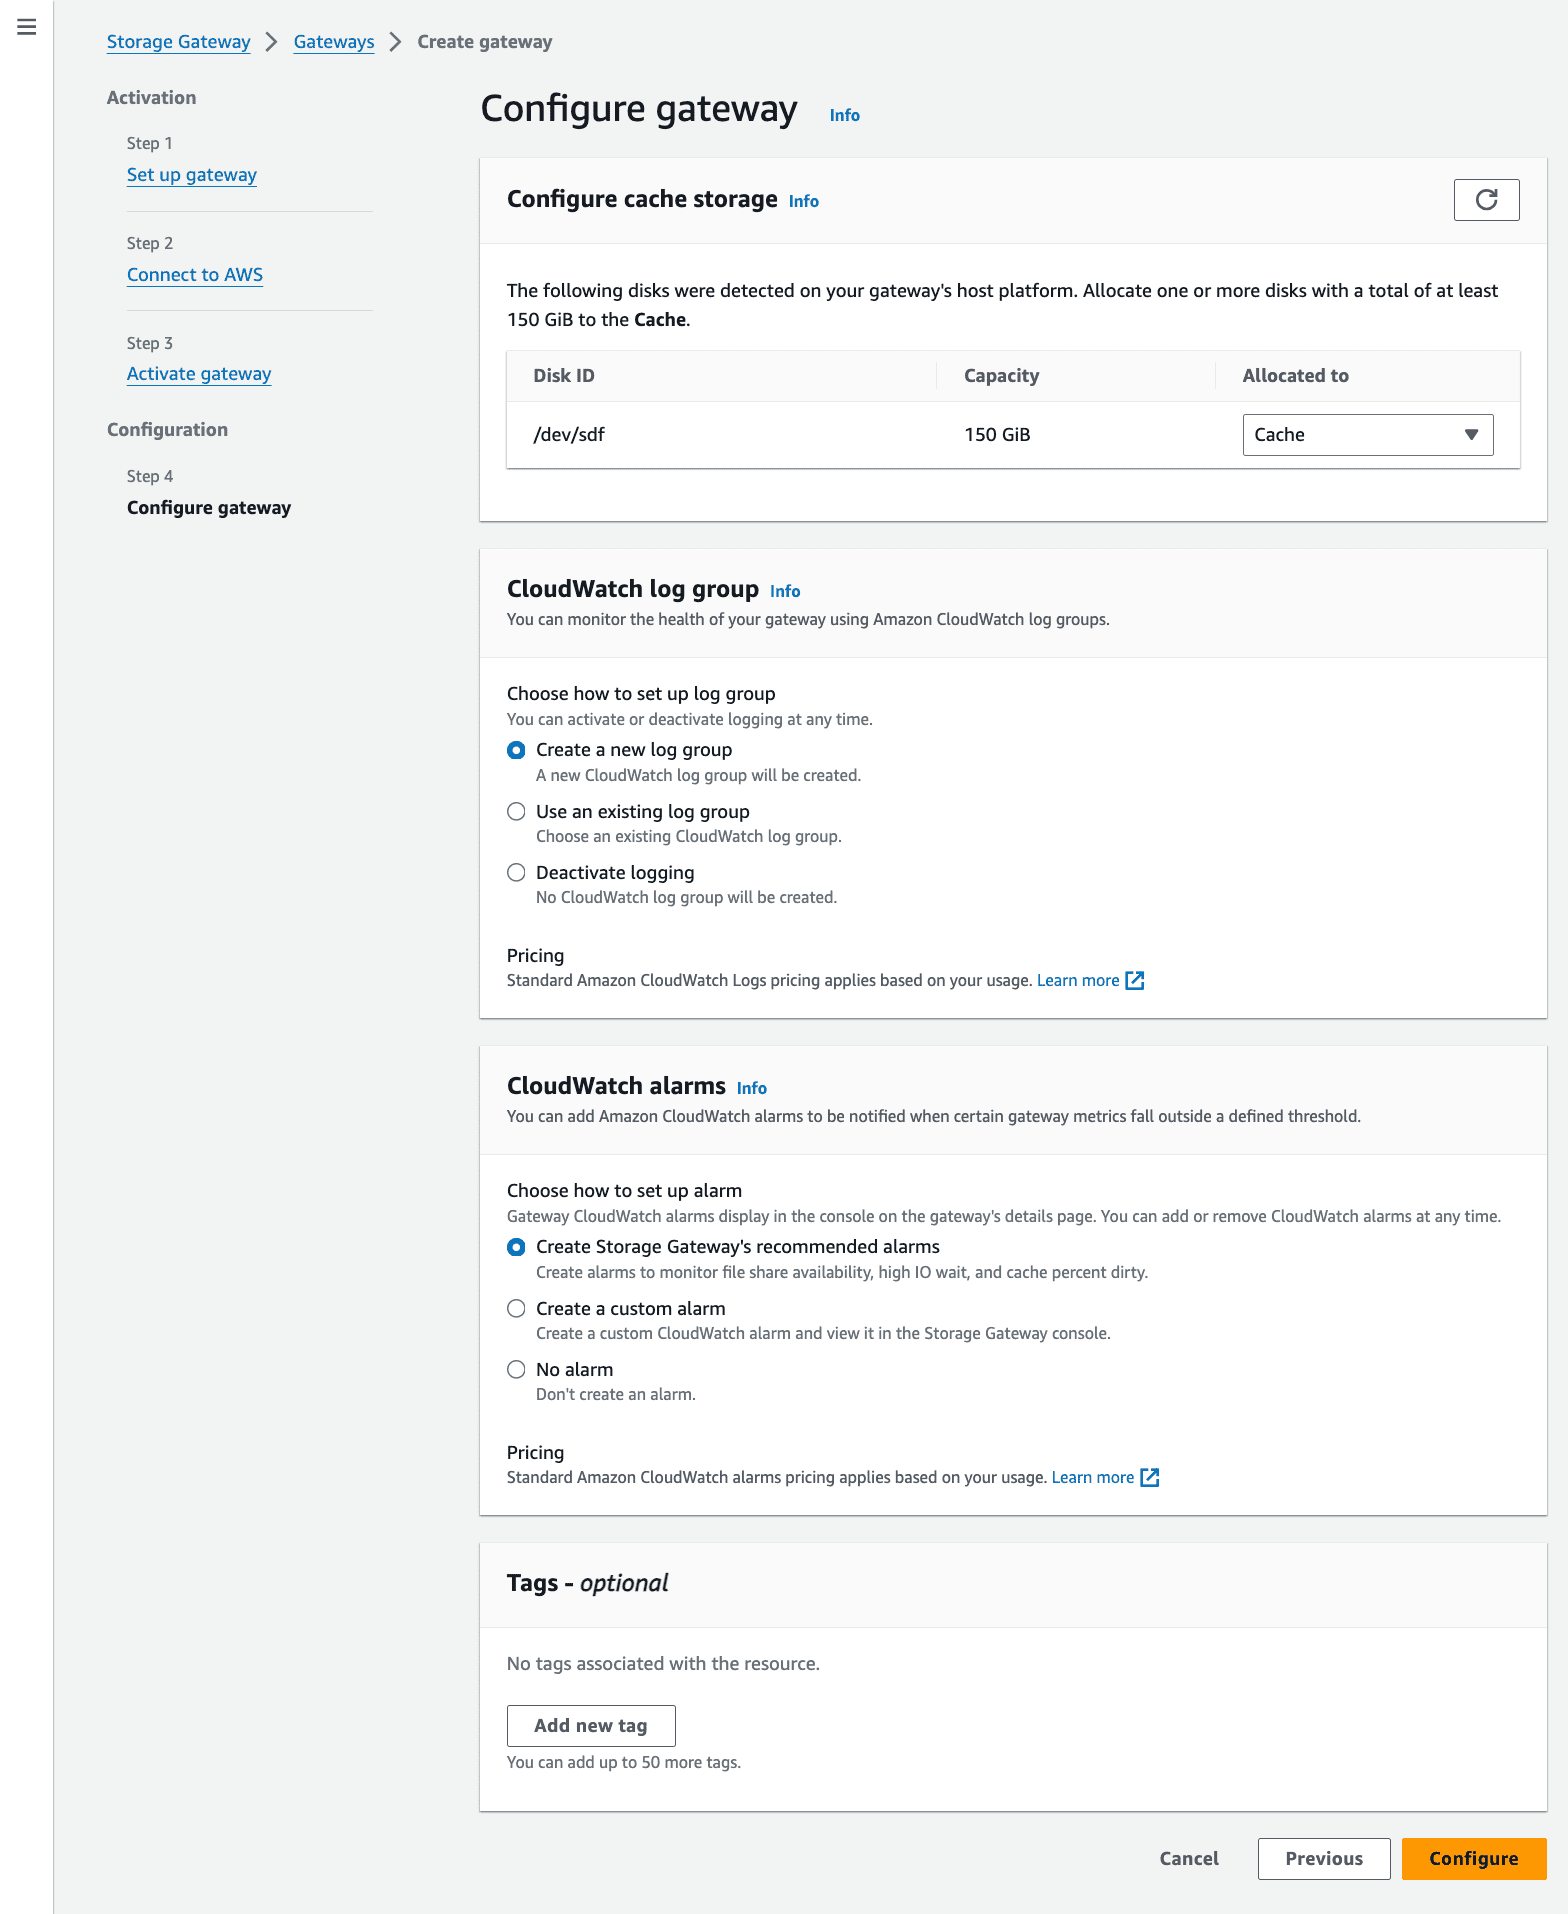
Figure 15—Step 3: Configure Gateway Cache and CloudWatch settings
Create a File Share for S3 File Gateway
Configure the file share with these settings:
- File Sharing Protocol: NFS
- S3 Bucket: Select the desired bucket for storage.
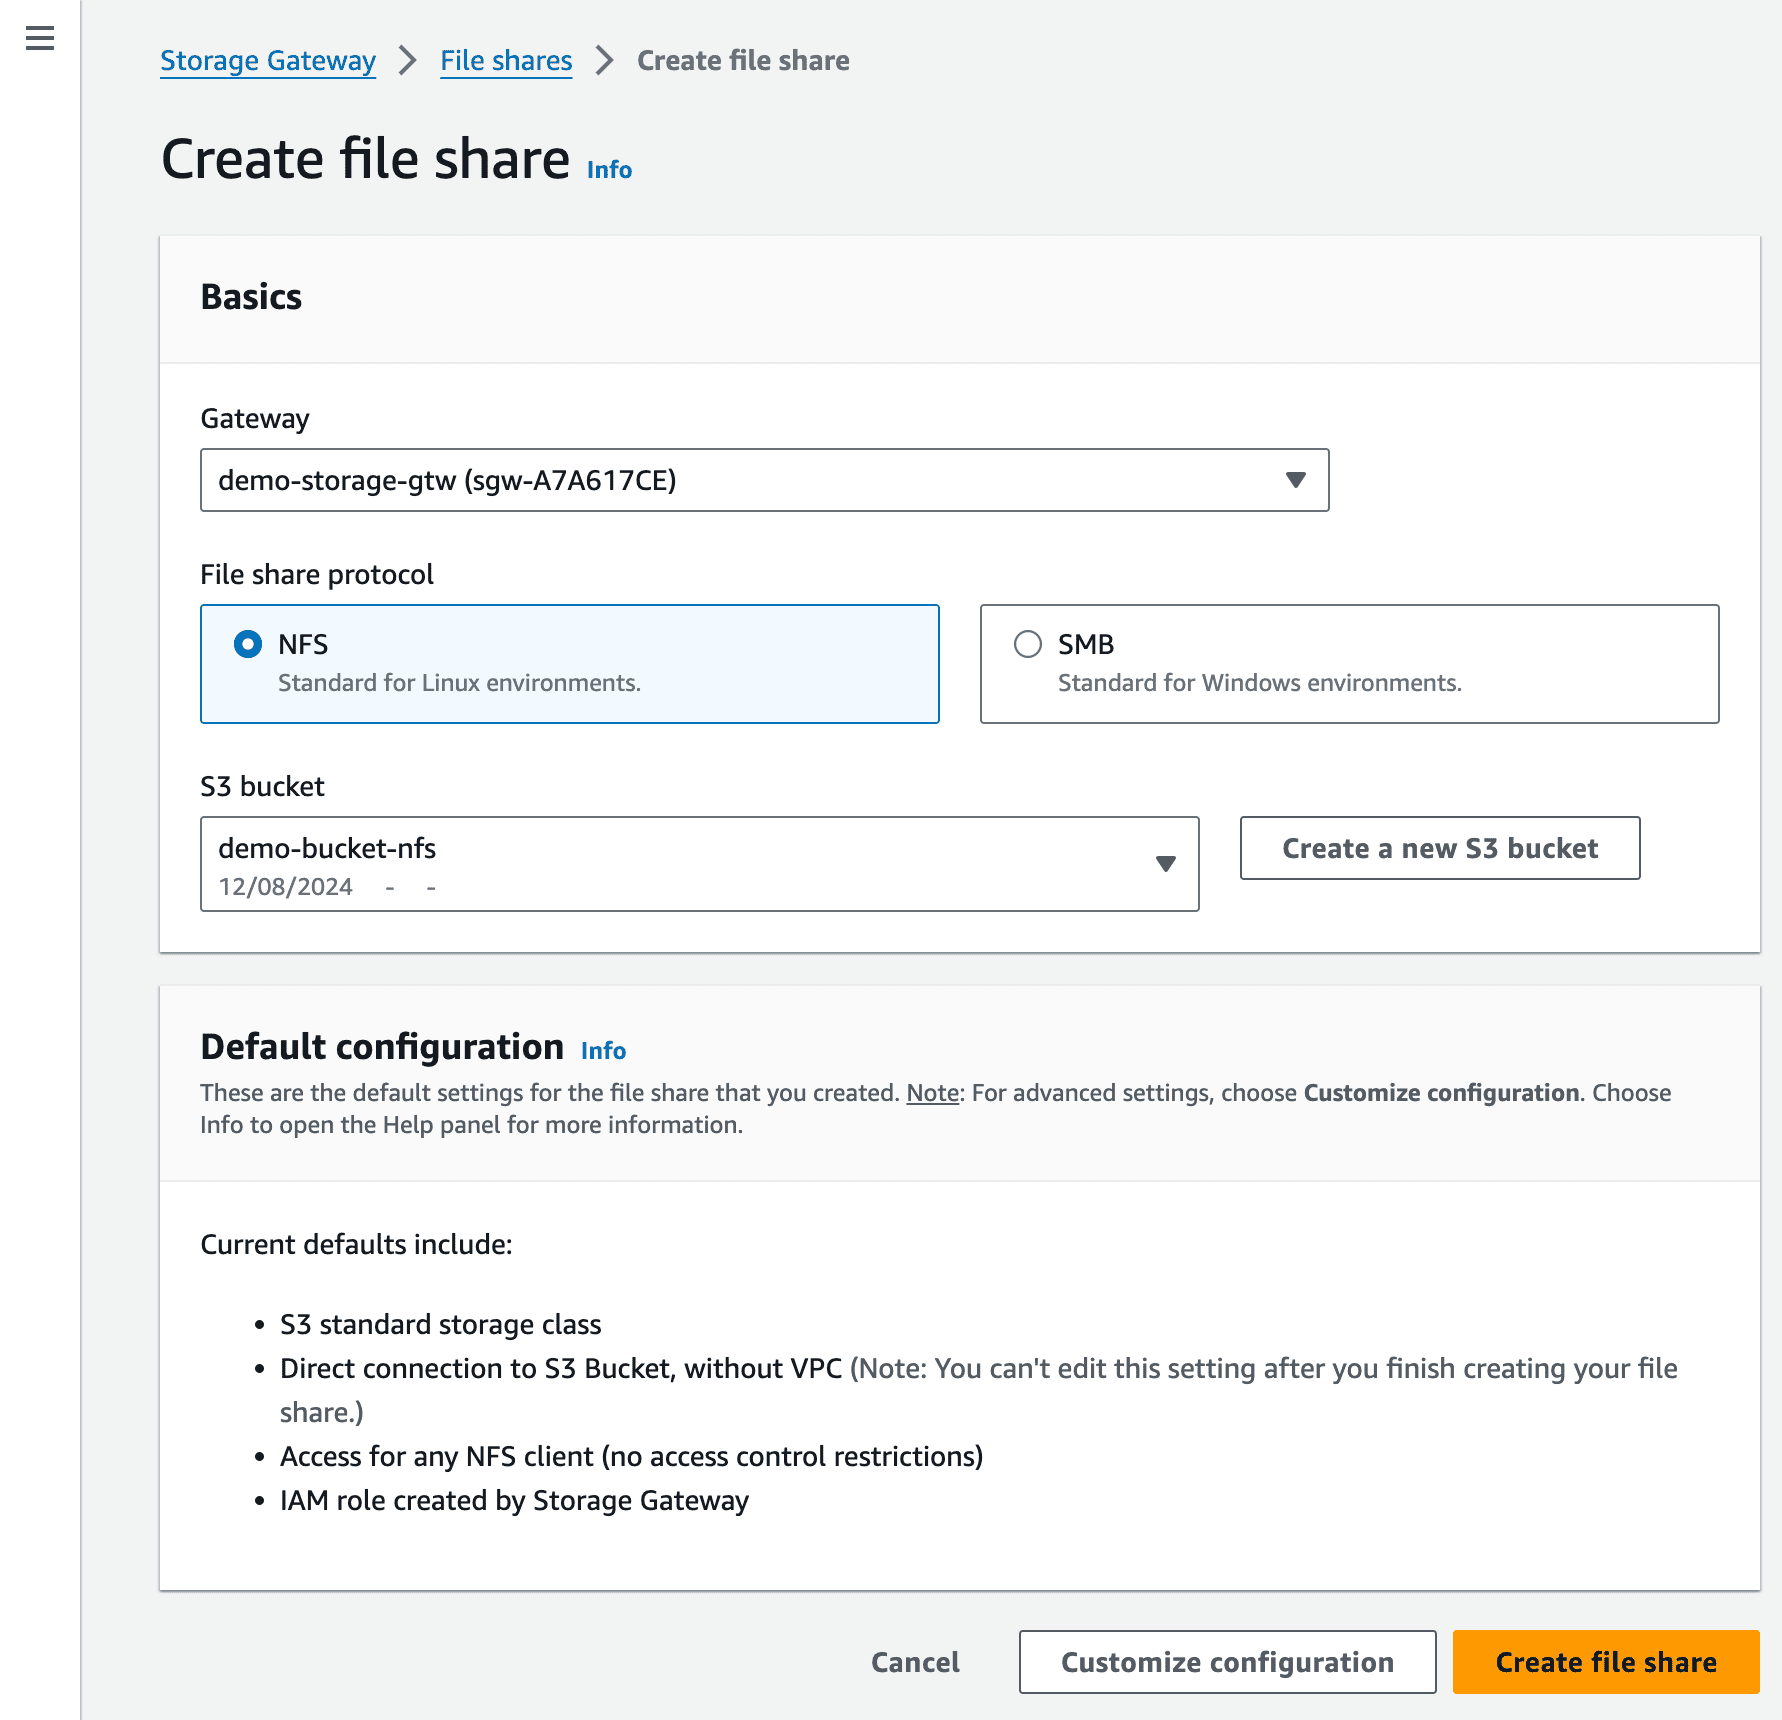
Figure 16—The image shows steps for creating a file share using NFS protocol for the S3 bucket.
Mount the S3 Bucket to the NFS Client
1. Before Mounting:
-
- The file share status will be unavailable.
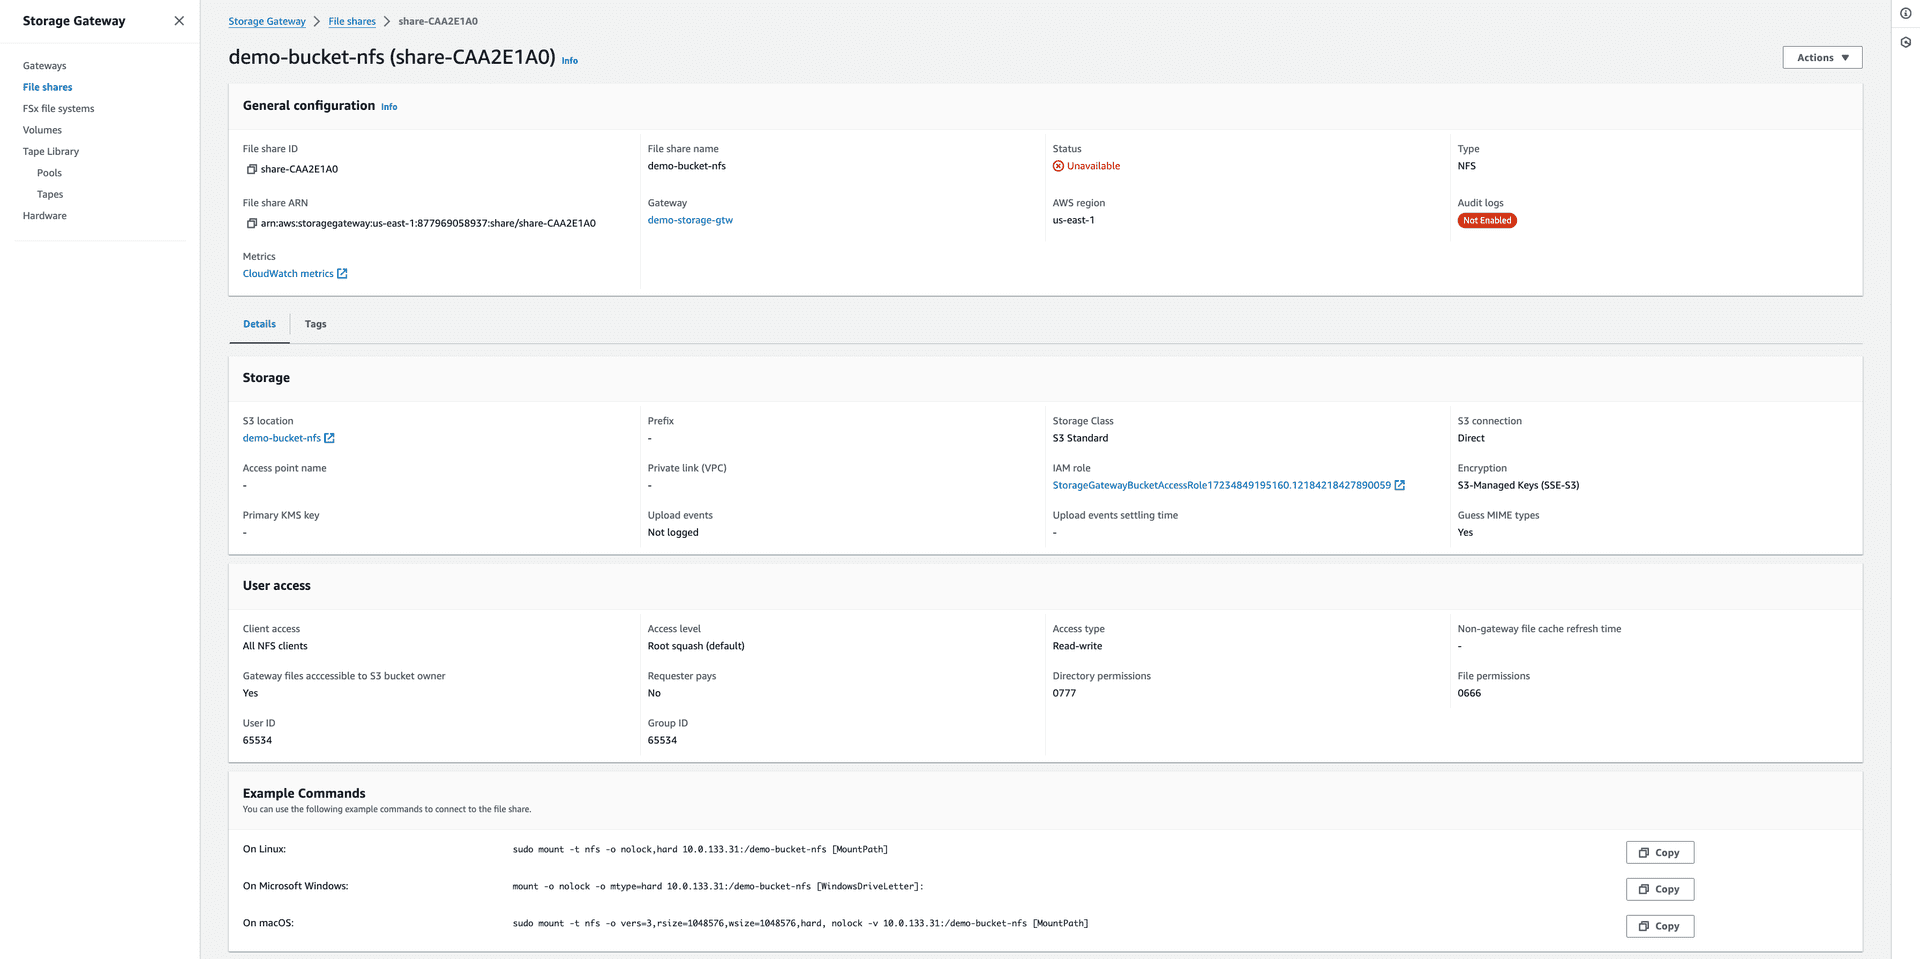
Figure 17—The file share status is unavailable before mounting.
-
- Mount the S3 by executing the command provided below:
sudo mount -t nfs -o nolock,hard <nfs-server-private-ip>:/<bucket-name> <mounted-path>
Parameters:
-
<nfs-server-private-ip>: Private IP address of the NFS server. - <
bucket-name>: The name of the S3 bucket. <mounted-path>: The directory path on the NFS client where the S3 bucket will be mounted.
2. After Mounting:
-
- The file share status should now be available.
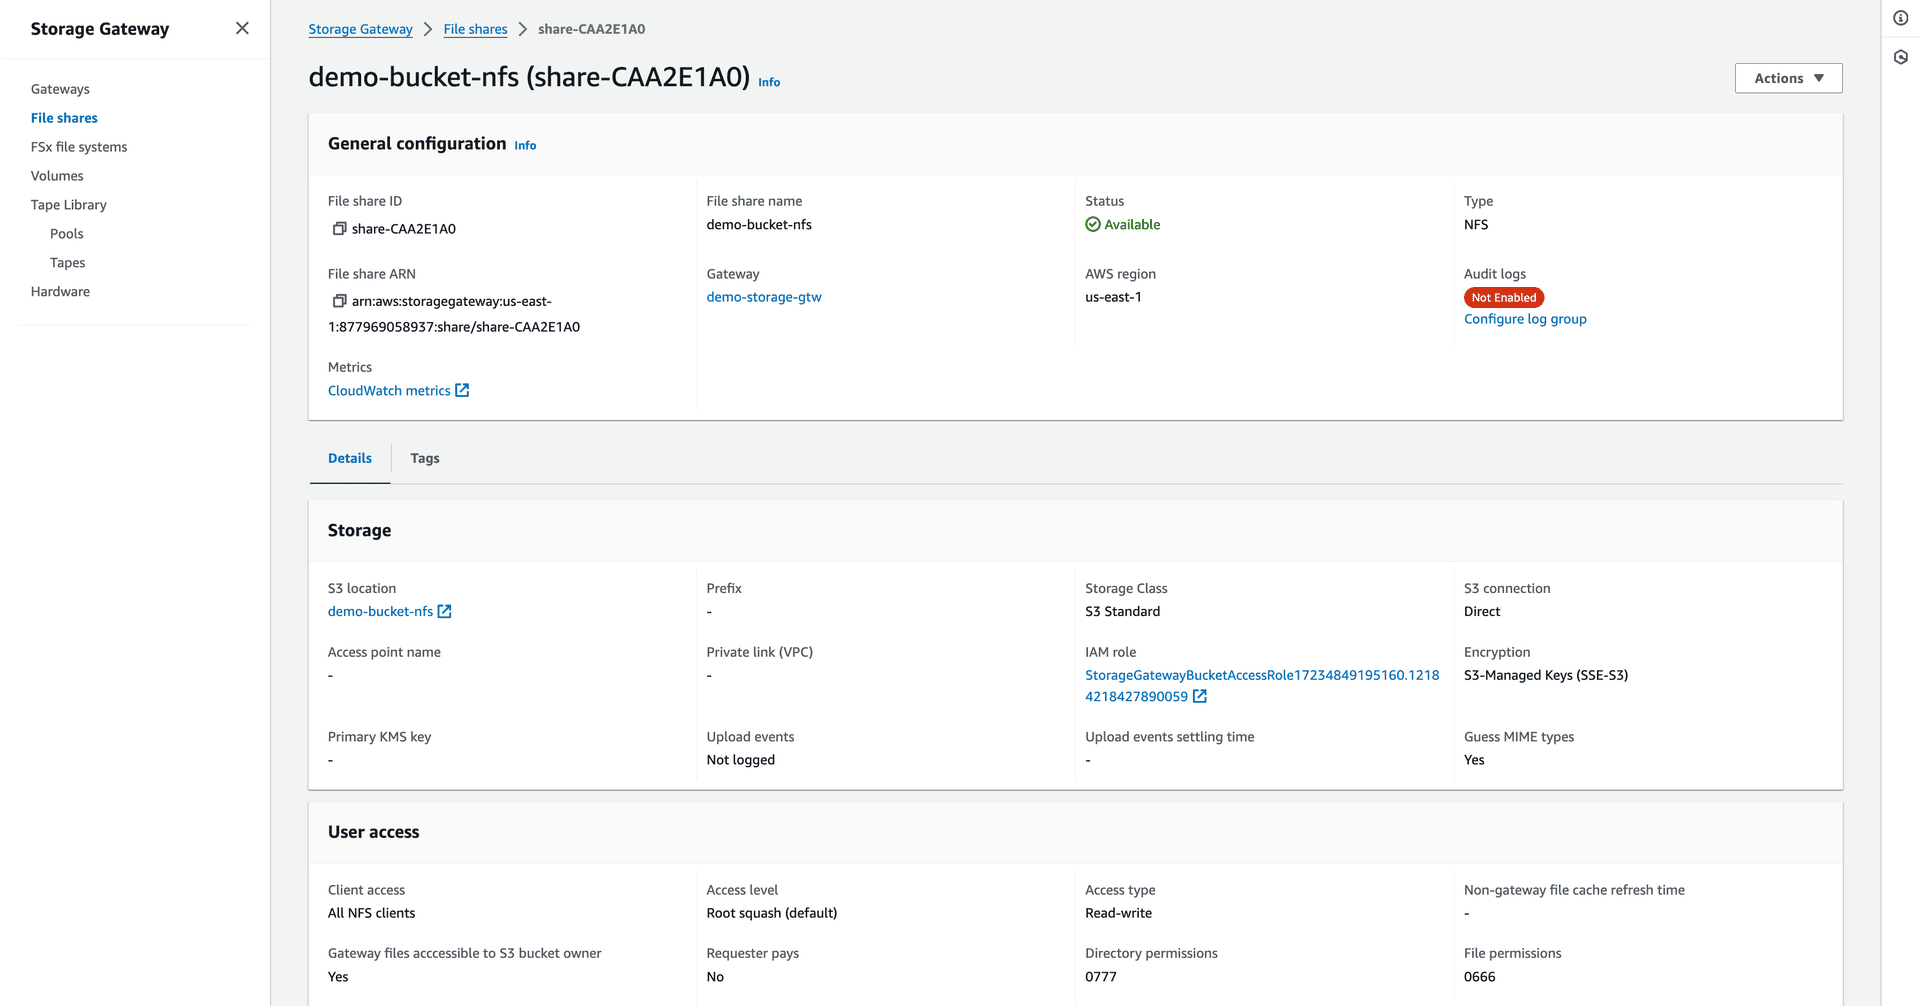
Figure 18—The file share status became available after mounting.
3. Verify:
- Create a text file named text.txt in the mounted directory.
- Verify if the file is saved in the S3 bucket.
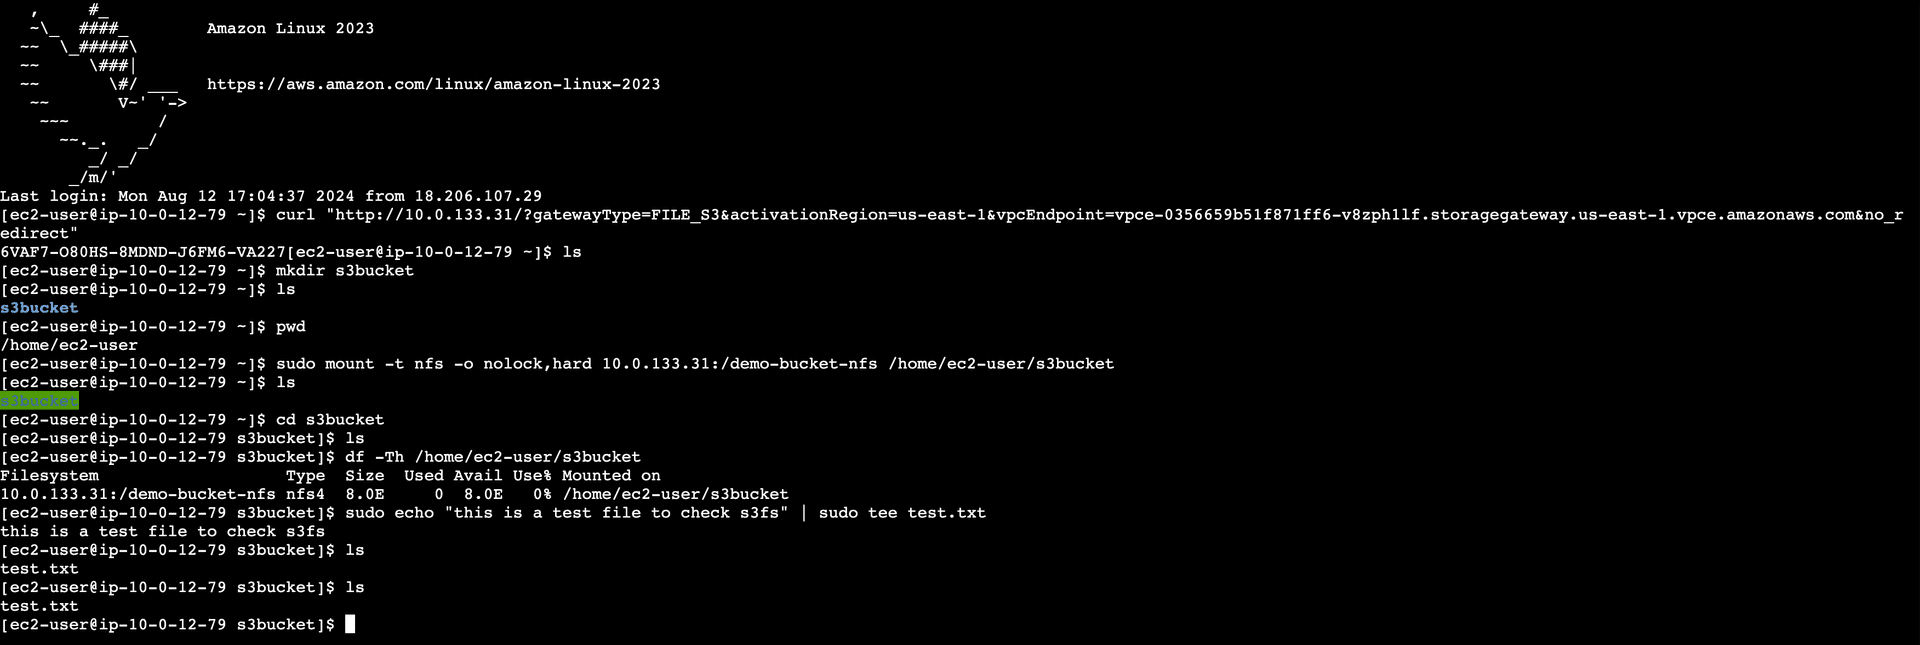
Figure 19—NFS Client CLI commands for mounting the S3 bucket using Amazon S3 File Gateway.

Figure 20—The image shows the S3 bucket containing the newly created test.txt file.
By following these steps, you can efficiently set up an AWS S3 File Gateway with EC2 instances to integrate on-premise applications with S3 storage, leveraging the power of hybrid cloud solutions.
Pricing for the Amazon S3 File Gateway
When considering AWS S3 File Gateway, it is crucial to understand the associated costs. Below is a note about the current pricing details for Amazon S3 File Gateway:
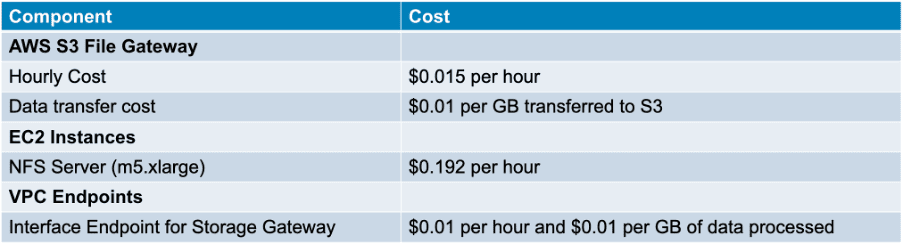
Note:
For the latest and detailed pricing information, you can always refer to the official AWS Storage Gateway Pricing page.
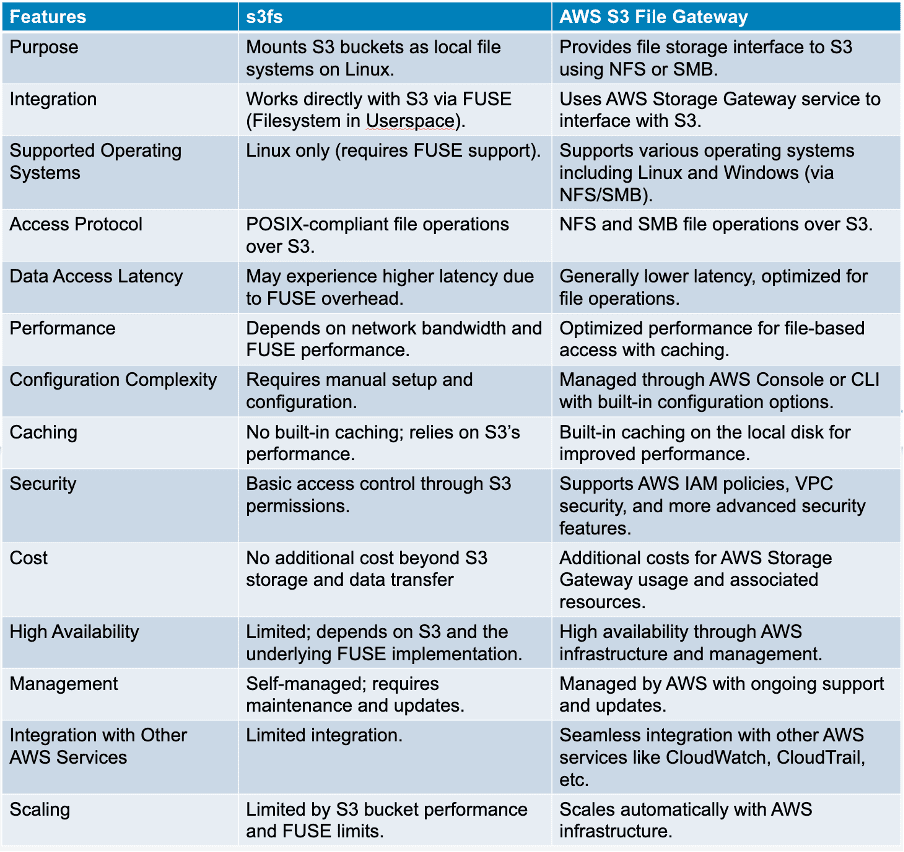
Comparison of s3fs and AWS S3 File Gateway:
Conclusion:
s3fs provides a straightforward and cost-effective solution for synchronizing files between EC2 instances and S3. It is easy to set up and has no additional cost beyond standard S3 usage. However, it may experience higher latency due to its use of the public network and lack of built-in caching.
AWS S3 File Gateway offers advanced synchronization features, with lower latency, built-in caching, and robust security through private network transfers. It is well-suited for complex synchronization scenarios and integrates seamlessly with other AWS services, though it does come with additional costs.
Choosing between these solutions depends on your specific needs, including budget, performance requirements, and desired features.
References:
- s3fs-fuse: FUSE-based file system backed by Amazon S3
- Mounting Amazon S3 to an Amazon EC2 instance using a private connection to S3 File Gateway
