
Introduction
In today’s modern era, where privacy concerns dominate the landscape of communication, implementing a highly scalable and secure chat application is paramount. In this blog, we will explore how to implement a highly scalable and secure chat application using Amazon’s Chime Chat SDK. Additionally, we will explore methods to determine users’ activity status and track unread message counts effectively.
Architecture
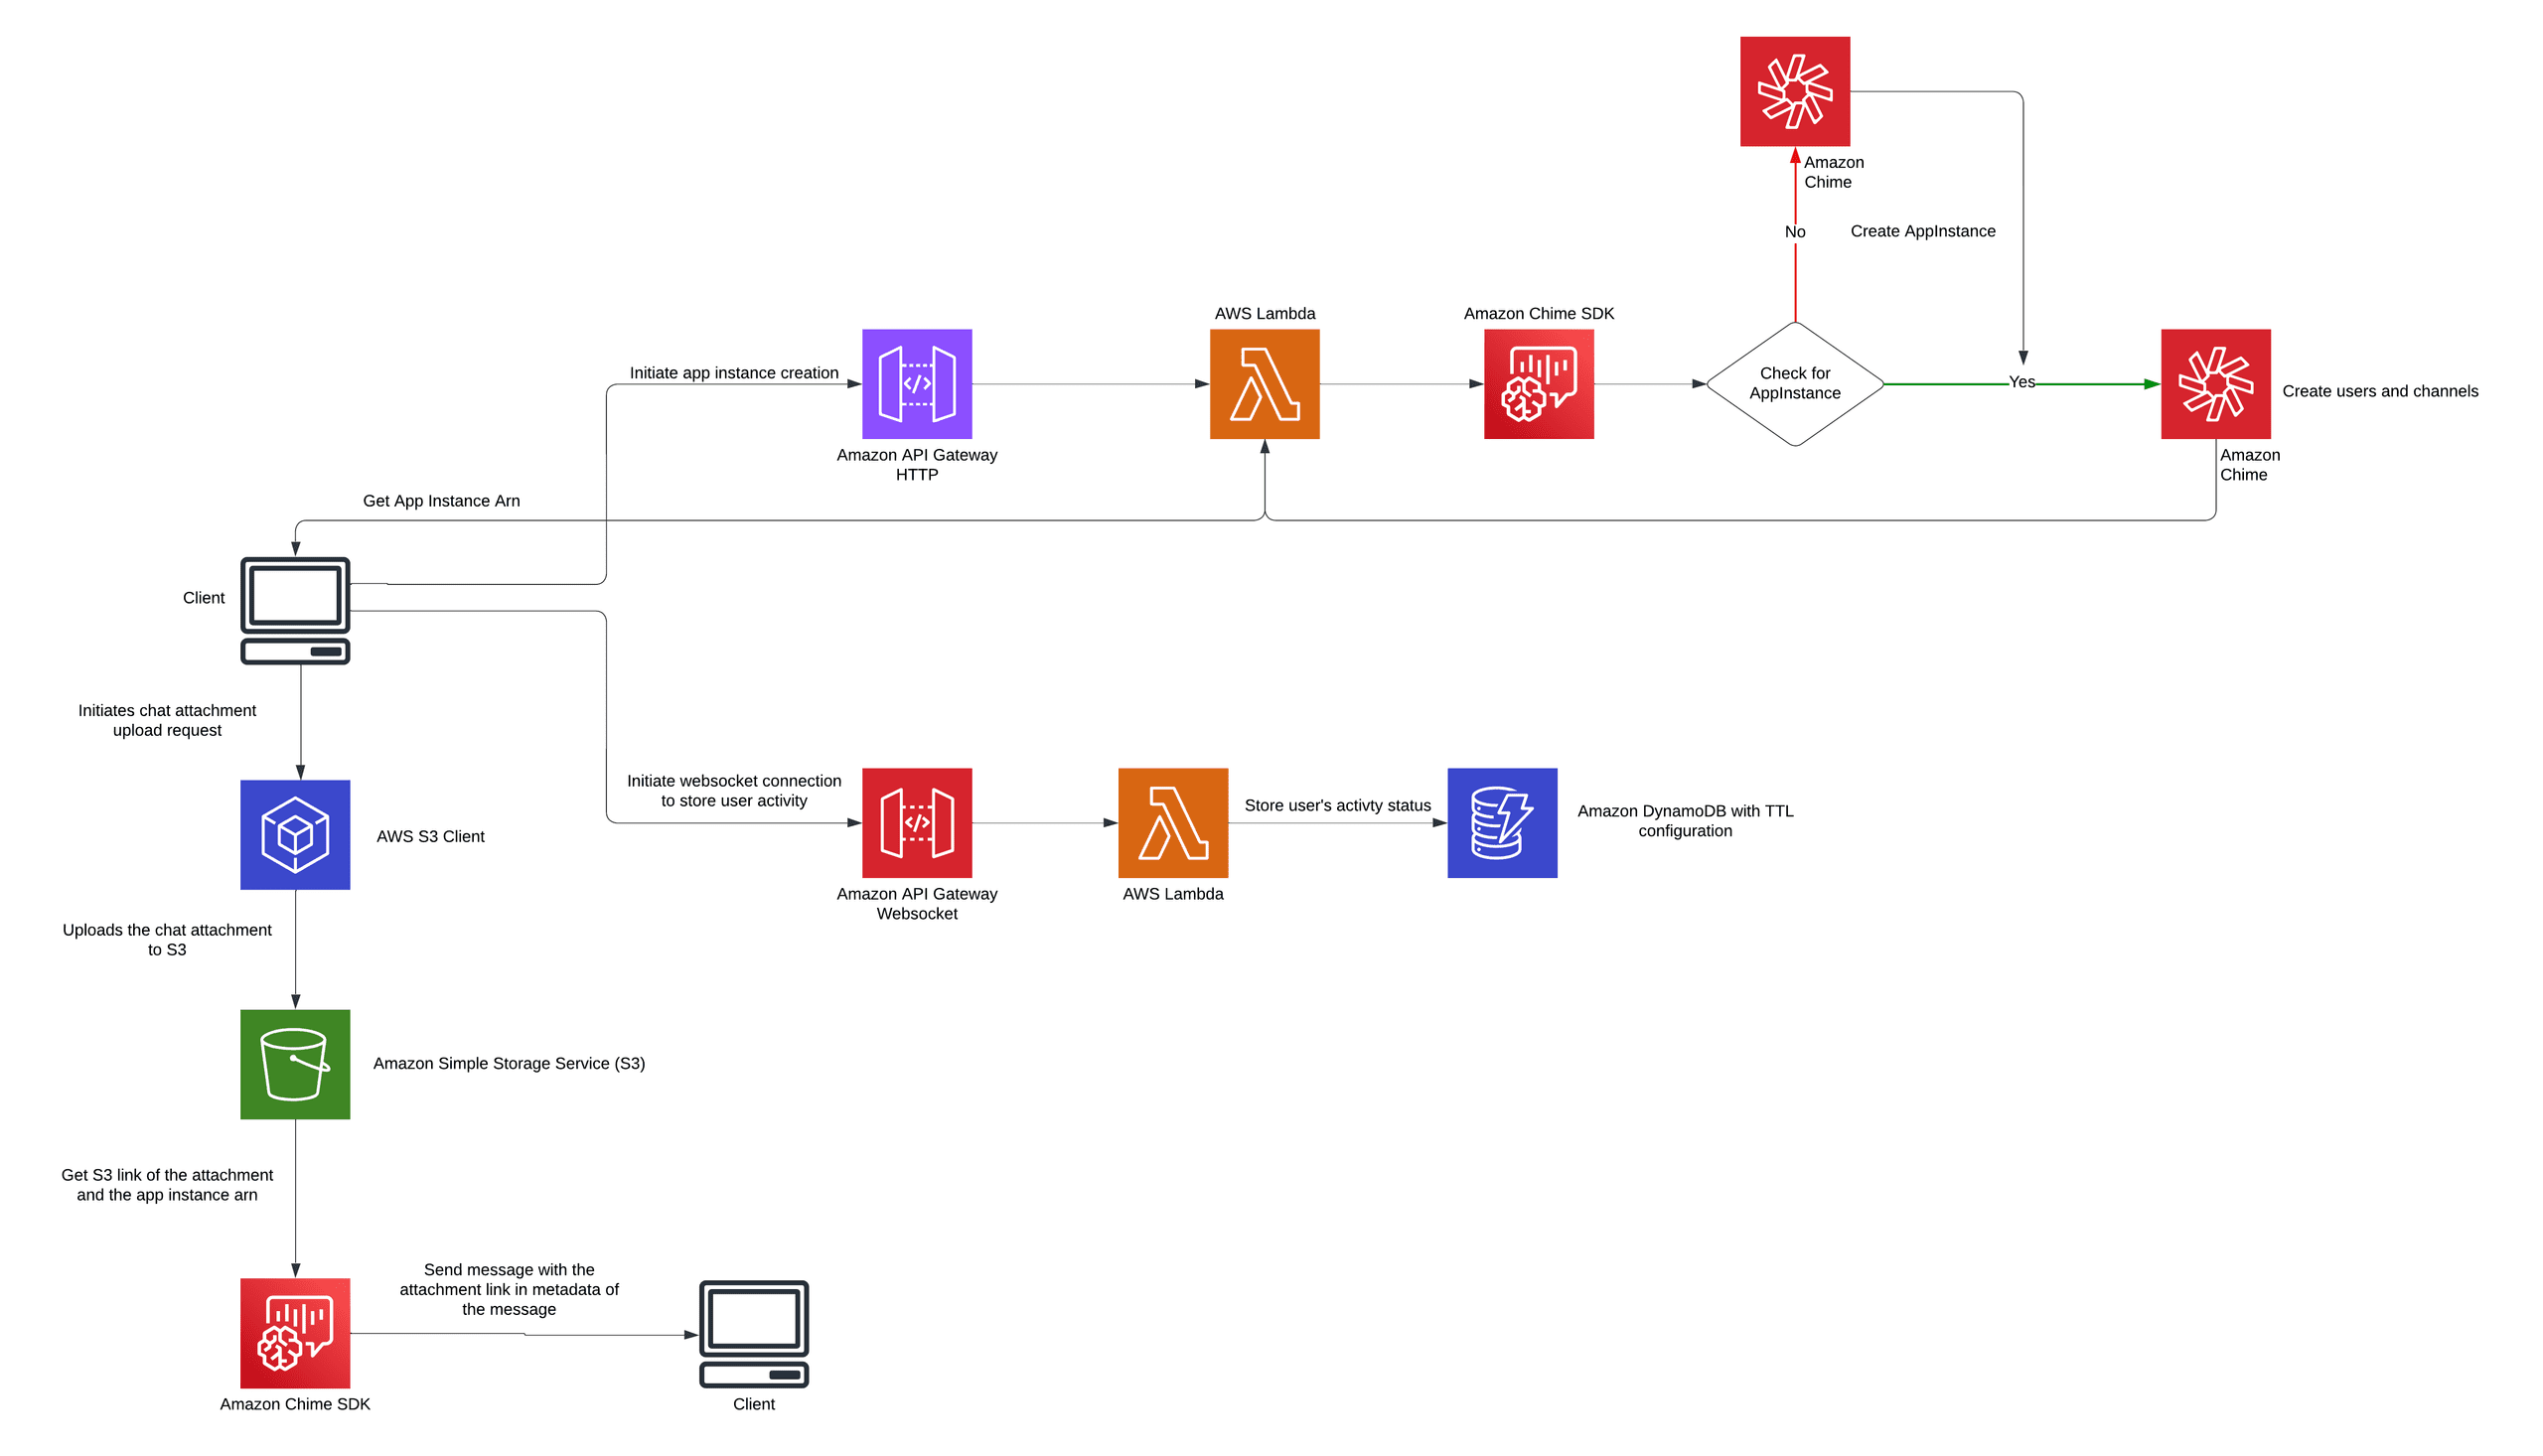
The browser client initiates an HTTP request via Amazon API Gateway to an AWS Lambda function, which interacts with the Amazon Chime SDK to create or retrieve an App Instance ARN. The client receives this ARN upon its retrieval.
Simultaneously, the client establishes a WebSocket connection through Amazon API Gateway to track user activity. The WebSocket API triggers an AWS Lambda function that updates the user’s activity status in Amazon DynamoDB with a TTL configuration.
For sending a message with an attachment, the client first uploads the file to Amazon S3 using the AWS S3 Client. After a successful upload, the client retrieves the S3 URL of the attachment and includes it in the metadata of the message before sending it via the Amazon Chime SDK.
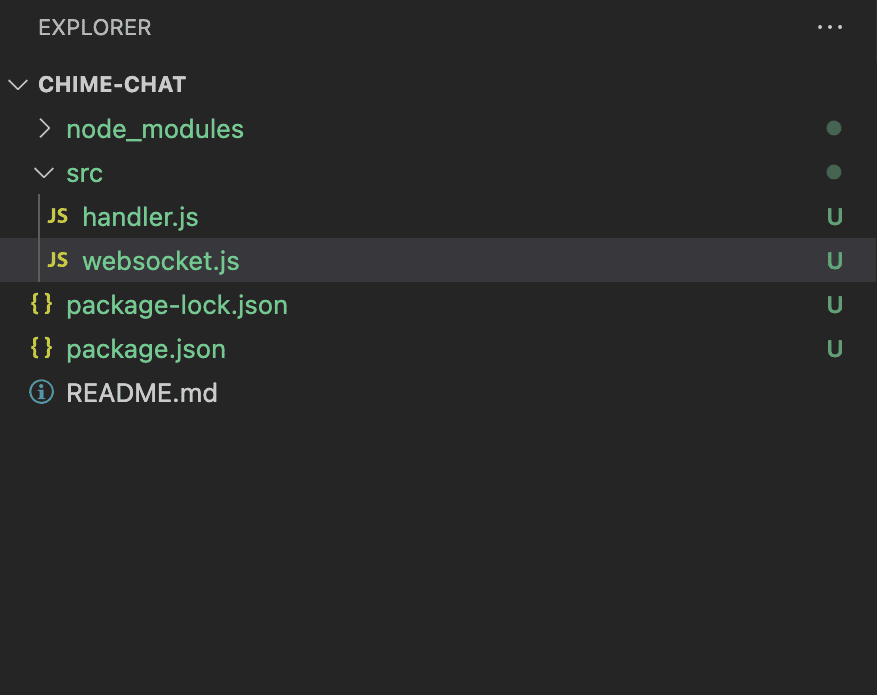
Project Structure
We can deploy the following functions in a serverless architecture using AWS Lambda and CloudFormation.
Package Dependencies
//package.json

"dependencies": {
    "@aws-sdk/client-apigatewaymanagementapi": "^3.583.0",
    "@aws-sdk/client-chime-sdk-identity": "^3.582.0",
    "@aws-sdk/client-chime-sdk-messaging": "^3.582.0",
    "@aws-sdk/client-dynamodb": "^3.584.0",
    "@aws-sdk/lib-dynamodb": "^3.584.0",
    "uuid": "^9.0.1"
  }
Chat Implementation
Creating an AppInstance
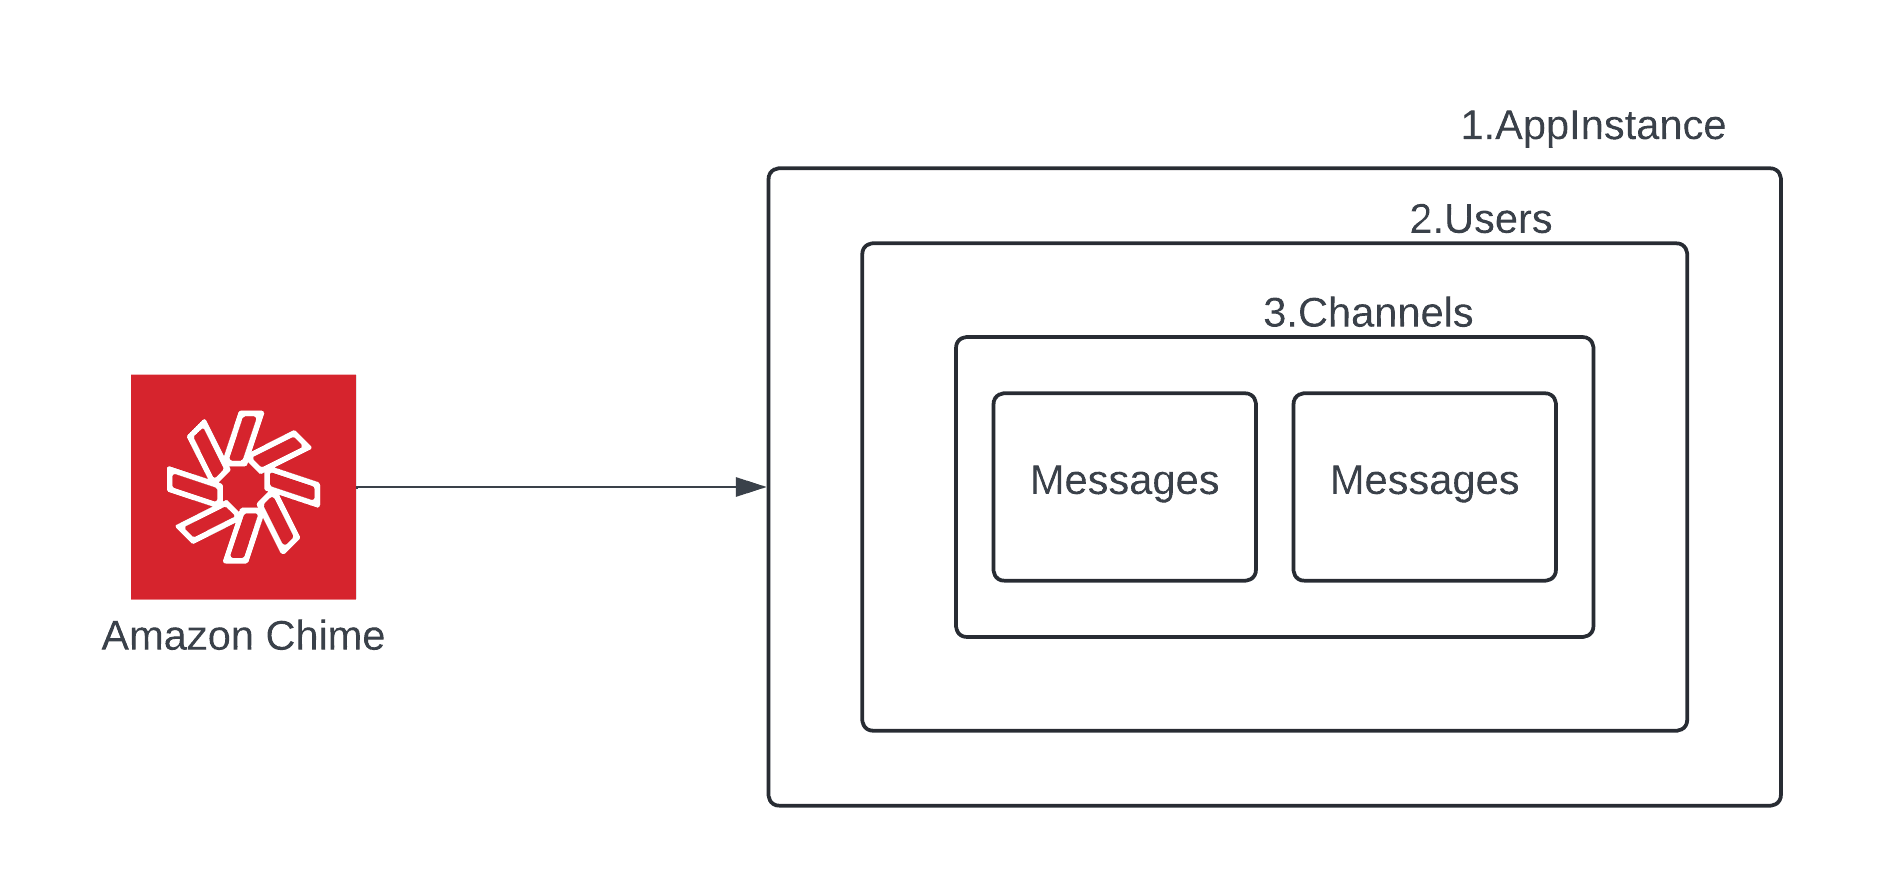
The first and foremost step in developing our chat application is to create an AppInstance, which will serve as the central repository for all Chime Chat-related resources.
Note: An “AppInstance” is a fundamental entity that acts as a container for your application’s messaging infrastructure, including users and channels.
//handler.js
const createAppInstance = async (appInstanceName) => {
    return chimeSdkClient.createAppInstance({
        Name: appInstanceName,
    });
};
Creating App Instance Users
Once an AppInstanceArn is created, the next step is to create multiple App Instance Users, which are essential for channel creation. The app instance user ARN will be in the format of {appInstanceArn}/user/{user-id}.
//handler.js
const createAppInstanceUser = async (
    appInstanceArn,
    appInstanceUserId,
    name
) => {
    return chimeSdkClient.createAppInstanceUser({
        AppInstanceArn: appInstanceArn,
        AppInstanceUserId: appInstanceUserId,
        Name: name,
    });
};

const userArn1 = await createAppInstanceUser(
        appInstanceArn,
        "User-1",
        "Jane"
    );
const userArn2 = await createAppInstanceUser(
        appInstanceArn,
        "User-2",
        "Clara"
    );
Creating DM and Group Channels
Once the app instance’s users are created, we can create channels. In Amazon Chime, there is no distinction between DM, group, and broadcast channels; there are only channels. We need to implement our custom logic to differentiate between different types of channels. One approach is to use prefixes in the channel names. Additionally, we can use the channel’s metadata (limited to 1KB) to store extra information, which can be retrieved via the DescribeChannel API.
For instance, to create a one-to-one DM channel, we can name the channel “DM-yourCustomName.” Similarly, “DG-yourCustomName” can be used for group channels and “BC-yourCustomName” for broadcast channels.
Note: The Chime Bearer refers to the Amazon Chime app instance user ARN, which uniquely identifies the user who is initiating the API call. It is a required parameter for most API requests involving the Chime Chat SDK.
You can customize the logic based on your business requirements.
//handler.js
const createChannel = async (
    appInstanceArn,
    metadata,
    name,
    chimeBearer,
    memberArns
) => {
    return chimeMessagingClient.createChannel({
        AppInstanceArn: appInstanceArn,
        ClientRequestToken: uuidv4(),
        Metadata: metadata, //Optionaly add extra information about the channel
        Mode: "RESTRICTED",
        Name: name,
        Privacy: "PRIVATE",
        ChimeBearer: chimeBearer,
        MemberArns: memberArns,
    });
};

//Here the ChimeBearer creating the channel will automatically become the moderator of the channel
Dynamic Channel Names for DM Channels
For DM channels, we need to construct dynamic channel names, unlike group and broadcast channels.
For instance, if Jane and Clara are participants in a DM channel, Clara should see Jane’s name as the channel name, and Jane should see Clara’s
To achieve this, we can use either the channel name or metadata. Let’s assume we’re using the channel name to generate a dynamic channel name. When creating the DM channel, we can construct the name in the format "DM-{userId1}#{userId2}". Since the channel name includes the user IDs of both participants, we can identify the user making the request and use the DescribeAppInstanceUser API call to retrieve the name of the other user.
Here is a basic API flow to achieve this:
- ListChannelMembershipsForAppInstanceUser: List the channel memberships for a particular user.
- DescribeAppInstanceUser: Retrieve app instance user details, including the user’s name.
This approach is customizable according to your business requirements.
Sending Messages to a Channel
After creating the channels, we can use the SendChannelMessage API call to send messages.
//handler.js
const sendMessage = async (channelArn, content, chimeBearer, metadata) => {
    return chimeMessagingClient.sendChannelMessage({
        ChannelArn: channelArn,
        Content: content,
        ChimeBearer: chimeBearer,
        Type: "STANDARD",
        ClientRequestToken: uuidv4(),
        Persistence: "PERSISTENT",
        Metadata: metadata, //Store s3 link to an attachment
    });
};
If we want to send a message with an attachment, we can utilize the message’s metadata. We can store the attachment in an S3 bucket and include the attachment link inside the metadata.
If an attachment is stored in an S3 bucket, your message payload might look like this:
{
  "ChannelArn": "arn:aws:chime:us-east-1:123456789012:channel/abcd1234",
  "Content": "Here's the file you requested.",
  "Metadata": "{\"attachment\": \"https://s3.amazonaws.com/my-bucket/attachment-file.pdf\"}"
}
End-to-End Flow for Managing Unread Counts and User Activity
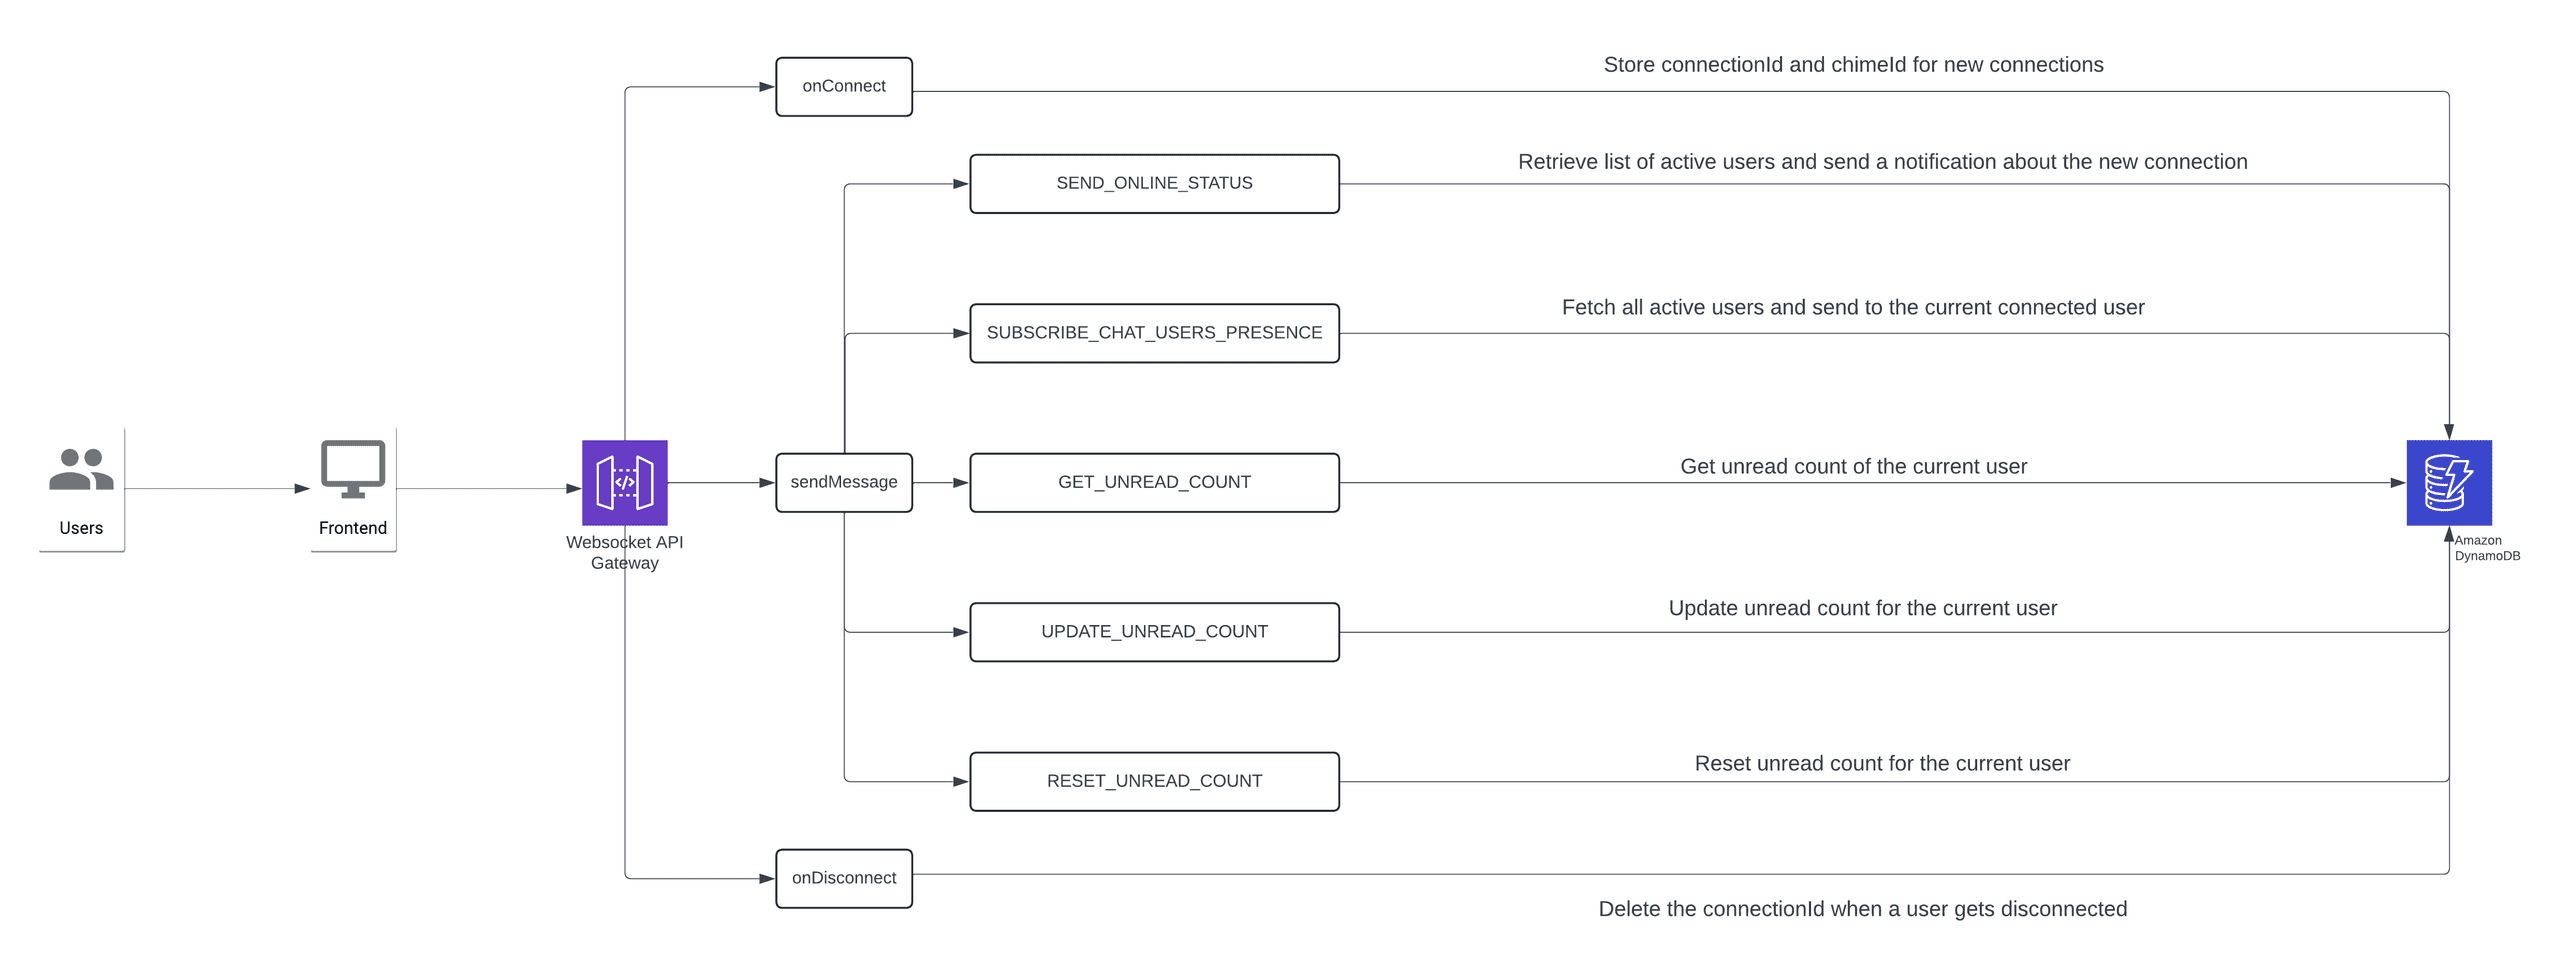
Tracking a user’s Activity Status
So far, we have created users and channels, and we have also sent messages. To track whether a user is active or inactive, we can send NON-PERSISTENT messages every 10 seconds or implement a custom architecture.
Sending NON-PERSISTENT messages can increase the frontend load exponentially based on the number of channels, so a custom approach may be more efficient. Refer to the sample payload for the websocket events.
{
        "eventName": "string",
		"channelId": "string",
		"userArns": ['user1','user2',..],
		"connectionIds": ['connectionId1','connectionId2',...],
}
If we choose a custom approach, we need to create a separate websocket and handle the events individually. The events are described below.
OnConnect—In this handler, we store the WebSocket connectionId and the corresponding chimeId in a DynamoDB table. This enables us to monitor user connections and effectively manage their presence status.
//websocket.js
export const onConnect = async (chimeId, connectionId) => {
  await dynamodbClient.send(
    new PutCommand({
      TableName: "YOUR_TABLE_NAME",
      Item: {
        connectionId,
        chimeId,
        //add other custom properties as required
      },
    })
  );
  return {
    statusCode: 200,
  };
};
SEND-ONLINE-STATUS— It helps to notify active users about a new connection. The procedure involves retrieving the list of active users from the DynamoDB table and sending a notification to each user about the new connection.
//websocket.js
export const sendMessage = async (domainName, stage, body, connectionId) => {
	Logger.info(`Sending message to connection ${connectionId}`);

	Logger.info(`Body : ${JSON.stringify(body)}`);

	const endpoint = 'https://' + domainName + '/' + stage;

	const params = {
		ConnectionId: connectionId,
		Data: JSON.stringify(body),
	};

	return new ApiGatewayManagementApi(endpoint).postToConnection(params);
};

export const getAllUsers = async () => {
	const response = await dynamodbClient.send(
		new ScanCommand({
			TableName: "YOUR_TABLE_NAME",
		}),
	);
	return response.Item;
};

export const sendOnlineStatus = async (stage, chimeId, connectionId, domainName) => {
    //get all active users
    const users = await getAllUsers();

	await Promise.all(
		users.map(async (user) => {
			const { connectionId: userConnectionId } = user;
			const body = {
				eventId: uuidv4(),
				requestId: null,
				eventName: 'CHAT_USERS_PRESENCE',
				eventTime: new Date().getTime(),
				data: {
					users: [
						{
							connectionId,
							chimeId,
							status: 'ONLINE',
						},
					],
				},
			};
			await sendMessage(domainName, stage, body, userConnectionId);
		}),
	);
};
SUBSCRIBE_CHAT_USERS_PRESENCE – It helps to fetch and return the list of all active users. The process involves scanning the DynamoDB table and returning details about the connected users.
//websocket.js
export const sendUsersToMyself = async (stage, connectionId, domainName) => {
	 //get all active users
    const users = await getAllUsers();

	await sendMessage(
		domainName,
		stage,
		{
			eventId: v4(),
			requestId: null,
			eventName: 'CHAT_USERS_PRESENCE',
			eventTime: new Date().getTime(),
			data: {
				users,
			},
		},
		connectionId,
	);
};
Unread Message Counts
We will be handling the unread counts in the below-described events.
GET-UNREAD-COUNT—Get the unread count for a particular channel.
//websocket.js
export const getUnreadCount = async (userArn, stage, domainName, connectionId) => {
	const channels = [];
	const userEntry = await getUserByUserArn(userArn);
	if (userEntry) {
		const { channels: channelsEntry } = userEntry;
		channels.push(...channelsEntry);
	}
	await sendMessage(
		domainName,
		stage,
		{
			eventId: v4(),
			requestId: null,
			eventName: 'GET_UNREAD_COUNT',
			eventTime: new Date().getTime(),
			data: {
				channels,
			},
		},
		connectionId,
	);
};
UPDATE_UNREAD_COUNT—To add or update a channel’s unread count.
//websocket.js
export const createUnreadEntry = async (userId, channels) => {
	await dynamodbClient.send(
		new PutCommand({
			TableName: "YOUR_TABLE_NAME",
			Item: {
				userId,
				channels,
			},
		}),
	);
};

export const getUserByUserArn = async (userArn) => {
	const response = await dynamodbClient.send(
		new GetCommand({
			TableName: "YOUR_TABLE_NAME",
			Key: { userId: userArn },
		}),
	);
	return response.Item;
};

export const updateUnreadCount = async (userArns, channelId) => {
    for (const userArn of userArns) {
      const userEntry = await getUserByUserArn(userArn);
      const channels = userEntry ? [...userEntry.channels] : [];

      const index = channels.findIndex(ch => ch.id === channelId);
      if (index > -1) {
        channels[index].count += 1;
      } else {
        channels.push({ id: channelId, count: 1 });
      }
      await createUnreadEntry(userArn, channels);
    }
    return { statusCode: 200 };
};
RESET_UNREAD_COUNT – Reset the unread count for a particular channel.
//websocket.js
export const deleteUnreadEntry = async (userId) => {
	return dynamodbClient.send(
		new DeleteCommand({
			TableName: '',
			Key: {
				userId,
			},
		}),
	);
};
export const resetUnreadCount = async (userArn, channelId) => {
	const userEntry = await getUserByUserArn(userArn);
	let channels = [];
	if (userEntry) {
		const { channels: channelsEntry } = userEntry;
		channels.push(...channelsEntry);
		const index = channelsEntry.findIndex((ch) => ch.id === channelId);
		//if the user have unread channels entry
		if (index > -1) {
			channels = channels.filter((ch) => ch.id !== channelId);
			if (channels.length > 0) {
				//if the user is having other channels, update the entry with the latest channel list
				await createUnreadEntry(userArn, channels);
			} else {
				//if the user has only the channel to be reseted, delete the entry
				await deleteUnreadEntry(userArn);
			}
		}
		await createUnreadEntry(userArn, channels);
	}
	return {
		statusCode: 200,
	};
};
OnDisconnect – This is a default handler for a disconnected connection. In this handler, remove the connectionId from the DynamoDB table.
//websocket.js
export const sendPresencesToUsers = async (
	domainName,
	stage,
	chimeId,
    status,
	userConnectionId,
	users,
) => {
	await Promise.all(
		users.map(async (user) => {
			const { connectionId } = user;
			const body = {
				eventId: uuidv4(),
				requestId: null,
				eventName: 'CHAT_USERS_PRESENCE',
				eventTime: new Date().getTime(),
				data: {
					users: [
						{
							connectionId: userConnectionId,
							chimeId,
							status,
						},
					],
				},
			};
			Logger.info(JSON.stringify(body));
			await sendMessage(domainName, stage, body, connectionId);
		}),
	);
}
export const deleteConnectionById = async (domainName,stage,connectionId,chimeId) => {
    //delete entry from dynamoDb
	await dynamodbClient.send(
		new DeleteCommand({
			TableName: "YOUR_TABLE_NAME",
			Key: { connectionId },
		}),
	);

    //get all active users
    const activeUsers = await getAllUsers();

    //send offline status to all connected users
    await sendPresencesToUsers(domainName,stage,chimeId,'OFFLINE',connectionId,activeUsers);

};
Conclusion
In this blog, we explored how to manage users, channels, and app instances effectively, while integrating real-time features like user activity tracking and unread message counts using AWS WebSocket and DynamoDB. These techniques can significantly enhance the responsiveness and interactivity of your application.
While our implementation is tailored to a specific use case, the principles are broadly applicable and can be adapted to suit your unique business needs.
