
Overview
In environments where Windows machines need to be managed remotely—especially via automation tools like Ansible—it’s crucial to use secure methods for remote communication. While WinRM is a powerful protocol for remote management, it must be configured properly to avoid becoming a security risk.
This post walks you through setting up WinRM over HTTPS with certificate-based authentication on Windows, which is far more secure than basic authentication and unencrypted traffic.
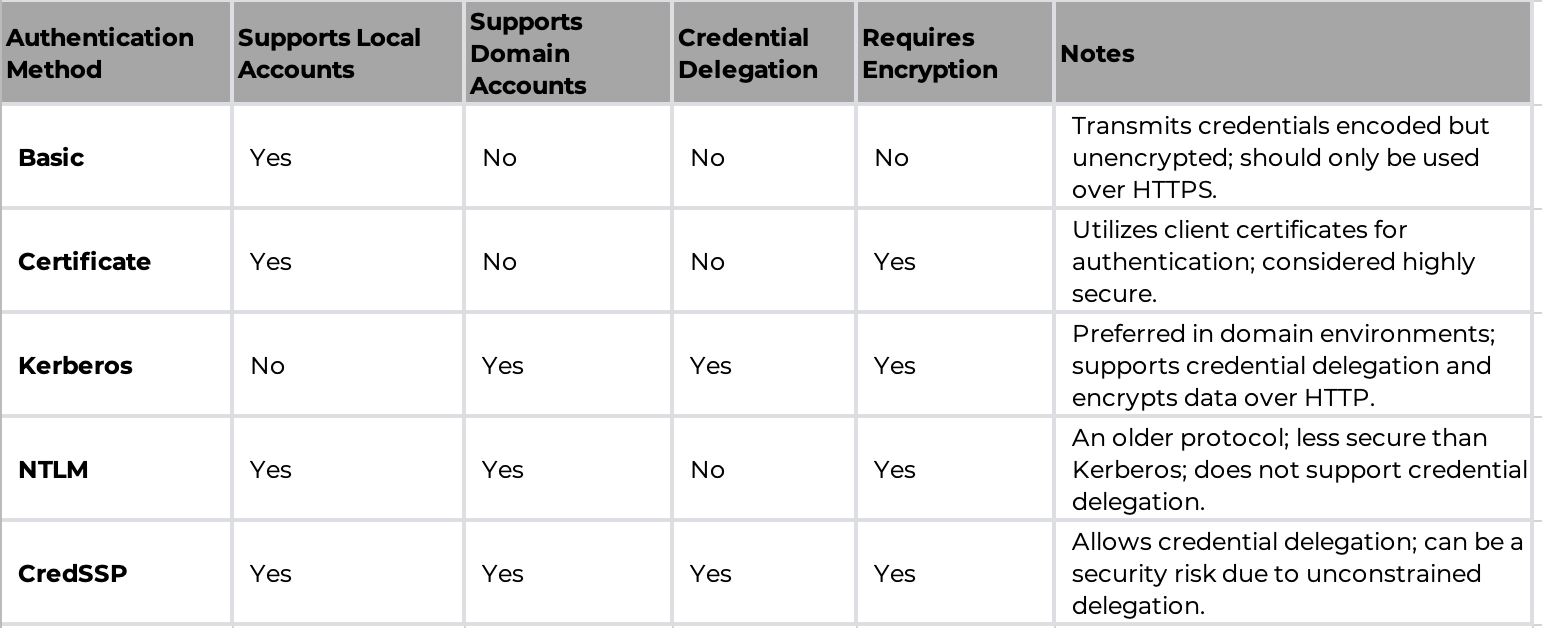
WINRM Authentication
Windows Remote Management (WinRM) supports several authentication methods, each with its own characteristics. Here’s a concise comparison:
Why Use Certificate-Based Authentication?
By default, WinRM uses basic authentication, which sends credentials in plain text (unless wrapped in HTTPS). Certificate-based authentication:
- Enables secure communication without exposing passwords
- Supports automation use cases like Ansible connecting to Windows
- Avoids dependency on Active Directory or Kerberos in some cases
Implementing certificate authentication requires additional setup, such as configuring HTTPS listeners and managing certificates, but the security benefits often outweigh these complexities.
Prerequisites
- A certificate is generated for the user ‘ansiblerunner’, with the username set as the CN.
- A user key file is available for authenticating the certificate.
- All certificates are stored in an S3 bucket.
- A PowerShell standup script runs after the Windows machine is created to configure the WinRM settings.
- The credentials for the ‘ansiblerunner’ user are stored in the SSM Parameter Store, and the Windows Server is configured with an instance profile for SSM Parameter Store access.
- A trusted CA certificate is available to act as the CA for the WinRM HTTPS SSL certificate.
- WinRM ports are opened on the Windows Server and accessible from the Ansible controller.
Example PowerShell Script to Generate a Certificate for a User
$username = "tester" $password = ConvertTo-SecureString -String "Ansible123#" -AsPlainText -Force Check if the user exists $userExists = Get-LocalUser -Name $username -ErrorAction SilentlyContinue if (-not $userExists) { Write-Output "User '$username' does not exist. Creating..." New-LocalUser -Name $username -AccountNeverExpires -Description "Ansible Remote Management" -Password $password Write-Output "User '$username' does not exist. Created!!" } else { Write-Output "User '$username' already exists." } Add user to Administrators group $adminGroup = Get-LocalGroupMember -Group "Administrators" | Where-Object { $_.Name -match $username } if (-not $adminGroup) { Write-Output "Adding '$username' to Administrators group..." Add-LocalGroupMember -Member $username -Group "Administrators" Write-Output "Added '$username' to Adminstrators group!!" } else { Write-Output "User '$username' is already in the Administrators group." } $userExists = Get-LocalUser -Name $username -ErrorAction SilentlyContinue if($userExists){ # Generate a self-signed certificate $clientParams = @{ CertStoreLocation = 'Cert:\CurrentUser\My' NotAfter = (Get-Date).AddYears(5) Provider = 'Microsoft Software Key Storage Provider' Subject = "CN=$username" TextExtension = @("2.5.29.37={text}1.3.6.1.5.5.7.3.2","2.5.29.17={text}upn=$username@localhost") KeyExportPolicy = 'Exportable' } $cert = New-SelfSignedCertificate @clientParams Export certificate to PFX $pfxPath = "$pwd\cert.pfx" $certPfxBytes = $cert.Export('Pfx', '') # Set a password for the PFX [System.IO.File]::WriteAllBytes($pfxPath, $certPfxBytes) Export certificate to PEM format $certPemPath = "$pwd\cert.pem" Set-Content -Path $certPemPath -Value @( "-----BEGIN CERTIFICATE-----" [Convert]::ToBase64String($cert.RawData) -replace ".{64}", "$&`n" "-----END CERTIFICATE-----" ) Write-Output "Certificates exported: $certPemPath and $pfxPath"If you don’t have an existing local user and certificate (optional), copy the certificate and PFX files to your local machine. You can extract the key from the PFX file and use it for further tasks.
Follow the steps below only if you don’t have a trusted root CA to generate a CA and server certificate issued by the CA:
It is recommended to have a certificate issued by a trusted CA in the Windows certificate store; the following is a workaround.
Execute the following commands in a Bash shell with the latest version of OpenSSL installed.
-
Generate a Certificate Authority (CA)
To create a CA for signing server and client certificates, generate a private key and a CA certificate:
openssl genrsa -out myCA.key 2048 openssl req -x509 -new -nodes -key myCA.key -sha256 -days 825 -out myCA.pem This creates:
- myCA.key → The private key for the CA
- myCA.pem → The CA certificate
Important: Remember the password used for the CA certificate, as it will be required when generating other certificates.
-
Generating Server Certificates
2.1: Generate a Server Key
openssl genrsa -out myserver.key 2048 2.2: Create a Certificate Signing Request (CSR)
openssl req -new -key myserver.key -out myserver.csr Note: The Common Name (CN) should match the hostname of the Windows server. Other fields can be customized or left as default.
2.3: Create the Server Certificate Configuration File
Create a file named myserver.ext and add the following contents:
authorityKeyIdentifier=keyid,issuer basicConstraints=CA:FALSE keyUsage = digitalSignature, nonRepudiation, keyEncipherment, dataEncipherment extendedKeyUsage = serverAuth subjectAltName = @alt_names [alt_names] DNS.1 = ec2-18-213-150-124.compute-1.amazonaws.com DNS.2 = 18.213.150.124Explanation of Fields:
- authorityKeyIdentifier → Links the certificate to the issuing CA.
- basicConstraints → Specifies this is not a CA certificate.
- keyUsage → Defines allowed cryptographic operations.
- extendedKeyUsage → Specifies server authentication use.
- subjectAltName → Defines valid DNS names and IPs for the certificate.
2.4: Sign the Server Certificate
openssl x509 -req -in myserver.csr -CA myCA.pem -CAkey myCA.key -CAcreateserial \ -out myserver.pem -days 825 -sha256 -extfile myserver.ext This generates:
- myserver.pem → The signed certificate.
2.5: Convert the Certificate to PFX Format (for Windows)
Windows requires the certificate and private key to be combined into a PKCS#12 file for import:
openssl pkcs12 -export -inkey myserver.key -in myserver.pem -out myserver.pfxTip: When prompted for an export password, press Enter to leave it empty.
-
Importing Certificates in Windows
3.1: Add CA Certificate to Trusted Root Store
To trust certificates issued by the CA, add the CA certificate to the Trusted Root Certification Authorities store:
Import-Certificate -FilePath "C:\path\to\myCA.pem" -CertStoreLocation Cert:\LocalMachine\Root This ensures Windows recognizes certificates issued by this CA as trusted.
3.2: Import Server Certificate
To import the server certificate (PFX) into the Personal (My) store, run:
Import-PfxCertificate -FilePath "C:\path\to\myserver.pfx" -CertStoreLocation Cert:\LocalMachine\MySteps to Configure Certificate Authentication
The PowerShell script executes the following steps.
-
Certificate Retrieval and Validation
- Retrieve the user certificate from a designated S3 bucket.
- Validate the presence of the certificate file and verify its contents.
- Convert the certificate from PEM format to binary format and extract the thumbprint.
- Ensure that the extracted certificate and thumbprint are valid.
-
Certificate Installation
- Add the retrieved certificate to the appropriate system certificate stores, including:
- Trusted Root Certification Authorities
- Add the certificate to this store only if it is self-signed; otherwise, the next two are enough.
- Adding this to the root store makes it a trusted CA.
- Trusted People
- Personal Certificate Store
- Trusted Root Certification Authorities
- Ensure the certificate is correctly added to the system to facilitate authentication.
-
Secure Credential Retrieval
- Obtain the necessary credentials from the AWS SSM Parameter Store or whichever credential store is compatible with the Windows machines for the ‘ansiblerunner’ user.
- Convert the retrieved credentials into a secure format for authentication.
- Create a credential object for user authentication.
-
Mapping Certificate to User Authentication
- Use the certificate thumbprint to map it to a user in WinRM.
- Configure WinRM to recognize the user’s certificate for authentication.
- Ensure that the mapping is successfully applied for remote authentication.
-
Configuring WinRM over HTTPS
- Stop the WinRM service before making configuration changes.
- Identify the appropriate SSL certificate issued by a trusted CA in the server’s certificate store.
- Set up WinRM to use certificate-based authentication.
- Configure WinRM to allow encrypted communication over HTTPS.
-
Creating a Secure HTTPS Listener
- Remove any existing HTTPS listeners to prevent conflicts. (Validate before removing)
- Create a new listener on the designated port (e.g., 5986) using the identified certificate.
- Validate that the listener is successfully created.
-
Configuring Firewall Rules
- Add firewall rules to allow incoming traffic on the specified WinRM HTTPS port.
- Ensure that the firewall configuration does not block remote management traffic.
-
Restarting and Verifying WinRM Configuration
- Set the WinRM service to start automatically when booting.
- Restart the WinRM service to apply changes.
- Verify that the HTTPS listener is properly configured.
- Test the remote management connection using PowerShell commands:
-
Test-WSMan -ComputerName -Port -UseSSL -
Enter-PSSession -ComputerName -Port -UseSSL -Credential (Get-Credential)
-
-
Standup script for performing the configurations
configure_winrm_certificate.ps1
param ( [string]$username = "ansiblerunner" ) function Configure-User-Auth{ #******************** Download the certificate from S3 bucket ****************************# $certPemPath = "$pwd\$username.pem" try { $sourceUrl = "https://s3.us-east-1.amazonaws.com/s3_bucket_path/ansiblerunner.pem" Invoke-WebRequest -Uri $sourceUrl -OutFile $certPemPath Write-Host "Certificate downloaded successfully from S3." } catch { Write-Host "Error: Failed to download certificate from S3 - $($_.Exception.Message)" exit 1 } #******************** retrive content from certificate for use ****************************# # Verify if the certificate file exists if (-not (Test-Path $certPemPath)) { Write-Host "Error: Certificate file not found at $certPemPath!" exit 1 } # Read and Validate Certificate Content $certPemContent = Get-Content -Raw -Path $certPemPath | Out-String if (-not $certPemContent -or $certPemContent.Length -lt 50) { # Basic validation for PEM content Write-Host "Error: Empty or invalid certificate content!" exit 1 } # Convert PEM to Binary and Import Certificate try { $certBytes = [Convert]::FromBase64String(($certPemContent -split "`n" | Where-Object { $_ -notmatch "-----(BEGIN|END) CERTIFICATE-----" }) -join "") $cert = New-Object System.Security.Cryptography.X509Certificates.X509Certificate2 -ArgumentList @(,$certBytes) $caThumbprint = $cert.Thumbprint } catch { Write-Host "Error: Failed to parse the certificate!" exit 1 } if (-not $cert -or -not $caThumbprint) { Write-Host "Error: CA Thumbprint could not be generated and certificate is invalid!" exit 1 } Write-Host "Certificate successfully parsed. CA Thumbprint: $caThumbprint" #******************** Add certificate to cert store ****************************# $stores = @("Cert:\LocalMachine\Root", "Cert:\LocalMachine\TrustedPeople", "Cert:\LocalMachine\My") foreach ($storePath in $stores) { try { $store = Get-Item -LiteralPath $storePath -ErrorAction Stop $store.Open('ReadWrite') $store.Add($cert) $store.Close() Write-Host "Certificate added to $storePath." } catch { Write-Host "Error: Failed to add certificate to $storePath - $($_.Exception.Message)" } } #******************** Certificate mapping for the user ****************************# try { $ssmParamterName = "ansiblerunnerPassword" $ssmParamterNameVal = Get-SSMParameterValue -Name $ssmParamterName $securePassword = ConvertTo-SecureString -String $ssmParamterNameVal -AsPlainText -Force $credential = New-Object System.Management.Automation.PSCredential ($username, $securePassword) } catch { Write-Host "Error: Failed to create credentials for $username - $($_.Exception.Message)" exit 1 } # Map certificate to user in WinRM if ($credential -and $cert -and $caThumbprint) { try { $certMapping = @{ Path = 'WSMan:\localhost\ClientCertificate' Subject = $cert.GetNameInfo('UpnName', $false) Issuer = $caThumbprint Credential = $credential Force = $true } New-Item @certMapping -ErrorAction Stop Write-Host "Certificate successfully mapped to WinRM for user $username." } catch { Write-Host "Error: Failed to map certificate to WinRM - $($_.Exception.Message)" exit 1 } } else { Write-Host "Error: Certificate mapping failed. Required components are missing." exit 1 } } function Configure-WinRMHttps { try { if (-not ([Security.Principal.WindowsPrincipal][Security.Principal.WindowsIdentity]::GetCurrent()).IsInRole([Security.Principal.WindowsBuiltInRole]::Administrator)) { Write-Host "Please run this script as Administrator" -ForegroundColor Red Exit 1 } # Stop WinRM service if running Write-Host "Stopping WinRM service..." Stop-Service WinRM -Force -ErrorAction Stop $dnsname = [System.Net.Dns]::GetHostByName($env:computerName).HostName Write-Output "Resolved DNS Name: $dnsname" $hostname = $env:COMPUTERNAME if((-not $hostname) -or (-not $dnsname)){ throw "Hostname and DNS name cannot be resolved!" } # Find certificate issued by CA $cert = Get-ChildItem -Path Cert:\LocalMachine\My | Where-Object { $_.Subject -match $dnsname -and $_.Issuer -match "YourCA" } if (-not $cert) { throw "No matching certificate found! WinRM HTTPS configuration failed." } $thumbprint = $cert.Thumbprint Write-Output "Certificate Thumbprint: $thumbprint" # Configure WinRM Write-Host "Configuring WinRM..." winrm quickconfig -q -Force winrm set winrm/config/service '@{AllowUnencrypted="true"}' winrm set winrm/config/service/auth '@{Basic="true"}' winrm set winrm/config/service/auth '@{Certificate="true"}' # Remove existing HTTPS listener Write-Host "Removing existing HTTPS listeners..." Get-ChildItem -Path WSMan:\localhost\Listener\ | Where-Object { $_.Keys -like "*HTTPS*" } | Remove-Item -Recurse -Force -ErrorAction Stop # Add new HTTPS listener Write-Host "Creating new HTTPS listener..." $port = 5986 New-Item -Path WSMan:\localhost\Listener -Transport HTTPS -Address * -CertificateThumbprint $thumbprint -Force -ErrorAction Stop # Configure firewall rule Write-Host "Configuring firewall rule..." $ruleName = "Windows Remote Management (HTTPS-In)" $existingRule = Get-NetFirewallRule -DisplayName $ruleName -ErrorAction SilentlyContinue if (-not $existingRule) { New-NetFirewallRule -DisplayName $ruleName ` -Direction Inbound ` -LocalPort $port ` -Protocol TCP ` -Action Allow ` -Program System -ErrorAction Stop Write-Host "Firewall rule created." } else { Write-Host "Firewall rule already exists." } # Start WinRM service Write-Host "Starting WinRM service..." Set-Service -Name WinRM -StartupType Automatic Start-Service WinRM -ErrorAction Stop # Verify configuration $listener = Get-ChildItem -Path WSMan:\localhost\Listener\ | Where-Object { $_.Keys -like "*HTTPS*" } if ($listener) { Write-Host "`nWinRM HTTPS Configuration Complete!" -ForegroundColor Green Write-Host "Certificate Thumbprint: $thumbprint" Write-Host "HTTPS Listener Port: $port" Write-Host "`nTo test the connection from another machine, use:" Write-Host "Test-WSMan -ComputerName $dnsname -Port $port -UseSSL" Write-Host "`nTo connect using PowerShell remoting:" Write-Host "Enter-PSSession -ComputerName $dnsname -Port $port -UseSSL -Credential (Get-Credential)" } else { throw "WinRM HTTPS Configuration Failed!" } } catch { Write-Host "Error: $_" -ForegroundColor Red Exit 1 } } # exit if ansiblerunner user doesn't exist try { $userExists = Get-LocalUser -Name $username -ErrorAction Stop } catch { Write-Host "User '$username' does not exist. Exiting..." exit 1 } # Call the function Configure-User-Auth Configure-WinRMHttps
-
Testing from the Ansible Controller Machine
- Create a Python virtual environment in the Ansible controller machine.
- Check the OpenSSL version and ensure compatibility.
- Use the openssl s_client command to validate if required:
- openssl s_client -connect your_server_hostname:5986
-
Ansible inventory file
windows: hosts: your_server_hostname: vars: ansible_user: ansiblerunner ansible_port: 5986 ansible_connection: winrm ansible_winrm_transport: certificate ansible_winrm_ca_trust_path: CAcert.pem ansible_winrm_cert_pem: ansiblerunner.pem ansible_winrm_cert_key_pem: ansiblerunner.key
-
Steps to Configure Ansible Automation Platform for Windows Server
12.1 Create a Custom Credential Type
A custom credential type is required to securely store certificates and keys for Windows authentication.
- Navigate to Ansible Automation Controller.
- Go to Infrastructure > Credential Types.
- Click Add to create a new credential type.
- Define the following fields:
- Name: Windows Certificate Authentication
- Description: Credential type to store certificates and keys for Windows authentication.
- Input Configuration (YAML):
fields: - id: cert type: string label: Certificate multiline: true - id: key type: string label: Key secret: true multiline: true - id: cacert type: string label: cacert secret: true multiline: true - Injector Configuration (YAML):
env: MY_KEY_FILE: '{{ tower.filename.key_file }}' MY_CERT_FILE: '{{ tower.filename.cert_file }}' MY_CACERT_FILE: '{{ tower.filename.key_file }}' file: template.key_file: '{{ key }}' template.cert_file: '{{ cert }}' template.cacert_file: '{{ cacert }}'
- Click Save to create the credential type.
12.2 Create a Credential for Windows Authentication
- Navigate to Credentials.
- Click Add to create a new credential.
- Fill in the following details:
- Name: Windows Server Credential
- Credential Type: Select Windows Certificate Authentication (created in the previous step).
- Organization: Select the appropriate organization.
- Certificates: Upload or paste the certificate contents (best to upload them to avoid formatting issues).
- Private Key: Upload or paste the private key content (best to upload it to avoid formatting issues).
- Click Save.
12.3 Create an Inventory with Windows Hosts
- Navigate to Inventories.
- Click Add and select Inventory.
- Enter the following details:
- Name: Windows Server Inventory
- Organization: Select the appropriate organization.
- Click Save.
- Click Hosts and add a new host with:
- Hostname: The IP or DNS name of the Windows server.
- Click Save.
- Or optionally, you can import hosts from your project’s inventory file.
12.4 Create a Job Template
- Navigate to Templates.
- Click Add and select Job Template.
- Fill in the following details:
- Name: Windows Server Automation
- Job Type: Run
- Inventory: Select Windows Server Inventory
- Project: Select the project containing the playbook.
- Playbook: Select the playbook to execute.
- Sample Playbook to ping the Windows machine:
-
- name: Windows Test hosts: windows gather_facts: false vars: ansible_user: ansiblerunner ansible_port: 5986 ansible_connection: winrm ansible_winrm_transport: certificate ansible_winrm_ca_trust_path: "{{ lookup('env', 'MY_CACERT_FILE') }}" ansible_winrm_cert_pem: "{{ lookup('env', 'MY_CERT_FILE') }}" ansible_winrm_cert_key_pem: "{{ lookup('env', 'MY_KEY_FILE') }}" tasks: - name: Ping Server ansible.windows.win_ping:
- Credentials: Select Windows Server Credential.
- Click Save.
12.5 Run the Job Template
- Navigate to Templates.
- Locate the Windows Server Automation job template.
- Click Launch to execute the playbook.
- Monitor the job execution logs for any issues.
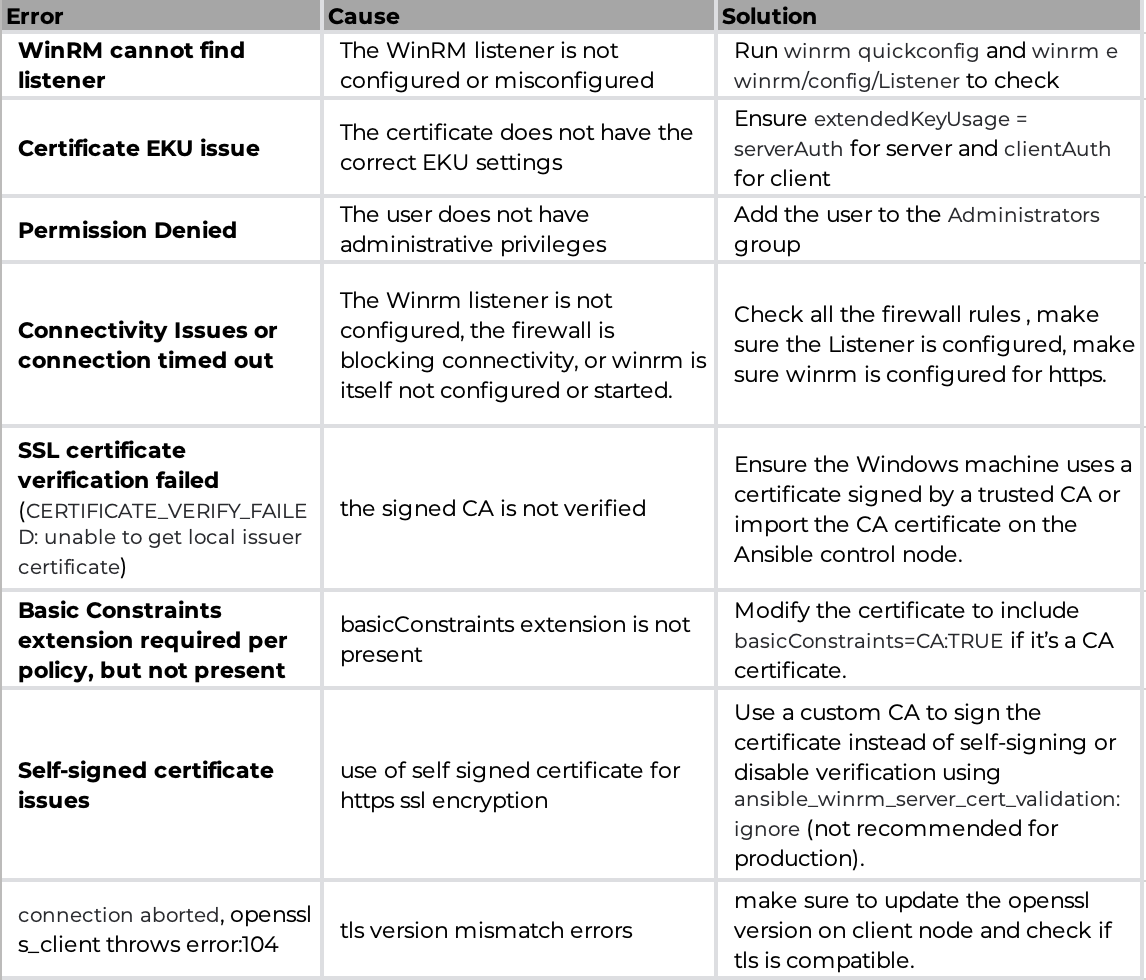
13. Common Issues & Troubleshooting
Conclusion
By following this guide, you have successfully configured certificate-based authentication for WinRM on Windows and secured the connection using HTTPS. This approach strengthens your security by encrypting all WinRM communication and ensuring that only trusted clients with valid certificates can authenticate—eliminating the need for password-based logins.
For additional debugging, check:
-
certlm.msc(Local Machine Certificates) -
winrm get winrm/config(View WinRM configuration) - Windows Event Logs under Applications and Services Logs → Microsoft → Windows → WinRM
If you encounter issues, recheck the certificate trust, WinRM listener configuration, and firewall rules.
References
- OpenSSL documentation :
- Ansible Windows Winrm Configuration :
- WINRM reference doc :