
Introduction
Managing multiple attachments in Microsoft Forms, particularly when several fields require file uploads, can present significant challenges, especially when ensuring accurate storage in a SharePoint list. In this blog post, we will demonstrate how to build a Power Automate Cloud Flow that simplifies and automates this process. The solution captures, processes, and stores all submitted data and attachments reliably in the appropriate SharePoint list.
Use Case Overview
The organization has a central repository in SharePoint to track all company-wide use cases. In our organization, a use case captures a real solution delivered to a client or internal team. Each submission includes key details like Account Name, Project Name, Technology Used, Industry, Vendor, and roles such as AM, Core AM, DSE, etc. Employees use an MS Forms interface to submit their use cases, and designated approvers review and approve them. Once approved, the system stores the use case details in a SharePoint list. The form consists of multiple fields, including two specific fields that require users to upload multiple attachments.
What is the Purpose of Using a Group Form? What are the Key Benefits?
To foster enhanced collaboration and shared ownership of the process for submitting use cases, we opted for a Group Form owned by our Microsoft 365 group. This strategic choice offers several key advantages:
- Shared Ownership: Multiple team members can collaboratively manage the form without dependence on a single individual.
- Centralized Responses: All form responses and associated files are automatically stored within the group’s SharePoint site, simplifying access control and management.
- Auditability: All modifications and submissions are transparently traceable to the Microsoft 365 group.
- Collaborative Management: All group members possess the ability to contribute to the form’s creation, editing, and overall management.
- Streamlined Approval Process: Designated approvers can efficiently review submitted use cases and take necessary actions directly within the workflow.
This approach not only simplifies the data collection workflow but also ensures active participation and efficient management of the form by all relevant team members. The most technically intricate aspect of this solution involved effectively handling multiple file attachments originating from different form fields in Microsoft Forms and accurately storing them within the SharePoint environment.
Solution Architecture
Our solution leverages the power of several integrated Microsoft 365 technologies to achieve seamless automation:
- MS Forms: Provides a user-friendly interface for data collection, including the capability to upload multiple attachments.
- Power Automate: Orchestrates the entire workflow and implements the necessary business logic for data processing and storage.
- SharePoint: Serves as the central repository for secure storage and organization-wide accessibility of use case data and attachments.
- Microsoft 365 Groups: Enables enhanced collaboration and simplified permission management for the form and its associated data.
We established a Group Form owned by a Microsoft 365 group to ensure collaborative management and automatic storage of form responses within the group’s SharePoint site.
-
Setting Up the MS Form
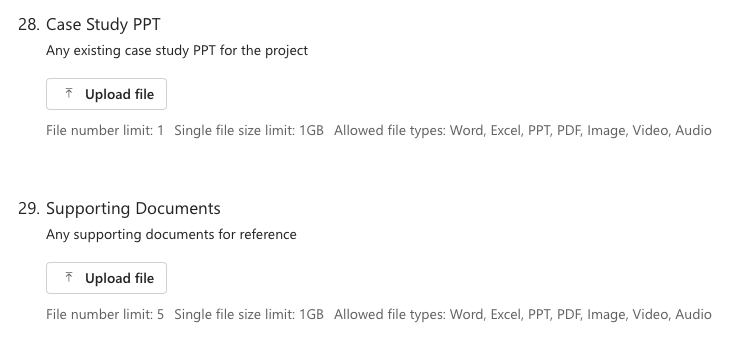
We designed our Microsoft Form with two distinct fields specifically configured to accept multiple file attachments from users.
-
Designing the Power Automate Flow
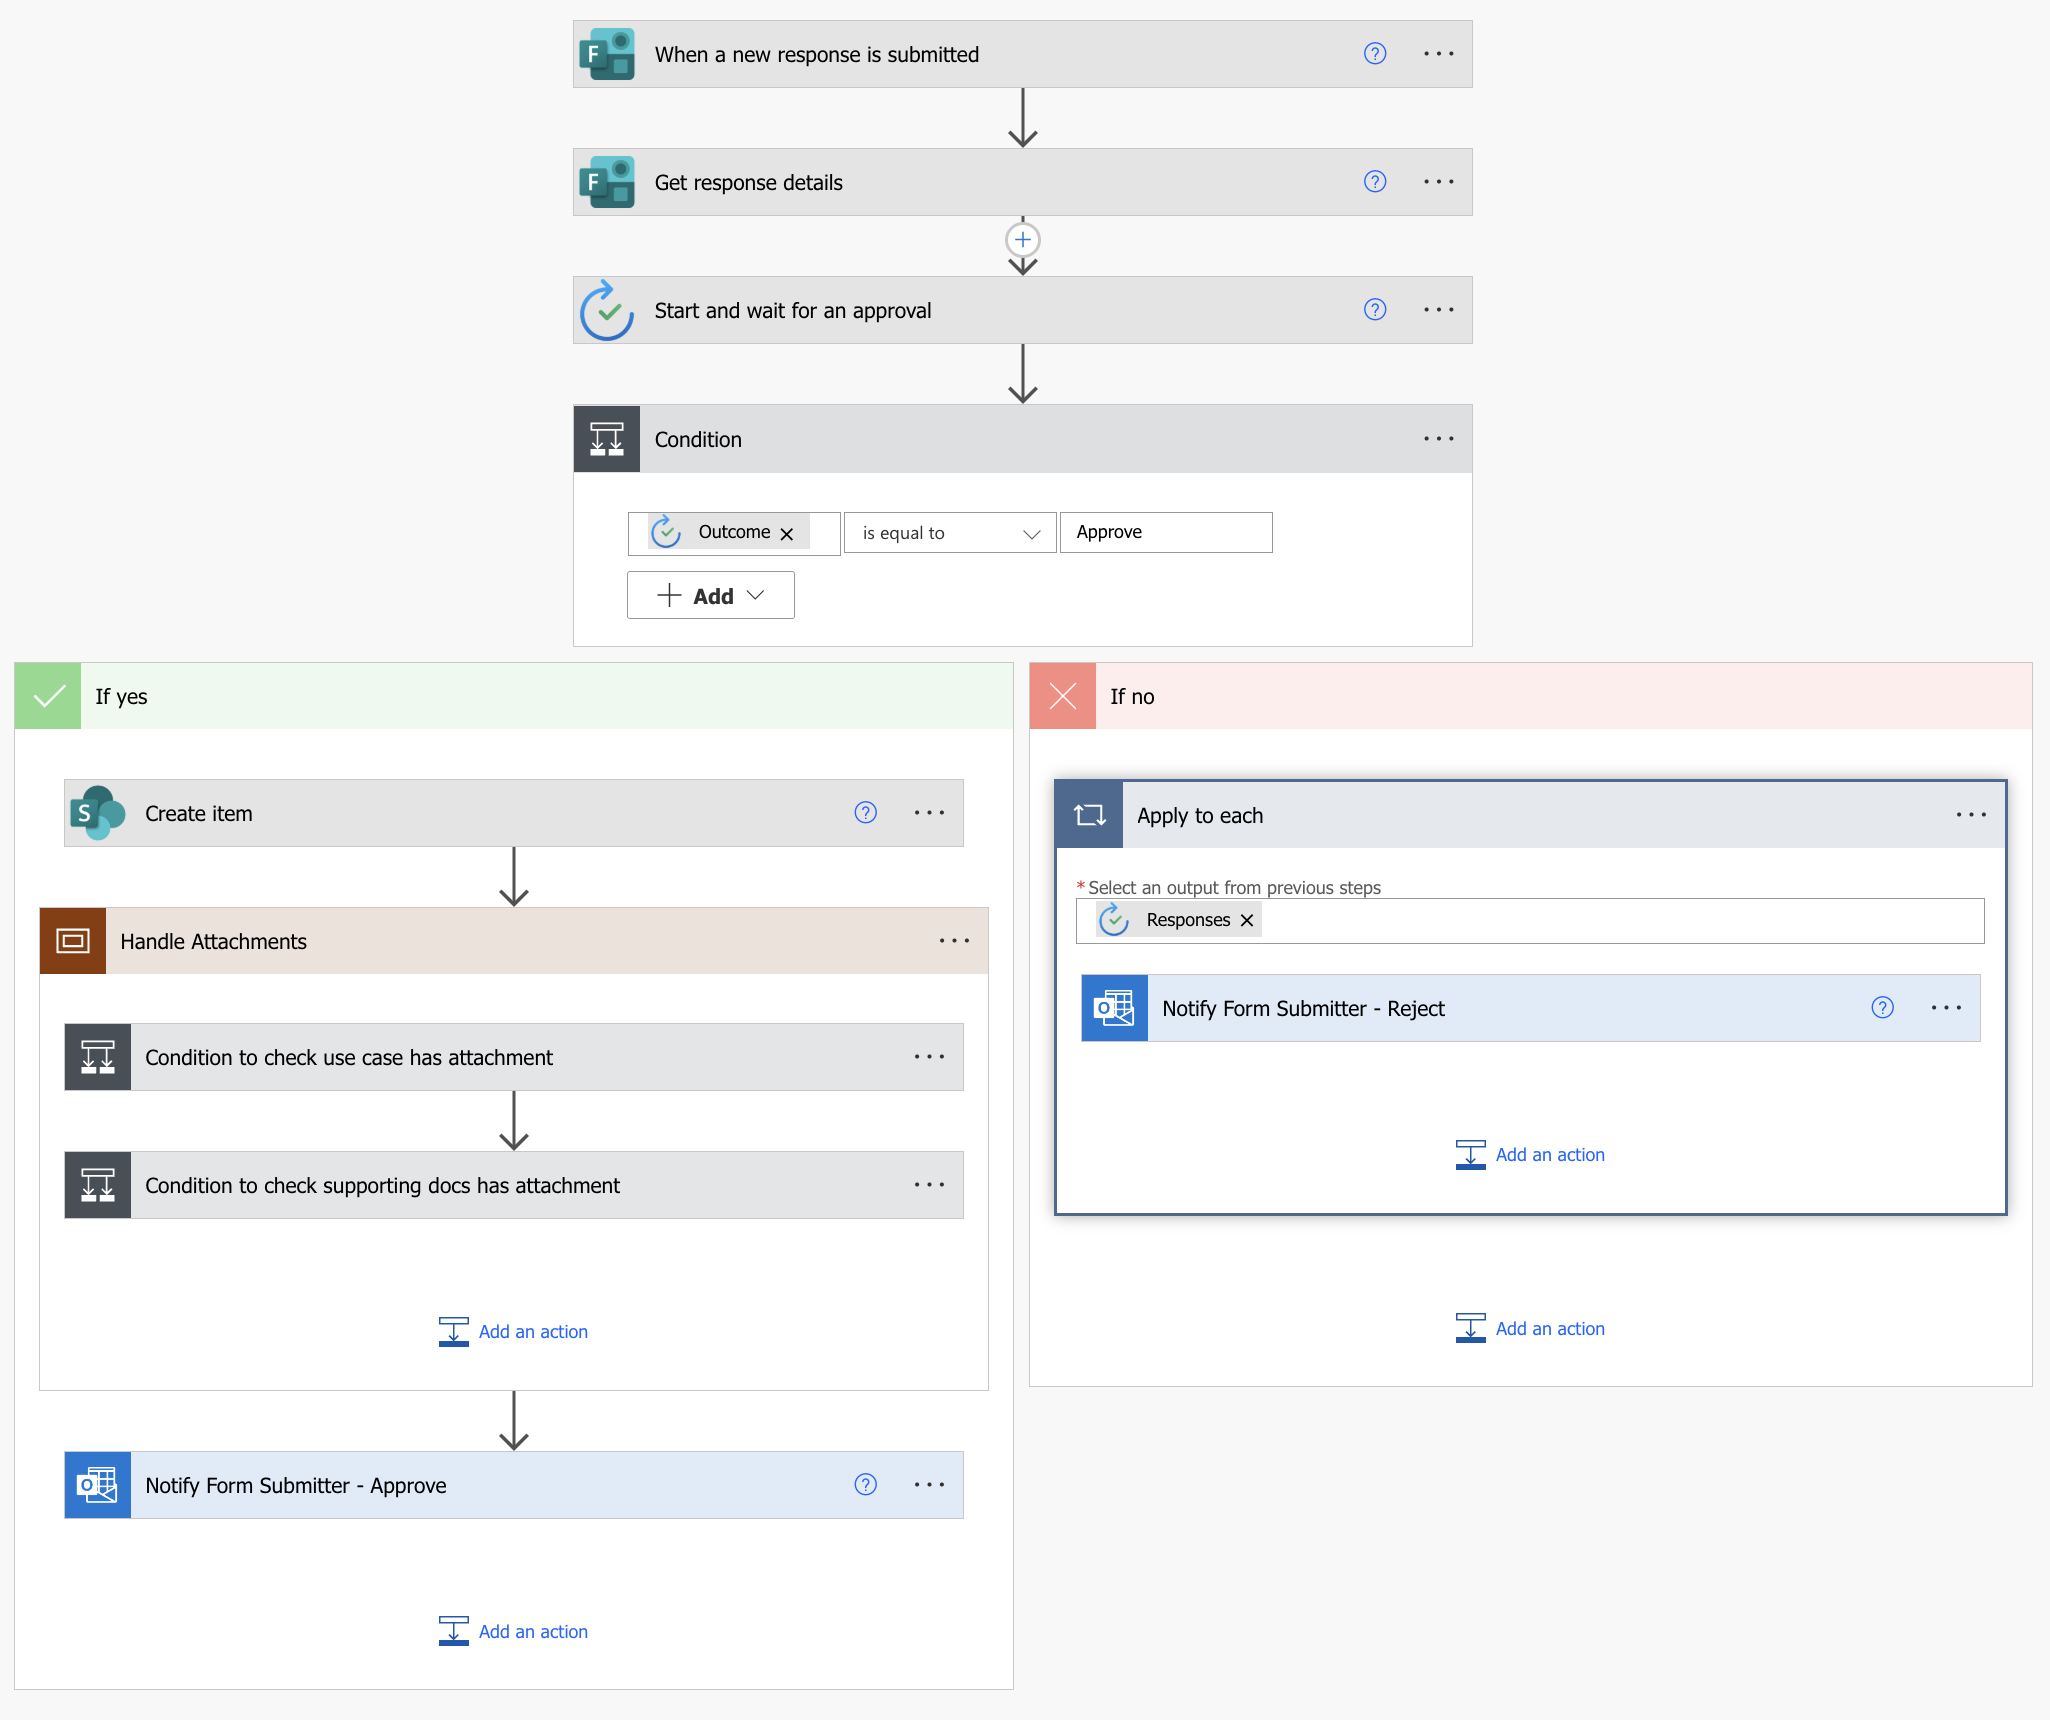
The Cloud Flow designed to automate the submission of use cases comprises the following key sequential steps:
-
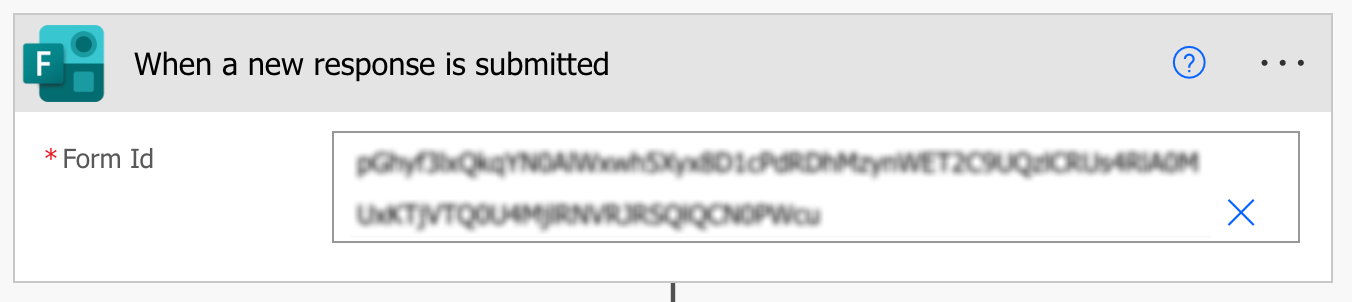
Trigger: When a New Response is Submitted
-
- Use the “When a new response is submitted” trigger for MS Forms.
-
- Identify the Form ID (since this is a Group Form, it is stored under the group’s SharePoint site).
-
Get Response Details
-
- Add the action “Get response details”.
-
- Select the same Form ID as used in the trigger.
-
- Use the Response ID from the trigger.
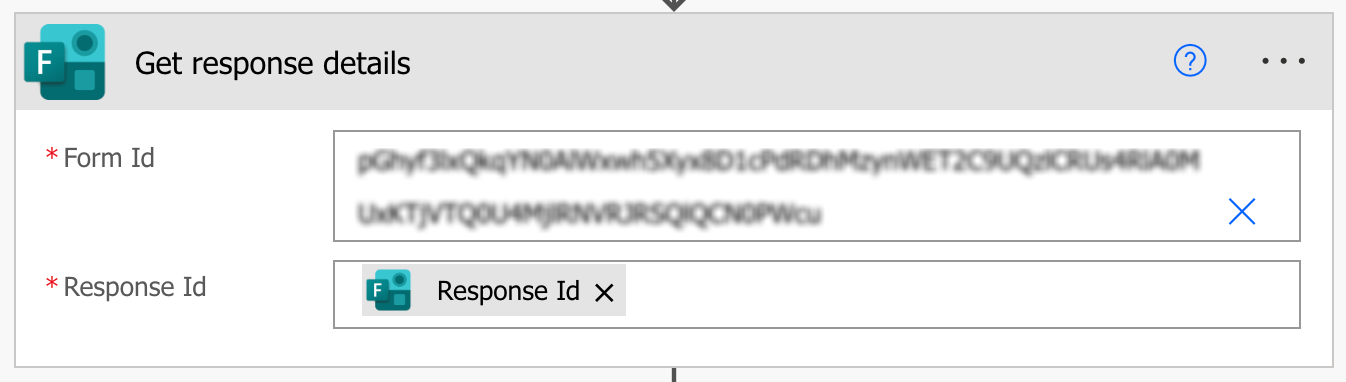
Note: Power Automate doesn’t support dynamically selecting a form from a variable (like using a form ID stored in a SharePoint list) in most connectors. It requires a hardcoded or manually selected value in the flow designer.
3. Approval Process
The flow incorporates an approval process using Power Automate’s Approval Actions. Once you submits the form, the system routes an approval request to the designated approvers. After they make a decision:
- If approved, the details from the form proceed to be added to the SharePoint list.
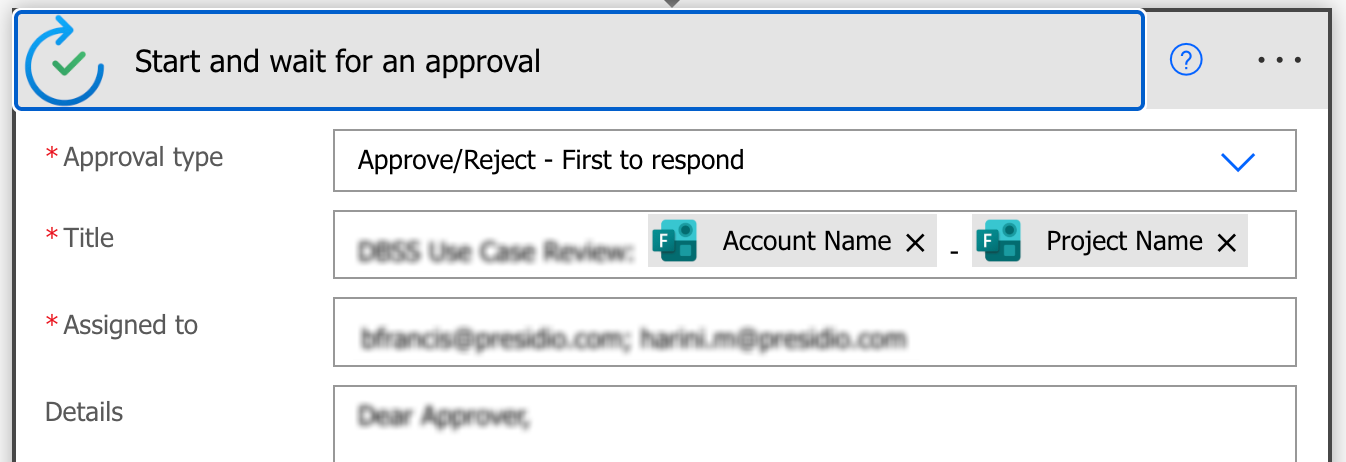
- If rejected, a notification email is automatically sent to the submitter, detailing the reasons for rejection and any necessary next steps. This step involves the “Start and wait for an approval” action, where you select the “Approval type” (e.g., “Approve/Reject — First to respond”), define the “Title” of the approval request, and assign it to the appropriate approvers. You can use dynamic content to include relevant details, such as the form submitter and key information about the submission.
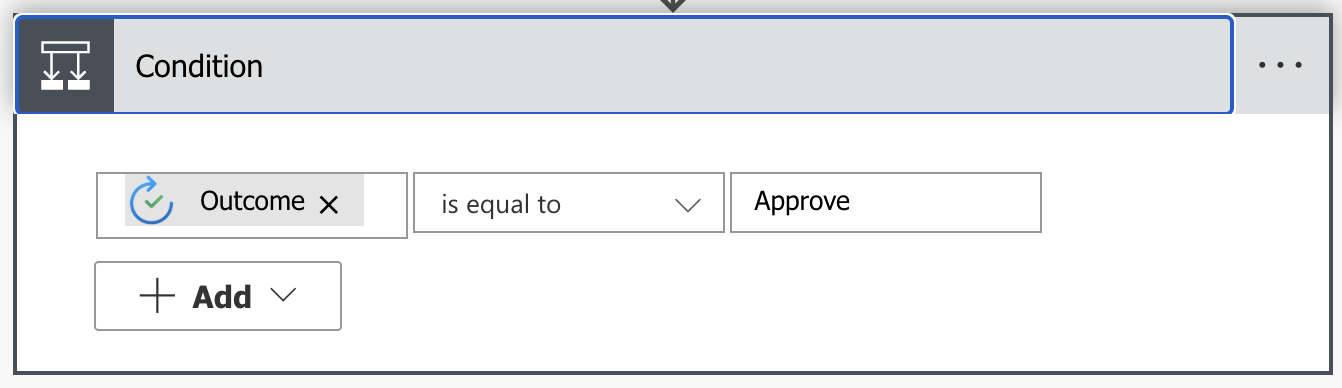
4. Condition — Check Approval Status
A “Condition” control is added to evaluate the outcome of the approval process. It checks if the approval status is “Approve.”
- If the condition evaluates to false (Rejected), an email notification is sent to the submitter, and the flow terminates.
- If the condition evaluates to true (Approved), the flow proceeds to create a new item in the SharePoint list.
-
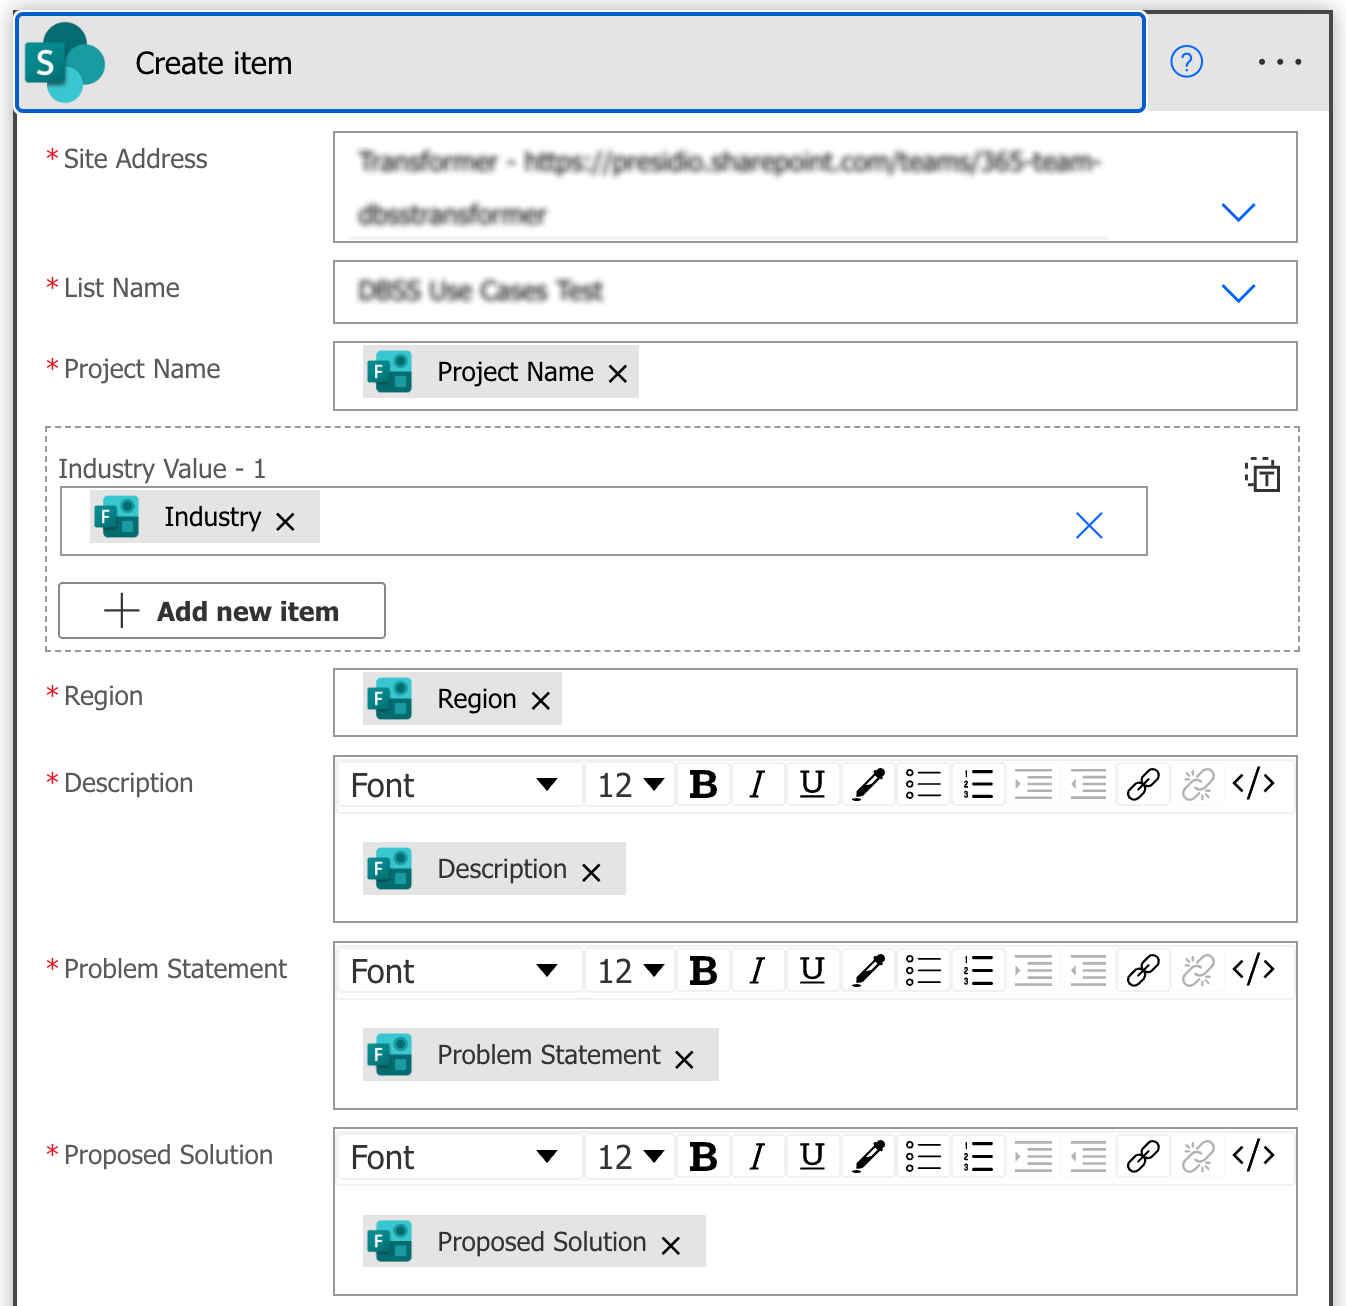
Create an Item in a SharePoint List
The “Create item” action is used to add a new item to the designated SharePoint list. You need to specify the Site Address and the List Name. Subsequently, map all the relevant fields from the Microsoft Form response to their corresponding columns in the SharePoint list. Importantly, we leave the attachment fields in the SharePoint list empty at this stage, as we will handle the attachments in subsequent steps.
6. Handle Attachments
As our form includes two fields that allow multiple attachments, we process the files from each field separately to ensure they are correctly associated with the newly created SharePoint item.
Action: Scope-Handle Attachments
A “Scope” action is added to logically group all the actions related to processing the attachments. This improves the flow’s organization and readability.
-
Process Attachments from First Attachment Field
This section details the steps to handle the attachments from the first attachment field in the form.
-
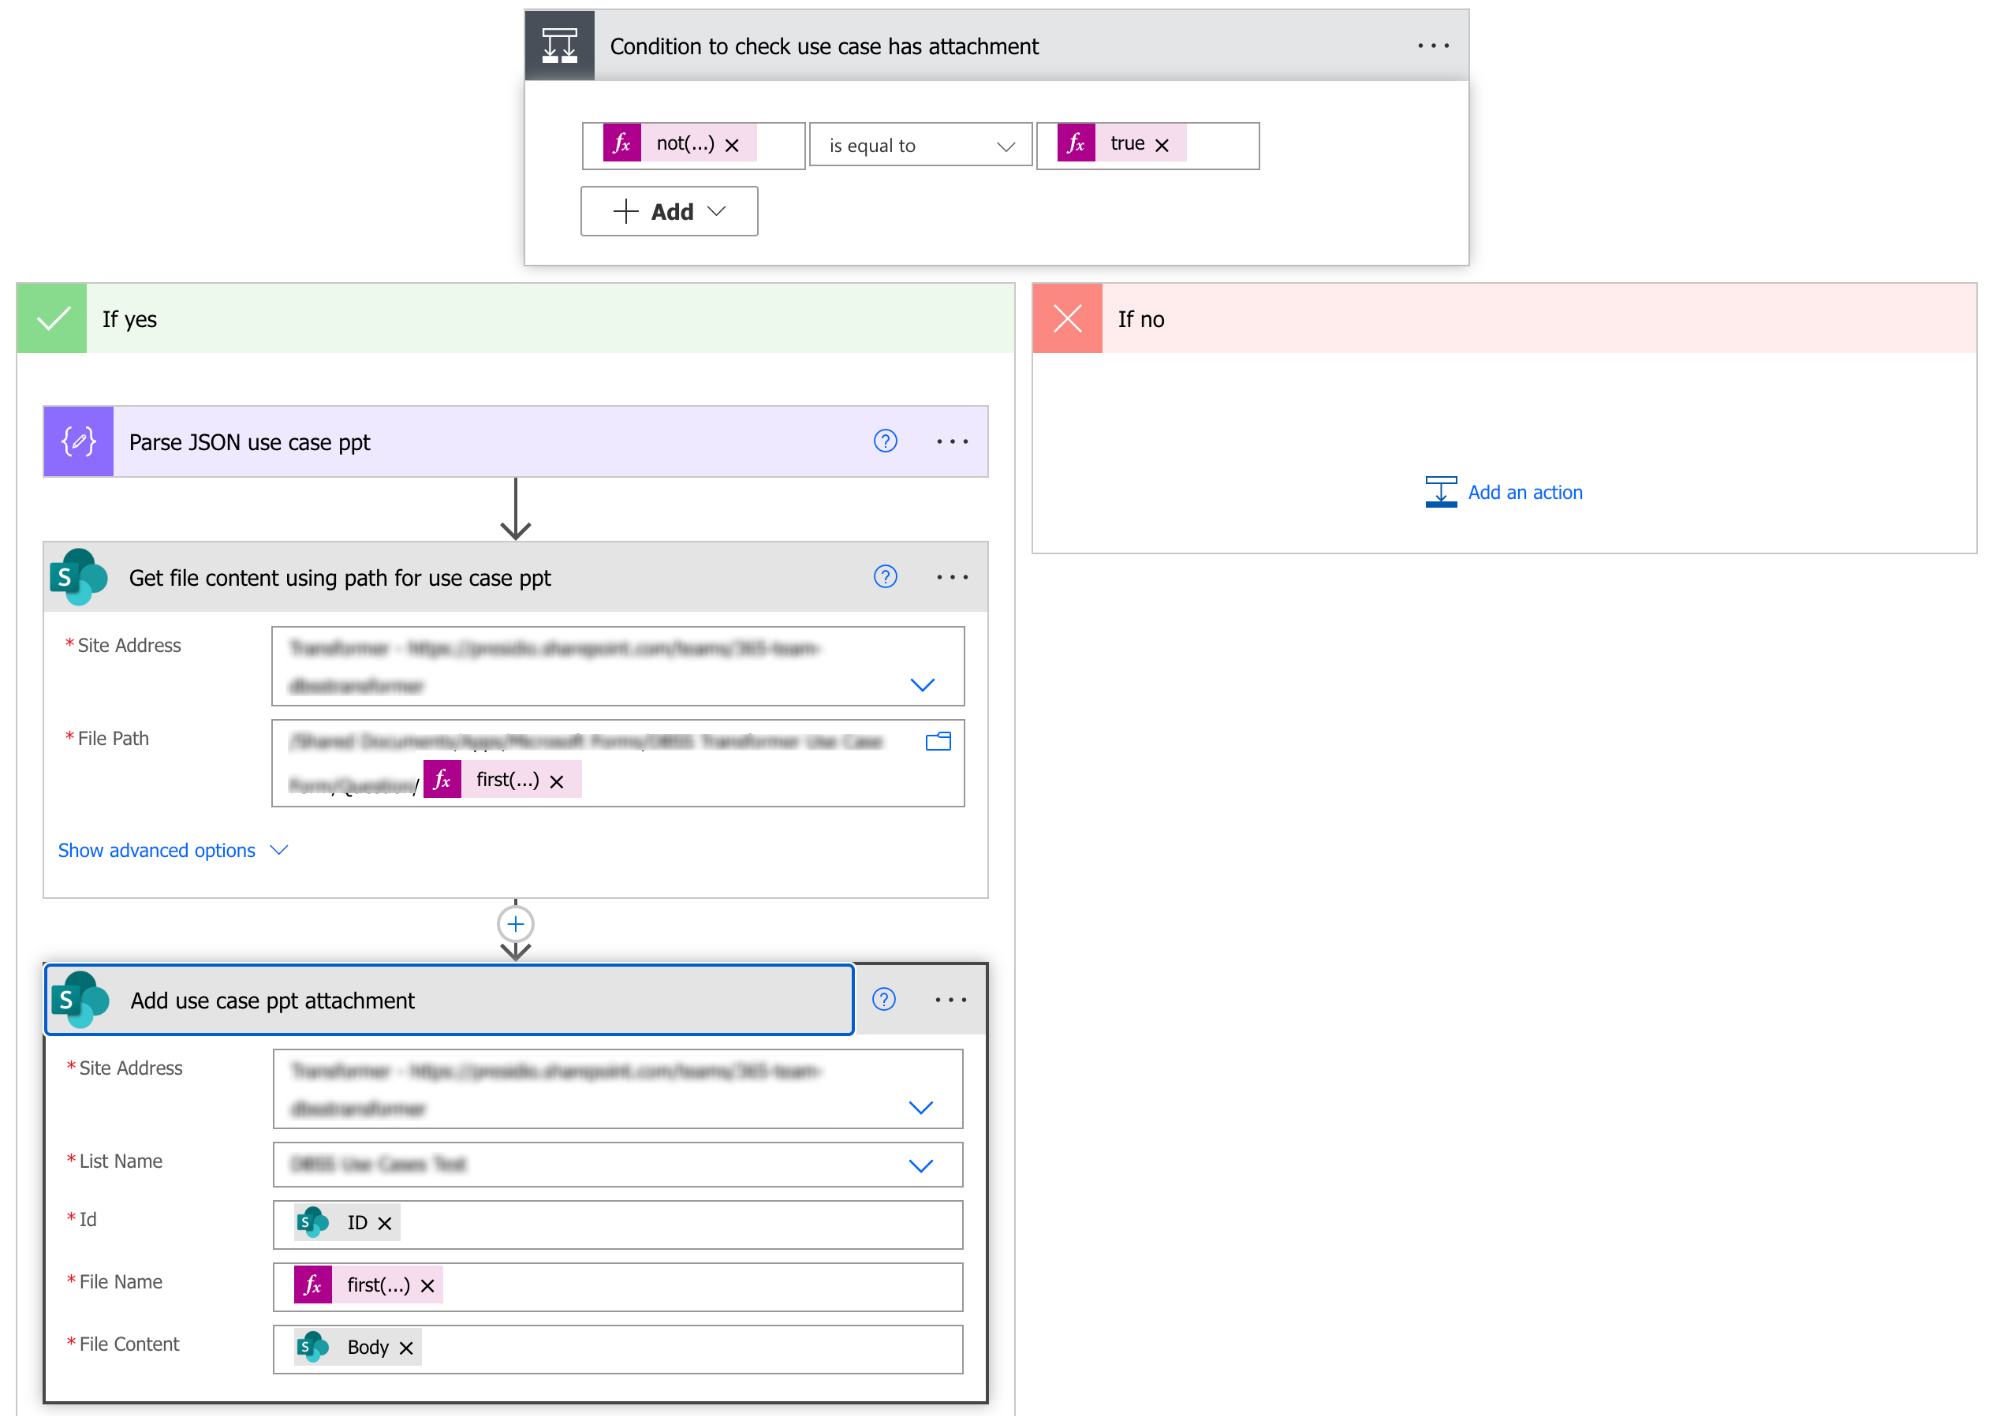
Condition—Check if the First Attachment Field has Files
A “Condition” control is used to determine if the first attachment field in the form response contains any files. The following expression is used on the left side of the condition: not(empty(outputs(‘Get_response_details’)?[‘FieldValue’])). If this condition evaluates to true, it means there are attachments to process; otherwise, the flow moves to the next step.
-
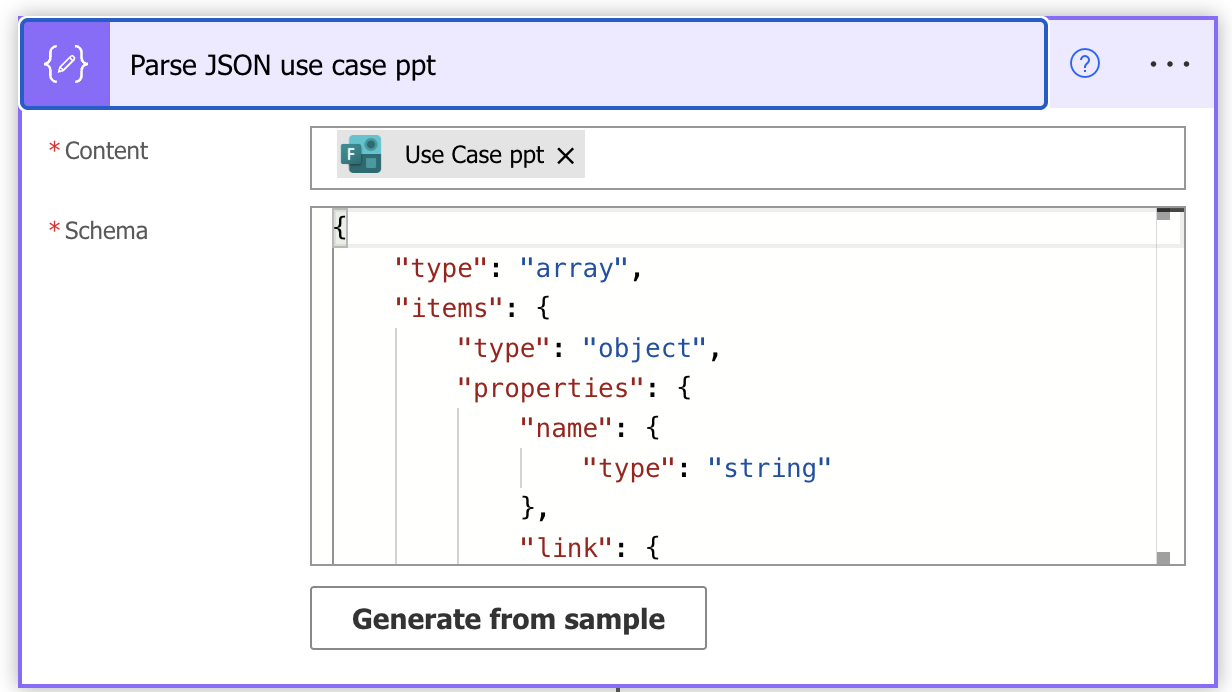
Parse JSON (First Attachment Field)
Add the “Parse JSON” action to extract the details of the attached files. In the Content field, use dynamic content to select the response from the first attachment field. Click Generate from sample and paste a sample JSON response obtained from previous test runs to define the schema.
Here’s how to do it:
- Submit the form with sample attachments.
- Run the flow and wait for it to complete.
- Open the flow run history in Power Automate.
- Find the step (like “Get response details”) and copy the output from the attachment field.
- Go back to the Parse JSON action, click “Generate from sample,” and paste that copied JSON.
Power Automate will then automatically generate the schema for you. This feature lets the flow understand the structure (like file name, file path, type, etc.) and allows you to use those properties in later steps.
-
Get File Content Using Path (First Attachment)
The “Get file content using path” action retrieves the actual file content from the SharePoint site where the form responses are stored. Use the “File Path” dynamic content from the “Parse JSON” action. The following expression was used in the file path to specifically fetch the file name: first(body(‘Parse_JSON_use_case_ppt’))?[‘name’].

-
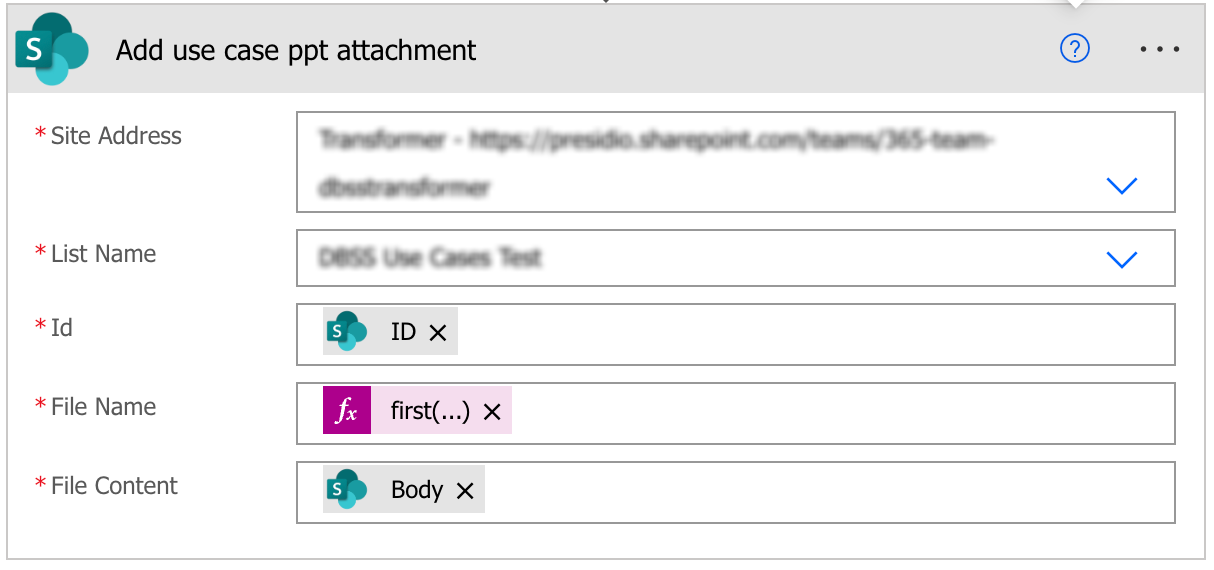
Add Attachment (First Attachment)
The “Add attachment” action associates the retrieved file with the SharePoint item created earlier. Specify the SharePoint Site and List Name. Use the ID from the “Create item” action to link the attachment. For the File Name, use the “name” dynamic content from the “Parse JSON” action (e.g., first(body(‘Parse_JSON_use_case_ppt’))?[‘name’]). For the File Content, use the output from the “Get file content using path” action.
-
Process Attachments from Second Attachment Field
The steps outlined in Section 7 are repeated here to process the attachments from the second attachment field in the form. This includes the following actions:
- Condition: Check if the second attachment field contains files.
- Parse JSON: Extract file details from the second attachment field’s response.
- Get File Content Using Path: Retrieve the content of the files from the SharePoint site.
- Add Attachment: Attach the retrieved files to the corresponding SharePoint item.
Note: Ensure that all dynamic content references in these steps correspond to the second attachment field in your Microsoft Form.
-
Notify the Submitter based on Approval and Rejection
This final step ensures that the form submitter receives timely feedback on the status of their submission.
Send an Email Notification
The “Send an email” action is used to send notifications.
- The To field is set to the email address of the form submitter.
- The Subject line clearly indicates the status of the submission (e.g., “Your Use Case Submission – Approved” or “Your Use Case Submission – Rejected”).
- The Body includes relevant details such as the approval/rejection status and, in case of rejection, the reasons and any required next steps.
Handling Delayed Approvals with Reminders
In real-world scenarios, an approver might not act on the request immediately. Since Power Automate approvals can remain pending for up to 30 days, it’s best to implement reminder logic to ensure timely responses.
Use a Do Until Loop for Periodic Reminders
- After triggering the approval, store the approval ID using the “Start and wait for an approval” action.
- Use a Do Until loop to:
-
- Check whether the approval outcome has been provided.
-
- Inside the loop:
-
-
- Add a Delay (e.g., wait for 1 or 2 days).
-
-
-
- Use the “Get approval details” action to check the current status.
-
-
-
- If still pending, kindly send a reminder email to the approver.
-
- Exit the loop if the approval is completed or after a set number of attempts (e.g., 3 reminders).
- Outside the loop:
-
- Use a Condition to check the final status and proceed accordingly (approved or rejected).
Benefits: This method offers structured retries, better user accountability, and helps prevent the flow from stalling silently.
Conclusion
By automating our use case submission, we’ve significantly improved how we collect, track, and manage key project insights across the organization. The Power Automate solution ensures seamless handling of multiple attachments, structured approvals, and real-time notifications.
Leveraging Microsoft 365 Groups enhances collaboration, while automated reminders ensure timely action from approvers. This scalable framework promotes better coordination, transparency, and knowledge sharing across teams—enabling us to continuously showcase value through impactful solutions.
