
Introduction
Have you ever developed a Power Apps app that required handling a lot of data or doing difficult things, only to encounter the dreaded “timeout” error? You’re not the only one. Power Apps has a 2‑minute time limit for operations that run concurrently. When you’re dealing with long‑running processes, this can become a significant challenge.
This blog will guide you through using a polling pattern to resolve timeout issues in Power Apps efficiently and cleanly. This pattern is useful in situations such as
- Handling large datasets
- Generating complex reports
- Making lengthy API calls
- Performing multiple tasks simultaneously
- Integrating with slow third-party systems
By the end of this blog, you’ll understand exactly how the polling pattern works and have a functional version ready to use in your applications.
Understanding the Problem
Let’s discuss what causes timeouts and why the polling pattern is effective before we get to the solution.
The Timeout Challenge
For synchronous activities, Power Apps has a 2-minute (120-second) timeout. This means that if your API call or Power Automate flow doesn’t respond within two minutes, Power Apps will terminate the connection and generate an error. This limit helps maintain system stability and prevents resource exhaustion.
Why Traditional Approaches Don’t Work
Many developers initially try to solve this by:
- Raising the timeout settings, but not exceeding the hard limit
- Breaking tasks down into smaller portions (which isn’t always practical)
- Using synchronous flows that take a long time to finish (which still hit the limit)
These methods overlook the fundamental issue: some tasks naturally require time to complete, and we need an effective way to manage them smoothly.
Enter the Polling Pattern
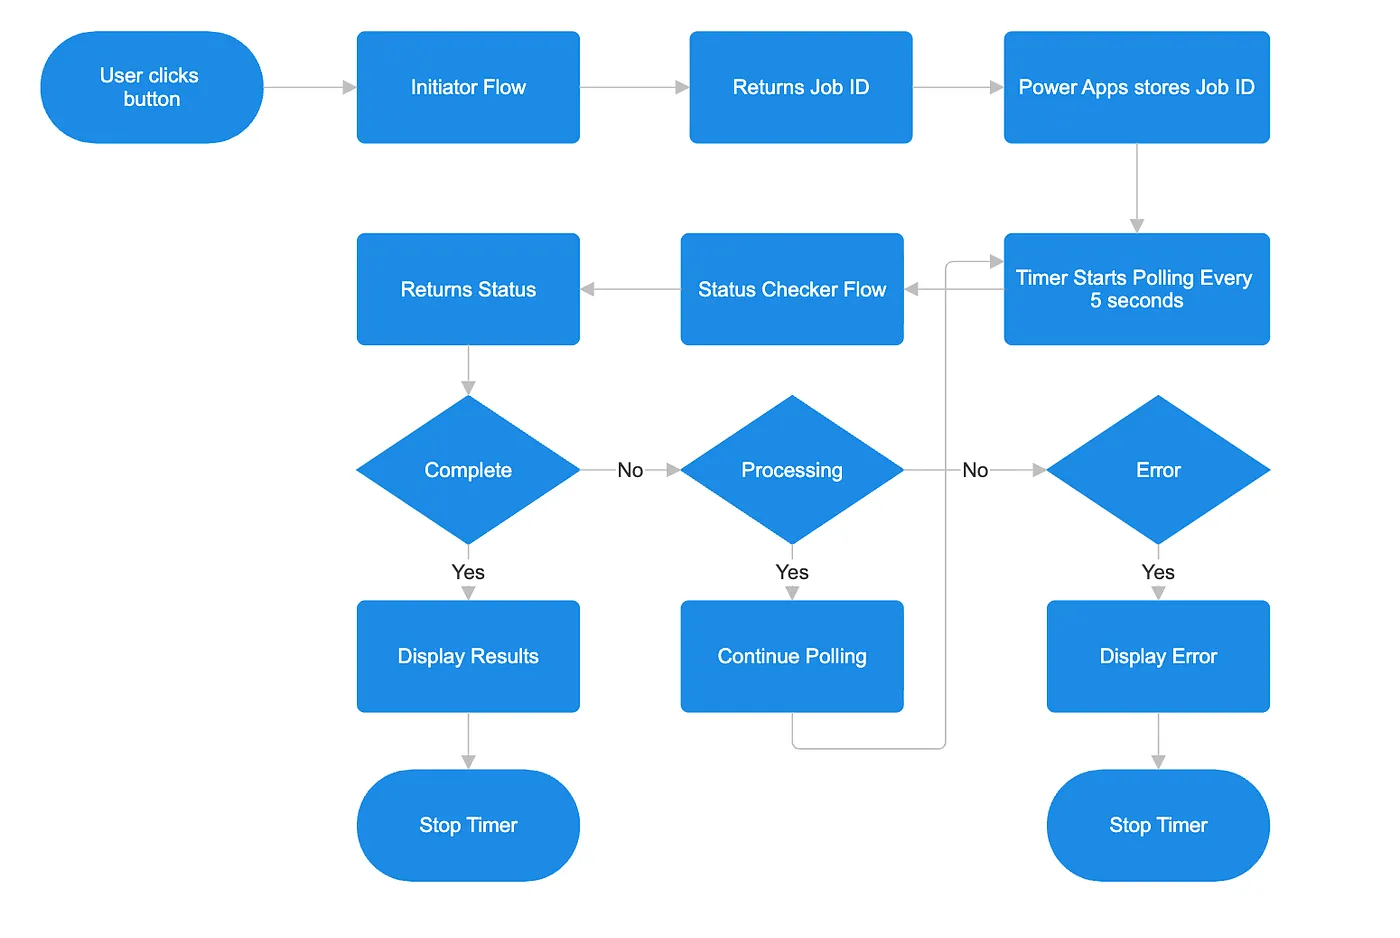
The polling pattern addresses this by transforming a long-running synchronous action into one that operates asynchronously. Here’s how it works:
- Start: Power Apps initiates the process and receives an immediate response.
- Poll: Power Apps periodically checks the status of the operation.
- Done: Once the operation is complete, Power Apps retrieves the final outcome.
Architecture Overview
This design keeps the app responsive while backend tasks continue running for as long as needed.
Components Required
Let’s look at the components you’ll need to implement this design:
- Power Apps (Frontend)
- An interface for initiating work
- A timer for polling
- A component to display the status of user comments
Power Automate Flow 1: Process Flow
- Receives the request from Power Apps initiated by the user.
- Starts the long-running process.
- Immediately provides a unique ID.
Power Automate Flow 2: Worker Flow
- Performs the time-consuming task.
- Stores the result in a database.
- Monitors the job status during execution.
Power Automate Flow 3: Status Checker
- Requires a Job ID.
- Returns the current status and results once the job is complete.
- Identifies the data source (such as SharePoint or Dataverse).
- Tracks job progress and its outcomes.
- Maintains job-related information throughout the process.
The Flow of Data
Implementation Guide
Now let’s build this solution step by step using clear and simple code examples.
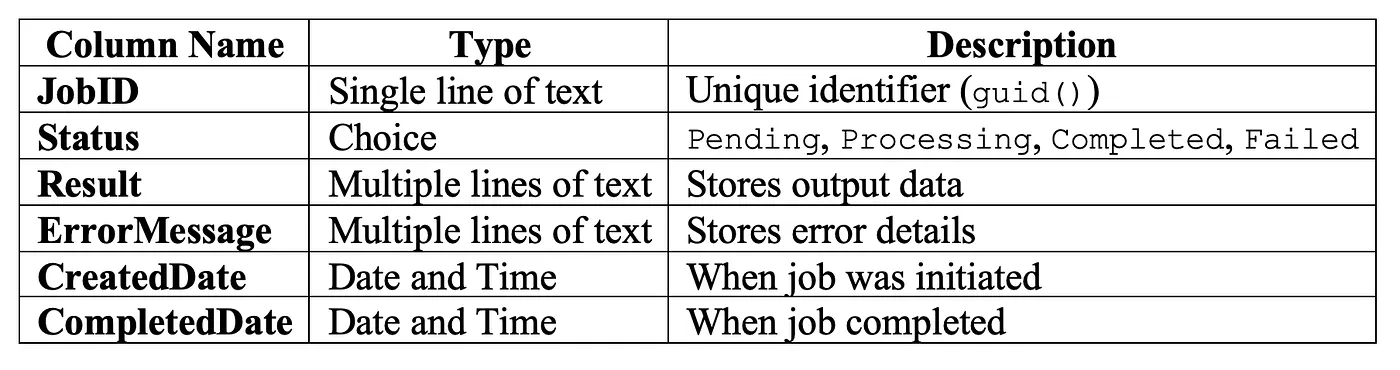
Step 1: Create the Data Source
Create a SharePoint List (or Dataverse Table) named JobStatus with the following columns:
Step 2: Build the Initiator Flow
Flow Name: InitiateLongRunningJob
# =====================================
# FLOW: InitiateLongRunningJob
# =====================================

trigger:
  type: PowerAppsV2

actions:
  - Initialize_Variable:
      name: varJobID
      type: string
      value: "@{guid()}"

  - Add_New_Row_to_Dataverse:
      table: JobStatus
      columns:
        crf_jobid: "@{variables('varJobID')}"
        crf_status: "Pending"
        crf_createddate: "@{utcNow()}"

  - Run_Worker_Flow_Async:
      flow: "ProcessLongRunningJob"
      parameters:
        JobID: "@{variables('varJobID')}"
      note: "Do not wait for response (asynchronous)"

  - Respond_to_PowerApps:
      outputs:
        jobid: "@{variables('varJobID')}"
Step 3: Flow — ProcessLongRunningJob
Trigger: Manual trigger with parameter JobID (String)
# =====================================
# FLOW: ProcessLongRunningJob
# =====================================

trigger:
  type: Manual
  inputs:
    - name: JobID
      type: string

actions:

  - Update_Status_to_Processing:
      type: Update_a_row
      table: JobStatus
      filter: "crf_jobid eq '@{triggerBody()['JobID']}'"
      fields:
        crf_status: "Processing"

  - Scope_Try:
      type: Scope
      runAfter: []
      actions:
        - Business_Logic_Step_1:
            description: "Perform data fetching, API calls, or processing"
        - Business_Logic_Step_2:
            description: "Generate report or compute results"
        - Update_Completed:
            type: Update_a_row
            table: JobStatus
            filter: "crf_jobid eq '@{triggerBody()['JobID']}'"
            fields:
              crf_status: "Completed"
              crf_result: "@{outputs('Business_Logic_Step_2')?['body']}"
              crf_completeddate: "@{utcNow()}"

  - Scope_Catch:
      type: Scope
      runAfter: [Scope_Try: Failed]
      actions:
        - Update_Failed:
            type: Update_a_row
            table: JobStatus
            filter: "crf_jobid eq '@{triggerBody()['JobID']}'"
            fields:
              crf_status: "Failed"
              crf_errormessage: "@{coalesce(body('Scope_Try')?['error']?['message'], 'Unknown error')}"
              crf_completeddate: "@{utcNow()}"
Purpose: Handles the main business logic securely and provides full error tracking.
Step 4: Flow — CheckJobStatus
Trigger: Power Apps (V2)
Input: JobID (String)
# =====================================
# FLOW: CheckJobStatus
# =====================================

trigger:
  type: PowerAppsV2
  inputs:
    - name: JobID
      type: string

actions:
  - Get_Job_Row:
      type: List_rows
      table: JobStatus
      filter: "crf_jobid eq '@{triggerBody()['JobID']}'"
      topCount: 1

  - Condition_RowFound:
      condition: "@greater(length(body('Get_Job_Row')?['value']), 0)"
      ifTrue:
        - Respond_to_PowerApps:
            outputs:
              status: "@{first(body('Get_Job_Row')?['value'])?['crf_status']}"
              result: "@{first(body('Get_Job_Row')?['value'])?['crf_result']}"
              errormessage: "@{first(body('Get_Job_Row')?['value'])?['crf_errormessage']}"
      ifFalse:
        - Respond_NotFound:
            outputs:
              status: "NotFound"
              result: ""
              errormessage: "Job not found"
Purpose: Allows Power Apps to poll job status safely and display updates.
Step 5: Power Apps Interface
Controls
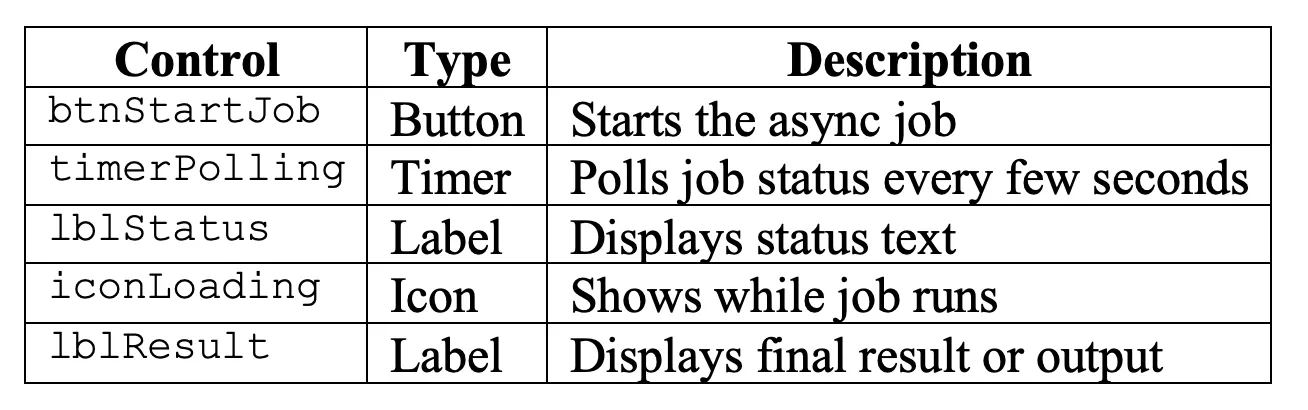 Button — Start Processing
// Reset variables
Set(varJobID, "");
Set(varJobStatus, "");
Set(varJobResult, "");
Set(varIsPolling, false);
// Start flow
Set(varResponse, InitiateLongRunningJob.Run());
Set(varJobID, varResponse.jobid);
// Start polling
If(
!IsBlank(varJobID),
Set(varIsPolling, true);
Notify("Job started. Tracking progress...", NotificationType.Success)
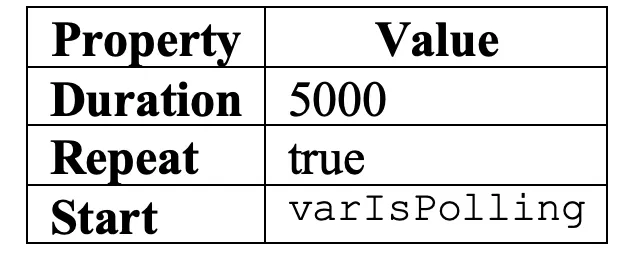
)Timer — Poll Job Status
Set(varStatusResponse, CheckJobStatus.Run(varJobID));
Set(varJobStatus, varStatusResponse.status);

If(
    varJobStatus = "Completed" || varJobStatus = "Failed",
    Set(varIsPolling, false);
    Set(varJobResult, varStatusResponse.result);
    If(
        varJobStatus = "Completed",
        Notify("Job completed successfully!", NotificationType.Success),
        Notify("Job failed: " & varStatusResponse.errormessage, NotificationType.Error)
    )
)
Label — Status Display
If(
    IsBlank(varJobID),
    "Click 'Start Processing' to begin",
    "Job ID: " & varJobID & Char(10) &
    "Status: " & varJobStatus & Char(10) &
    Switch(
        varJobStatus,
        "Completed", "Result: " & varJobResult,
        "Failed", "Error: " & varStatusResponse.errormessage,
        "Processing... Please wait."
    )
)
Loading Spinner

Result Label

Following Best Practices and Making Things Better
After your asynchronous job pattern works with Dataverse and Power Automate, the next step is to follow these best practices to get it ready for the real world.
Improving the Polling Interval
Don’t request votes constantly. Five seconds is a good starting point, but you should adjust the interval between jobs based on how long you expect them to take.
- If you’re working on short tasks (less than 30 seconds), take breaks every 3 to 5 seconds.
- If you’re doing medium-length tasks (1 to 5 minutes), breaks should last 5 to 10 seconds.
- If a job takes more than five minutes, breaks should be 15 to 30 seconds long.
You can also use an exponential backoff method to create dynamic polling. This means the interval between polls increases over time, preventing the server from becoming overloaded while still allowing short jobs to respond promptly.
Users Have Better Experiences
Improve how people interact with and perceive the job tracking system to make it more useful and easier to use.
Signs of Progress: Modify your worker flow to save the Dataverse table’s progress as a percentage (e.g., 10%, 40%, or 70%). Display this in Power Apps so users can see the current status.
Option to Cancel: Add a “Cancel” button that sets the work’s status to “Cancelled.” The worker flow should periodically check this status and stop processing if a cancellation is detected.
History of Jobs: Store completed tasks in the Dataverse database so users can view and reuse them. This allows users to see the results of previous tasks without having to repeat them.
How to Handle Mistakes: Be prepared for any errors that may occur, such as:
- Network problems during polling.
- Flow timeouts (after 30 days, flows may terminate automatically).
- Invalid or missing job IDs.
- Permission issues when accessing Dataverse or SharePoint.
Power Fx Logic to Check Statuses Again:
If(
    IsError(CheckJobStatus.Run(varJobID)),
    Notify("Failed to check status. Retrying...", NotificationType.Warning);
    Set(varRetryCount, varRetryCount + 1);
    If(
        varRetryCount > 3,
        Set(varIsPolling, false);
        Notify("Maximum retries exceeded", NotificationType.Error)
    )
)
This block retries up to three times before stopping and notifying the user of a failure.
Optimizing Your System:
Consider these factors when optimizing your system to ensure continuous efficiency and smooth operation.
- To keep old jobs manageable, set up a scheduled flow that deletes records older than 30 days.
- Index the JobID column in Dataverse to speed up searches and queries.
- Use delegation-friendly formulas in Power Apps to ensure filters and lookups run on the server rather than on the user’s device. This will help the app scale effectively.
Security
- When creating, always consider how to keep data safe and restrict access.
- Ensure users can only see their own jobs by checking permissions. Add a CreatedBy column to Dataverse and use User() or email from Power Apps to filter results.
- Avoid saving critical information in plain text by cleaning up your data. If necessary, encrypt the data or save links to the content instead of the actual content.
- Before allowing a user to start a new job, verify they don’t already have one pending or in progress. This helps enforce rate limiting.
Making Reports in the Real World
One way to demonstrate how these best practices work is to create a monthly sales report that combines data, performs complex calculations, and exports the results to Excel.
Your report should:
- Retrieve information from multiple tables in Dataverse.
- Transform data and perform calculations.
- Export the results to an Excel document.
- Take between three and five minutes to complete.
- Logic for the Flow of Workers.
- Set the job status to “Processing—Gathering data (10%).”
- Retrieve sales information from Dataverse.
- Change the status to “Processing—Analyzing trends (40%).”
- Perform calculations and analysis.
- Update the status to “Processing—Generating Excel (70%).”
- Connect to Excel Online to create the Excel file.
- Add the file to a SharePoint document library.
- Set the operation’s status to “Completed” and place the file URL in the Result box.
Power Apps Enhancements
Add a Download button that becomes visible when the job completes successfully.
Visible property:
varJobStatus = "Completed"OnSelect property:
If(
    !IsBlank(varJobResult),
    Launch(varJobResult)
)
This allows the user to open or download the generated report directly from SharePoint once processing is finished.
Testing Your Implementation
Test scenarios to include:
Happy Path: The job completed successfully.
Flow Timeout: The worker flow is taking longer than expected.
Network Interruption: The user loses internet access while voting.
App Closure: The user closes the app while the job is still running (the job should continue to completion).
Concurrent Jobs: Multiple users performing jobs simultaneously.
Final Thoughts
The polling pattern is an effective way to manage long-running tasks in Power Apps. While it requires a bit more effort to set up compared to a simple synchronous call, the benefits are significant:
- No errors due to timeouts.
- Progress feedback improves the user experience.
- Can be used for processes of any length.
- Capable of handling network issues.
- Allows users to perform other tasks while waiting.
This pattern is not limited to Power Apps; it is a fundamental approach to handling asynchronous processes in modern software development. Understanding and applying it will make you a better Power Platform developer.
Next Steps
Now that you understand how the polling pattern works, consider the following:
- Use it in your current apps that experience timeout issues.
- Add webhooks to receive real-time notifications.
- Integrate everything with Power BI for job analytics.
- Create a library of reusable components for your business.
Happy developing, and may your apps never stop working again!
